
AG Grid allows extensive customisation by creating custom components. In this post we will create custom components for a React Data Grid to render cells, filter column values, and edit cell values.
An earlier version of this post covers the same content with examples using classes. In this post all code examples will be written using functions and React hooks.
- Custom Components
- Code and Getting Started
- Start Point
- Cell Renderer
- Creating a Cell Editor
- Custom Filter
- Next Steps
Custom Components
We will build:
- A Cell Render which displays a number as a currency complete with currency symbol e.g.
35000would become€35,000.00. - A custom editor which restricts input keys to numbers only.
- A filter which uses a syntax to select a range of values ie.
30000 - 36000.
Code and Getting Started
The code for this example is in the React-Data-Grid repo on Github in the customization-demo-hooks folder.
If you want to get started with AG Grid using React then a good place to start is the Getting Started in 5 Minutes with React Data Grid and Hooks blog post, followed by our documentation Getting Started Guide.
Start Point
The initial starting point was as follows in CustomizedGrid.js:
export function CustomGrid() {

    const [rowData, setRowData] = useState([]);

    const [colDefs, setColDefs] = useState(
        [
            {field:"make"},
            {field:"model"},
            {field:"price", editable:true}
        ]);

    useEffect(() => {
        fetch('https://www.ag-grid.com/example-assets/row-data.json')
            .then(result => result.json())
            .then(rowData => setRowData(rowData))
    }, []);

    return (
        <div className="ag-theme-alpine"
            style={{height: '400px', width: '600px'}}
        >
            <AgGridReact
                defaultColDef={{sortable: true, filter: true }}
                pagination={true}
                rowData={rowData}
                columnDefs={colDefs}>
            </AgGridReact>
        </div>
    );
}
This renders a grid and loads the data in from a server.
The CustomGrid component is used in the App.js directly:
import logo from './logo.svg';
import './App.css';
import {CustomGrid} from './CustomizedGrid.js'

function App() {
  return (
    <CustomGrid />
  );
}

export default App;
Cell Renderer
The simplest component to add is a cell renderer from NumberFormatter.js:
import React, { Component } from 'react';

export function NumberFormatter(props){

        const value = Number(props.value);
        const text = value.toLocaleString(undefined, {style: 'currency', currency: 'EUR'});

        return (
            <span>{text}</span>
        );
}
This is a function that has props, and these are detailed in the official documentation on the Component Cell Renderer page.
The 'value' is the current value to be rendered in the cell.
All we do in this component is convert the value from props into a number and then a currency, which we return in a span.
This will render the value in the React Data Grid as follows:
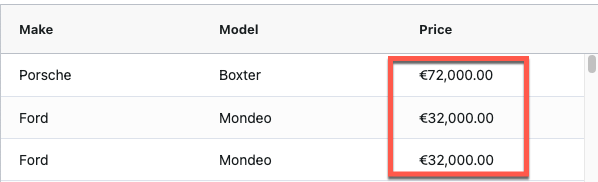
Using the Cell Renderer
To use the Cell Renderer in the Grid component we:
- import it,
- add it to the column definition,
- define it in the grid's
frameworkComponents.
Import it as normal:
import { NumberFormatter } from './NumberFormatter.js';
Add it to the column definition object, in this case I'm adding it to the price column.
            {field:"price", editable:true,
            cellRenderer: "numberFormatter",
            }
Then we add a new attribute into the grid definition JSX:
            frameworkComponents={{
                numberFormatter: NumberFormatter,
            }}
The grid should then render the price in euros with a currency symbol.
Creating a Cell Editor
The next component to look at is the Custom Cell Editor.
Cell editors are documented in the official documentation React Data Grid Cell Editors.
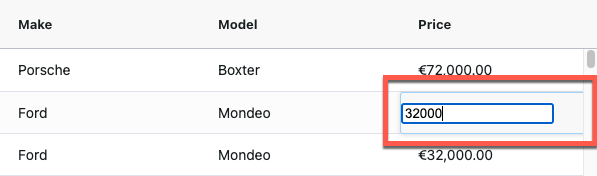
This cell editor is a simple input field which restricts keypresses to numbers only. The value will be stored in state and stored in the grid as the edited value changes.
The basic structure of the cell editor is as follows:
import React, {forwardRef, useState, useRef, useEffect, useCallback, useImperativeHandle} from 'react';

export const NumericCellEditor = forwardRef((props, ref) => {

    const [value, setValue] = useState(parseInt(props.value));
    const refInput =  useRef(null);

    return (
        <input
            onKeyPress={onKeyPressListener}
            value={value}
            onChange={onChangeListener}
            ref={refInput}
        />
    );
});
The code above receives the ICellEditorParams as props defined in the documentation, and a ref to the element.
Initially set the value state from the props.
To the above code I have to add the onPressKeyListener the onChangeListener and a hook for useImperativeHandle for the grid to use and handle the focus.
We need to set the focus on the input, in a class this would be done afterGuiAttached but we will use the useEffect hook:
    // afterGuiAttached
    useEffect( ()=> refInput.current.focus(), []);
The onChangeListener will amend the value as state using a callback to optimise for rendering.
const onChangeListener = useCallback( event => setValue(event.target.value), []);
The onKeyPressListener, again uses the useCallback hook. It only allows numbers to be entered, so if a non numeric key is pressed it uses event.preventDefault() to ignore the keypress.
    const onKeyPressListener = useCallback( event => {
        if (!isNumeric(event.nativeEvent)) {
            event.preventDefault();
        }

        function isNumeric(event) {
            return /\d/.test(event.key);
        }
    }, []);
The final chunk of code is to allow the grid to receive the value, which requires use of the useImperativeHandle hook.
    useImperativeHandle(ref, () => {
        return {
            // the final value to send to the grid, on completion of editing
            getValue() {
                return value;
            }
        };
    });
Giving us a final set of code of:
import React, {forwardRef, useState, useRef, useEffect, useCallback, useImperativeHandle} from 'react';

export const NumericCellEditor = forwardRef((props, ref) => {

    const [value, setValue] = useState(parseInt(props.value));
    const refInput =  useRef(null);

    useImperativeHandle(ref, () => {
        return {
            getValue() {
                return value;
            }
        };
    });

    const onKeyPressListener = useCallback( event => {
        if (!isNumeric(event.nativeEvent)) {
            event.preventDefault();
        }

        function isNumeric(event) {
            return /\d/.test(event.key);
        }
    }, []);

    const onChangeListener = useCallback( event => setValue(event.target.value), []);

    useEffect( ()=> refInput.current.focus(), []);

    return (
        <input
            onKeyPress={onKeyPressListener}
            value={value}
            onChange={onChangeListener}
            ref={refInput}
        />
    );
});
This will render as a text input field:
Using The Editor in the Grid
To use the editor we: import, add to column def, and define in the framework components.
import {NumericCellEditor} from './NumericCellEditor.js';
Add to the column definition:
    {field:"price",editable:true,
    cellRenderer: "numberFormatter",
    cellEditor: "numericCellEditor",
    }
Expand the framework components definition:
    frameworkComponents={{
        numberFormatter: NumberFormatter,
        numericCellEditor: NumericCellEditor,
    }}
Now when the editor is used the custom input element is used.
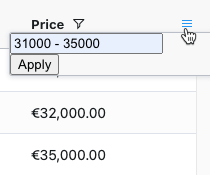
Custom Filter
The custom filter will be an input that uses the format low - high e.g. 30000 - 35000 to show only values between 30000 euros and 35000 euros.
The custom filter will be created in RangeFilter.js.
Custom filters are documented in the official documentation for React Data Grid Filter Component
The basic structure of a filter component is as follows:
import React, { useState, forwardRef, useRef, useImperativeHandle, setState, useCallback, useEffect } from 'react';

export const RangeFilter = forwardRef((props, ref) => {

    const [filter, setFilter] = useState('');
    const input =  useRef(null);

    return (
        <form onSubmit={onSubmit}>
            <input name="filter" ref={input} defaultValue={filter}/>
            <button>Apply</button>
        </form>
    );

});
We will need to add a hook for useImperativeHandle to integrate with the grid, call the filter changed call back and handle the form we are using for input.
First set the focus to the input:
useEffect( ()=> input.current.focus(), []);
And when the filter changes we want to call the grid callback defined in props:
    useEffect(() => {
        props.filterChangedCallback()
    }, [filter]);
Because we are using a form as the DOM component for input we need to handle the onSubmit event, but preventing the default form processing and using the state to set the filter value:
    const onSubmit = useCallback( event => {
        event.preventDefault();

        let currFilter = event.target.elements.filter.value;

        if (filter !== currFilter) {
            setFilter( currFilter);
        }
    });
Then we handle the grid's lifecycle call backs. The filter itself is implemented as doesFilterPass:
    useImperativeHandle(ref, () => {
        return {
            isFilterActive() {
                return filter !== '';
            },

            doesFilterPass(params) {
                const myfilter = filter.split('-');

                const gt = Number(myfilter[0]);
                const lt = Number(myfilter[1]);
                const value = params.node.data.price;

                return value >= gt && value <= lt;
            },

            getModel() {
                return {filter: filter};
            },

            setModel(model) {
                const filter = model ? model.filter : '';
                setState( filter);
            }

        };
    });
Using the Filter Component
Using the same pattern as before: import, add to column def, and define in the framework components.
import { RangeFilter } from './RangeFilter';
Add to the column definition:
    {field:"price",editable:true,
    cellRenderer: "numberFormatter",
    cellEditor: "numericCellEditor",
    filter: 'rangeFilter'
    }
Expand the framework components definition:
    frameworkComponents={{
        numberFormatter: NumberFormatter,
        numericCellEditor: NumericCellEditor,
        rangeFilter: RangeFilter
    }}
Now when the editor is triggered the custom input element is used.
Next Steps
The full code for this example is in the react-data-grid examples repo.
We also have some examples in the React Data Grid Example repo.
Or follow the Getting Started guide in the documentation.