
Wouldn’t it be great if we could combine Angular forms and ag-Grid? This article documents how.
- Introduction
- The Use Case - Treat Cells as Form Fields
- Angular Form Example # 1 — The Grid Is The Form
- Angular Form Example #2 — The Grid Is Part Of The Form
- Angular Form Example # 3— The Grid Is Part Of The Form: As A FormArray
- Caveats
- Conclusion
Introduction
Angular Forms are a great way to encompass a logic unit of data — something you can submit to the backend for further processing, saving etc.
Wouldn’t it be great if we could combine angular forms and ag-Grid? And better yet, wouldn’t it be great if we could treat grid cells as part of the wider form?
It would! This article documents how you can integrate these two great technologies.
The Use Case - Treat Cells as Form Fields
ag-Grid is a feature rich grid with a huge amount of functionality — documenting what can be done with it would be a series of articles in it’s own right.
Suffice to say if you require data to be displayed in a tabular format ag-Grid should be your first choice.
There are cases where you want to have an array of data that you want to be editable by the user, that you then want to submit as part of a wider form as part of a logical whole.
If we can treat the grid cells as regular form fields, then the two would naturally fit together.
Let’s assume for example you were managing a group of car dealerships and needed to update the stock in each regularly.
Let’s also assume that on occasion you need to update the dealership details (Lead Salesperson, Address etc).
In both cases a form would be a convenient mechanism to capture the current state — we’ll start with the simplest use case (the grid is the form), before building on this to have a slightly more sophisticated application, with the grid being part of a wider form.
We’ll be using Angular’s Reactive Forms for this as this supports dynamic form components, which we’ll be making use of here.
We’ll also be using the Angular CLI to generate and build our application and use Angular Material Design & Flex Layout for styling and layout, but won’t be discussing this side of things. These are secondary to the main thrust of this article, which is to understand how you can use Angular Forms with ag-Grid.
Angular Form Example # 1 — The Grid Is The Form
The code for this part can be found at https://github.com/seanlandsman/ag-grid-ng-forms, under branch part-1 (git checkout part-1).
As a first pass, let’s assume all the data we wish to capture is within the grid:
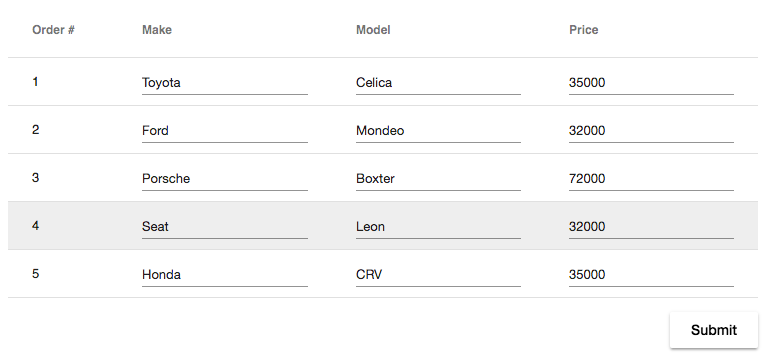
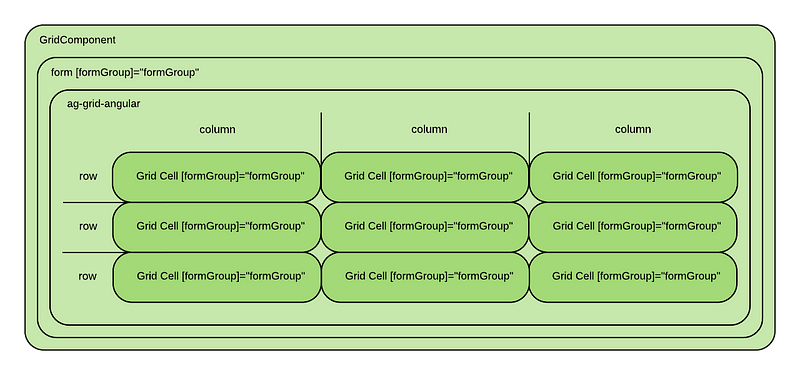
Here all the data we wish to capture is within the grid — as such our form will encompass the grid and be the only FormGroup used within the application.
Within the GridComponent we’ll have a form that contains the main FormGroup which each cell in the grid will reference:
The sequence of events will be as follows:
We need a way to link child form cells within the grid to the parent FormGroup. Ordinarily this would be done by specifying the formGroup and the formControlName on the child input as normal, but as the grid will create the child cells dynamically, we need a mechanism to do so asynchronously.
We specify the parent Form and Grid as normal, up front:
<form (ngSubmit)="onSubmit()" [formGroup]="formGroup" style="...">
    <ag-grid-angular class="ag-theme-material" style="...">
We also specify the child cell inputs as normal, but add a conditional check to only render them when the parent FormGroup has been provided
<div *ngIf="formGroup" [formGroup]="formGroup">
    <mat-form-field [floatLabel]="'never'" style="width: 100%">
        <input matInput [formControlName]="key" [id]="key" placeholder="Enter {{columnName}}">
    </mat-form-field>
</div>
The key parts of this are
<div *ngIf="formGroup"
Without this check Angular would throw an error as the FormGroup would not be available yet. We’ll provide this in the final step.
Both the parent grid and the child cells/FormControl make use of the ag-Grid context to provide both the formGroup and the createKey method (discussed below):
<ag-grid-angular ...other grid properties
                 [context]="getContext()">
getContext() {
return {
form: this.formGroup,
createKey: this.createKey
}
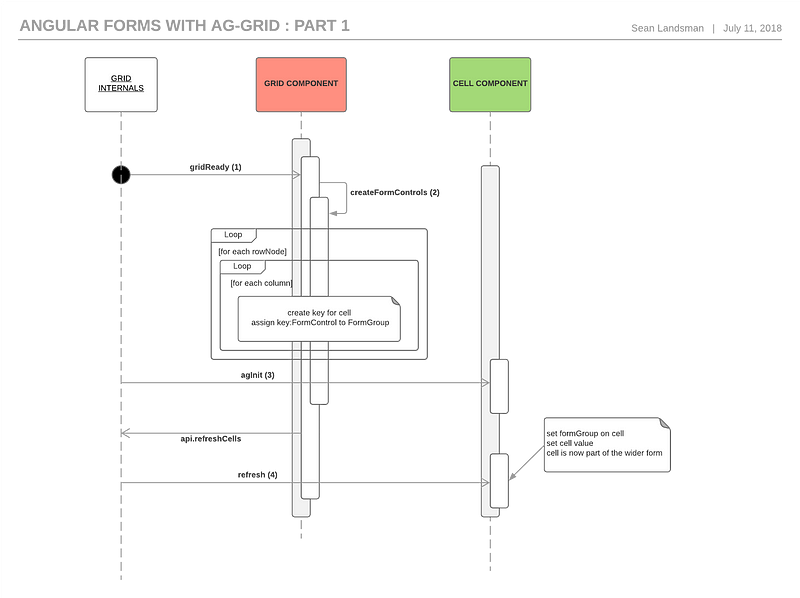
}As the grid cells will be created before the grid as a whole is ready and as we need to specify the formGroup on the parent form up front, we’ll break the process up into 4 distinct steps:
1: gridReady is fired
Ordinarily this would mean that the grid and all the cells are ready to go, but as we need to declare the form upfront and then add form data to it asynchronously we’ll use this as a trigger to close the circle and add the cells to the form.
Once the grid is ready we create and bind the FormControls to the parent FormGroup (createFormControls) and then force refresh the cells to update the cells themselves.
gridReady(params: GridReadyEvent) {
    this.createFormControls();
    this.api.refreshCells({force: true});
}
2: Create FormControls and add them to the parent FormGroup
We create the form controls by iterating over all rows and columns, and for each cell create a FormControl which we’ll add to the parent FormGroup.
createFormControls() {
    let columns = this.columnApi.getAllColumns();

    this.api.forEachNode((rowNode: RowNode) => {
        columns.filter(column => column.getColDef().field !== 'orderNumber')
            .forEach((column: Column) => {
                const key = this.createKey(rowNode.id, column);
                this.formGroup.addControl(key, new FormControl())
            })
    });
}
Note that we generate a unique key based on the row and column data. We’ll use this same key generator on the cell level to link the FormControl defined here to the actual FormControl in the cell (next step) — this is important to allow us to determine where the cell belongs in the wider form:
const key = this.createKey(rowNode.id, column);    // the cells will use this same createKey method
this.formGroup.addControl(key, new FormControl())
The logic used to create the unique key is simple in our case, but can be tied to something that makes more sense in your business use case.
This creation and linking is only necessary once, after grid initialisation.
3: agInit is called on each of the newly created cells
We store the cell value and the shared createKey function that we’ll use to assign a key to the cell. Doing this ensures that both the parent Grid and child Cell have the same key value, and will allow Angular to add the cell to the parent Grid Form automatically.
agInit(params: any) {
    this.columnName = params.column.colDef.headerName;
    this.key = params.context.createKey(params.node.id, params.column);
    this.value = params.value;
}
4: When the cell is refreshed (this will be after the cell is created — we force refresh the cells once above in gridReady as part of the form initialisation), set the parent FormGroup, as well as the actual cell value
refresh(params: any): boolean {
    this.formGroup = params.context.formGroup;

    this.formGroup.controls[this.key].patchValue(this.value);
Note that the setting of the value could have been done in step 2 too, but doing so in the cell feels more natural.
Once the FormGroup has been set the cell will be rendered and the circle will be complete. Angular will be aware of the Form and all child FormControls.
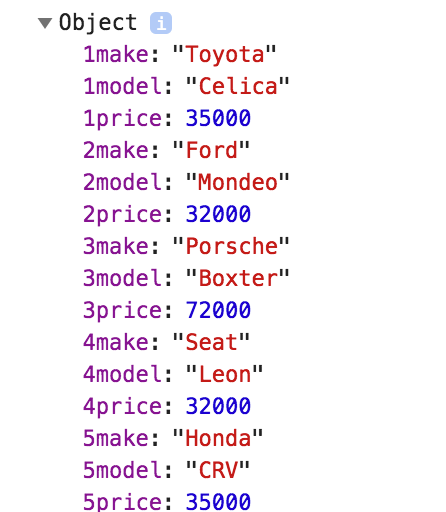
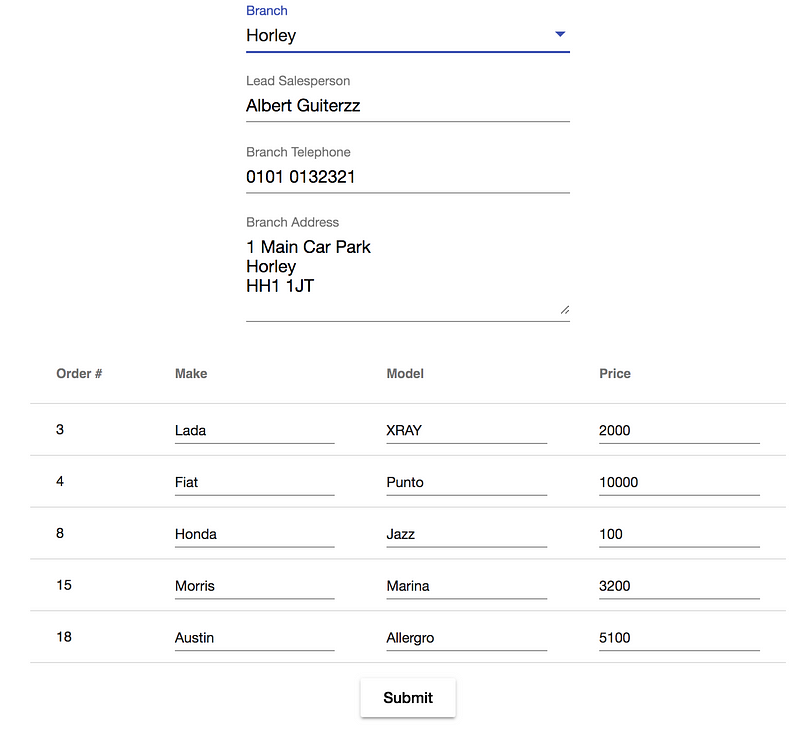
Now that this has been done we have a fully functional form — we can test this by adding a submit button to print the form value:
<form style="width: 750px; height: 300px;"
      (ngSubmit)="onSubmit()" [formGroup]="formGroup">
onSubmit() {
console.dir(this.formGroup.value);
}Which will result in an output like this:
Angular Form Example #2 — The Grid Is Part Of The Form
The code for this part can be found at https://github.com/seanlandsman/ag-grid-ng-forms, under branch part-2 (git checkout part-2).
This use case is probably more typical — the grid (and the cell inputs within) will form part of a larger form.
In this scenario most of what we did in Part 1 applies, but I’ve expanded the example to illustrate a case where the row data changes when higher level data changes, to demonstrate one small but important difference.
In this case the grid information is simply part of a larger form. As such we’ll create a grid form with the constituent FormControls, with the grid FormControls living in the stock FormGroup:
gridForm: FormGroup = new FormGroup({
    salesperson: new FormControl(),
    telephone: new FormControl(),
    address: new FormControl(),
    stock: new FormGroup({})
});
The Grid FormControls are now part of a larger FormGroup
As in Part 1, we need to create the grid FormControls dynamically, but we’ll additionally clear out old form group controls if switching between car dealership branches:
    private createFormControls() {
        let columns = this.columnApi.getAllColumns();

        const stockGroup = (<FormGroup>this.gridForm.controls['stock']);

        // clear out old form group controls if switching between branches
        let controlNames = Object.keys(stockGroup.controls);
        controlNames.forEach((controlName) => {
            stockGroup.removeControl(controlName)
        });

        this.api.forEachNode((rowNode: RowNode) => {
            columns.filter((column:Column)=> column.getColDef().field !== 'orderNumber')
                .forEach((column: Column) => {
                const key = this.createKey(rowNode.id, column); // the cells will use this same createKey method
                stockGroup.addControl(key, new FormControl())
            })
        });
    }
This clearing out step is important to ensure we’re capturing the form as it currently is and not retaining any data from a previous form/view.
We also listen to row data change events to refresh the form controls as this new scenario allows for switching between data sets:
<ag-grid-angular class="ag-theme-material"
                 style="..."
                 (rowDataChanged)="refreshFormControls()"
                 ....other properties & events
private refreshFormControls() {
if(this.api) {
this.createFormControls();
this.api.refreshCells({force: true});
}
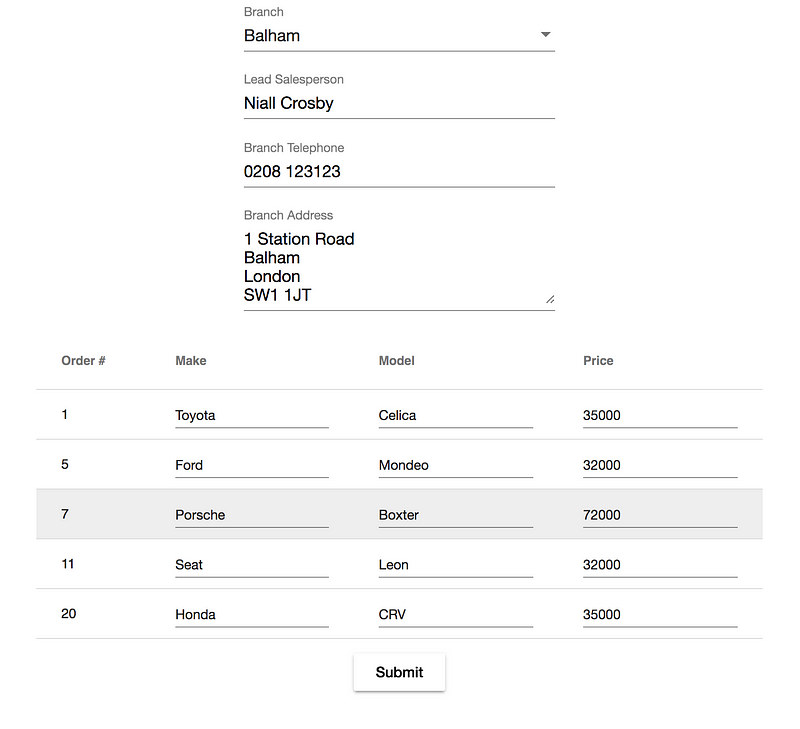
}With this in place we can try submit once again — we’ll see an output as follows:
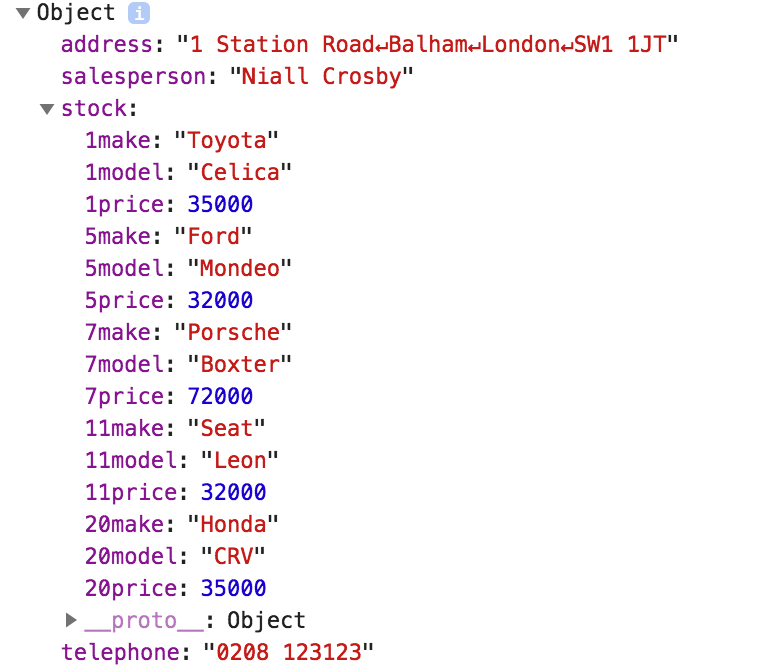
Note that we now have new top level data (address, salesperson etc), but the grid data is now contained within the stock property.
Angular Form Example # 3— The Grid Is Part Of The Form: As A FormArray
The code for this part can be found at https://github.com/seanlandsman/ag-grid-ng-forms, under branch part-3l (git checkout part-3).
This final example is probably the most natural to use and would be my preference if using the Grid as part (or as) an Angular Form.
As with Use Case 2, our grid is part of a wider form, but this time the Grid data will be available as a FormArray.
Doing this is feels more natural as we’ll be able to mentally map the resulting array data to what we’re seeing on the screen.
We need to make changes in two places for this to work:
1: createKey
private createKey(columnApi: ColumnApi, column: Column): any {
    return columnApi.getAllColumns().indexOf(column) - 1;
}
This time we’ll use the column index as the key — this makes sense if all the values for a column will be in the same index location in the resulting FormArray.
2: createFormControls
private createFormControls() {
    let columns = this.columnApi.getAllColumns();

    const stockGroup = (<FormGroup>this.gridForm.controls['stock']);

    // clear out old form group controls if switching between branches
    let controlNames = Object.keys(stockGroup.controls);
    controlNames.forEach((controlName) => {
        stockGroup.removeControl(controlName)
    });

    this.api.forEachNode((rowNode: RowNode) => {
        const formArray: FormArray = new FormArray([]);
        columns.filter((column: Column) => column.getColDef().field !== 'orderNumber')
            .forEach((column: Column) => {
                const key = this.createKey(this.columnApi, column); // the cells will use this same createKey method
                formArray.setControl(<any>key, new FormControl());
            });
        stockGroup.addControl(<any>rowNode.id, formArray);
    });
}
This is similar to previous iterations with two key differences:
For each row, we create a FormArray first:
const formArray: FormArray = new FormArray([]);
We then add the row values one by one to the FormArray:
const key = this.createKey(this.columnApi, column);
formArray.setControl(<any>key, new FormControl());
Finally, we add the FormArray to the parent stock FormGroup:
stockGroup.addControl(<any>rowNode.id, formArray);
With that in place the resulting form value will look as follows:
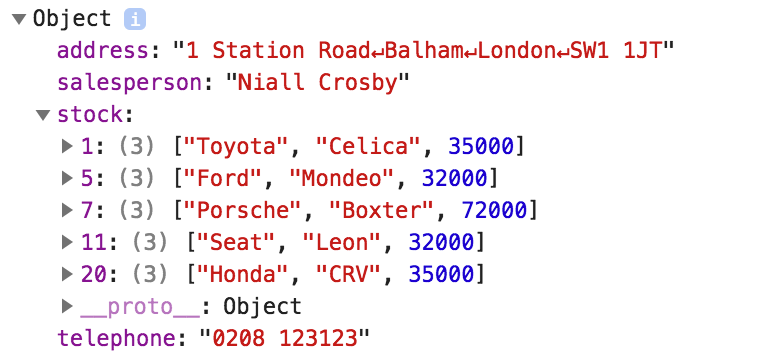
Note that there is a downside to this implementation — it only makes sense for grids where column positions cannot be re-arranged. If column positions change then the values will be in different index locations to the columns index location.
Caveats
All of the above implementations assume that all the grid data is present on the screen. If you have a large set of data and have row (or column) virtualisation enabled (which would be the default) then rows/columns will be removed/added to the DOM as the user scrolls.
To use the above techniques on a large form you have the following options:
- Disable column/row virtualisation
- Manually handle rows/columns being added/removed to the parent Form
Conclusion
So there you have it — 3 options for using ag-Grid as part of a wider Angular Form.
There is a small bit of code and one-off initialisation required, but it isn’t too much and is only required once.
The benefits are that you’ll be able to treat the grid (and the data therein) as a natural part of the Angular Form, which is a big win.
Comments and questions welcome below — I hope that you found this useful!
Learn about AG Grid Angular Support here, we have an Angular Quick Start Guide and all our examples have Angular versions.