
Introduction
If you’ve already read a few articles on JSON web tokens (JWT) before arriving here you may get an impression that JWT is part of modern authorization and authentication frameworks such as OAuth and OpenID. Although it is indeed used in these frameworks, it doesn't make up part of them. Moreover, its applications go way beyond authorization workflows.
In this article I’m going to give you a short yet comprehensive overview of the JWT and its features. We’ll take a look at its structure and build the JWT from scratch. Then we’ll explore its most common usages and talk about stateful (server-side) and stateless (client-side) sessions. And we’ll finish with the cryptographic security features which make the JWT a regular citizen in authorization workflows.
So let’s start, shall we? I suggest we begin with the definition.
What is JWT?
If you google “what is JWT” you’re most likely to get the following definitions:
…is a means of representing claims to be transferred between two parties
…is a JSON object that is defined in RFC 7519 as a safe way to represent a set of information between two parties
…is an open standard (RFC 7519) that defines a compact and self-contained way for securely transmitting information between parties as a JSON object
These are all correct definitions but to me they sound a little bit too scientific and abstract. After reading a dozen articles and an in-depth book on JWT I’ve come up with my own version:
A JSON web token, or JWT (“jot”) for short, is a standardized, optionally validated and/or encrypted container format that is used to securely transfer information between two parties.
I hope you find this definition easier to grasp than the definitions I mentioned above. Let me know what you think in the comments.
Now I want to break down the definition and analyze it word by word.
Container format
Arguable, the most important part of the definition is the container format. JWT defines the structure of the information we’re sending across the network and it comes in two forms — serialized and deserialized. The serialized form is used to transfer data through the network with each request and response. On the other hand, the deserialized form is used to read and write data to the token. Let’s take a close look at these forms.
Deserialized
JWT in the deserialized form consists of a header and a payload. They are both plain JSON objects as you can guess from the name — JSON web token.
A header (also known as the JOSE header), it mostly used to describe the cryptographic operations applied to the JWT — signing and/or encryption. Optionally, it can also specify additional properties like media and content type of the JWT, although they are rarely used. If you want to learn more about these properties check out the specification.
The cryptographic operations in the header define whether the JWT is signed and/or encrypted, and if so what cryptographic algorithms are used. This information is provided by the alg claim with an algorithm name as a value, as in example below:
{
"alg": "HS256"
}
The word claim that I used above comes from the JWT spec and simply means a piece of information asserted about a subject. A claim appears as a name/value pair where the name is always a string and the value can be any JSON value. In the context of a JSON object a claim is simply an object’s key. For example, the following JSON object consists of three claims — iss, exp and http://example.com/is_root:
{
    "iss": "joe",
    "exp": 1300819380,
    "http://example.com/is_root": true
}
JWTs contain claims that are either registered or user defined. Registered claims are usually part of some standard or a proposal, like JSON Web Token Claims Registry and have specific meanings attached to them. The most common registered claims are: iss that identifies the party that issued the JWT, sub that identifies the party that this JWT carries information about and aud that identifies the intended recipients of this JWT. Often also the other two claims are present: exp that defines the expiration date and iat that defines the time at which the JWT was issued. For a complete list of claims check out the registry.
Unsecured tokens
We learnt above that the header describes the cryptographic operations applied to the JWT. However, some JWTs may also be created without a signature or encryption. This usually happens when a JWT is a part of some already encrypted data structure. Such a token is referred to as unsecured and its header should have the alg claim set to none:
{
"alg": "none"
}
Payload
The payload is the part of the token where all interesting user data is usually added. Just like the header, the payload is a JSON object. Unlike the header, however, no claims are mandatory. It usually contains application specific claims and the registered claims iss, sub and aud which we reviewed above. For example, this is how the JWT looks like when used as part of OpenID authentication framework:
{
  "iss": "https://auth-provider.domain.com/",
  "sub": "auth|some-hash-here",
  "aud": "unique-client-id-hash",
  "iat": 1529496683,
  "exp": 1529532683
}
If interested, you can check out the definition for all OpenID specific claims in the spec.
Let’s take a look now at the serialized form.
Serialized
JWT in the serialized form represents a string of the following format:
[ Header ].[ Payload ].[ Signature ]
A header and a payload are always present, however the signature may not be present if a JWT is unsecured. To give you an idea how it looks, here is a compact serialized form:
eyJhbGciOiJub25lIn0.
eyJzdWIiOiJ1c2VyMTIzIiwicHJvZHVjdElkcyI6WzEsMl19.
of the following header and a payload:
// header
{"alg":"none"}
// payload
{"sub":"user123", "productIds":[1,2]}
As you can see the header defines an unsecured token though the alg claim. It’s exactly the reason why we don’t have a signature in the string. Note, however, that the trailing dot (.) in the serialized form is still added.
Serialization
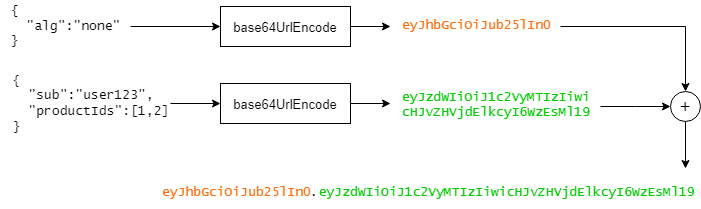
The process of JWT serialization consists of encoding a header, payload and signature if present with base64url algorithm. The algorithm is a simple variation of base64 that uses URL safe _ character instead of URL unsafe characters + and / used by base64. The need for the JWT base64url encoding is due to the fact that some media designed to deal with textual data recognizes and processes control characters like line feed and tabs. To avoid that these control characters should obscured so that text information (JSON) can be safely transmitted through this media. To learn more about base64 check out this explanation.
The following illustration shows the process of serialization for an unsecured token:
It can be implemented in the code like this:
function encode(h, p) {
const header = base64UrlEncode(JSON.stringify(h));
const payload = base64UrlEncode(JSON.stringify(p));
return `${header}.${payload}`;
}
To decode JWT, it’s enough to simply split the string by the dot and decode a header and payload from base64Url into a string. Here is a simple code that can do that:
function decode(jwt) {
const [headerB64, payloadB64] = jwt.split('.');
const headerStr = base64UrlDecode(headerB64);
const payloadStr = base64UrlDecode(payloadB64);
return {
header: JSON.parse(headerStr),
payload: JSON.parse(payloadStr)
};
}
Using libraries to encode/decode JWT
Certainly you don’t encode/decode JWTs manually. There’s a bunch of libraries that can help you do that. For example, a token can be encoded/decoded using the jsonwebtoken library like this:
const jwt = require('jsonwebtoken');
const secret = 'shhhhh';
// encode
const token = jwt.sign({ foo: 'bar' }, secret);
// verify and decode
const decoded = jwt.verify(token, secret);
console.log(decoded.foo) // bar
The code above creates a signed JWT using a secret word. It then verifies the authenticity of the token and decodes it using the same secret word. We’ll talk about the signature and other security mechanism further in the article.
Applications
We are finally ready to explore the applications for JWT. Basically, any workflow that involves an exchange of data through network can employ JWT. The exchange can be as simple as one client-one server communication and as complex as multiple clients and servers talking to each other. Authorization frameworks like AuthO and OpenID make a good example of the sophisticated workflows that involve multiple consumers of the data. Most of these workflows use so called client-side (stateless) sessions —information stored on the client side and transferred with each request. And that is where JWT comes in handy as it provides a compact and secured container for such information. To understand JWT we need to understand the general concept of client-side sessions. Let’s get to it now. We’ll start with traditional server-side sessions and show why the transition to client-side session occurred.
Server-side/Stateful Sessions
As you know, HTTP is a stateless protocol, which means that it doesn’t provide a mechanism to associate multiple requests with the same client. However, that is what most web applications need to do in order to offer a personalized experience to users. If an application requires a login, you usually need to track some information about a logged-in user. For example, his or her credentials or a list of items in this user’s cart. For years, the default mechanism to achieve that has been implemented as server-side sessions.
Under this workflow, a user’s data is stored on a server using various store implementations like file system, database or memcache. For example, here is a list of session stores for the popular node’s express-session package. To associate a session data with a client’s request, a server stores the session ID in a cookie or by means of other HTTP features. This ID is sent to a server with every request and is used to look up a session for that client. It’s important to emphasize that session data is not saved in the cookie, just the session ID. Since a session data represents some state, server-side session implementations are sometimes referred to as stateful servers or sessions.
But server-side or stateful sessions are not without their problems. Their implementation is rather complex and having a state makes it harder to replicate and fix bugs. But the biggest disadvantage of the server-side sessions is that they are notoriously difficult to scale. You either need to replicate a session data across all web servers, use a central store that each web server connects to or ensure that a given user always hits the same web server. All of these have downsides of a significant performance cost and increased complexity.
All that prompted software engineers to look for alternatives. One of the obvious ones is to keep the user’s data on the client instead of the server. That approach is widely used nowadays and is known as client-side or stateless sessions.
Client-side/Stateless Sessions
Unlike server-side sessions, a client-side session data is stored on the web client and sent to a server with each request. One way to do that is to store the entire session data in cookies, not just a session ID as in the case of server-side sessions. Cookies are a convenient mechanism since they are handled automatically by web browsers, but not the only one. A session data can also be passed through HTTP headers (Authorization) to avoid CORS issues or URL parameters to make a client state bookmarkable.
With client side sessions you no longer have the scalability problems. However, since the session data is stored on the client side security vulnerabilities emerge. How can you guarantee that a client doesn’t tamper with the session data? For example, if the user ID is stored in a cookie, it is easy for that user to modify the cookie and change that ID. This will make it possible to get access to someone else’s account. To prevent that possibility we need to wrap that data in a tamper-proof package.
That’s exactly the job for JWT. Since JWTs can be signed, a server can verify the authenticity of the session data and trust that it hasn’t been tamped with. If needed, JWTs can also be encrypted to obscure the session data which prevents users from reading or modifying it.
Just as server-side sessions have their pros and cons, client-side sessions are not an exception. For example, your application may require large amount of data that needs to be sent back and forth for every request. This can easily overcome the benefits of the reduced complexity and scalability issues in the backend. So in the real world you may find applications that mix both client-side and server-side sessions.
Securing JWT
As mentioned in the previous section, JWT uses two mechanisms to secure the information — signing and encryption. The two standards that describe these security features of JWT are JSON Web Signature (JWS) and JSON Web Encryption (JWE). Let me give you a rundown on them.
Signing
The purpose of a signature is to allow one or more parties to establish the authenticity of the JWT. Remember our example of tampering user ID stored in a cookie to get access to someone else’s account? Well, that’s where we can use JWS to sign the token and let verify that the data contained in the JWT has not been tampered with. A signature, however, does not prevent other parties from reading the contents of the JWT. This is what encryption is designed to do. A signed JWT is known as JWS (JSON Web Signature) and in the compact serialized form it carries the signature that appears after the last dot.
The most common signing algorithm for JWTs is HMAC. It combines a certain payload with a secret using a cryptographic hash function (most often, SHA-256) and produces a signature that can be used to verify the message. This is so-called shared-secret signing scheme since both the party that generates the signature and the party that verifies it know the secret. And since both parties know it, both can generate a new signed message.
RSASSA is the other algorithm that is used for signing. Unlike HMAC, it allows the receiving parties to only verify the authenticity of a message, but not generate it. The algorithm is based on the public/private key scheme. The private key can be used to both create a signed message and to verify its authenticity. The public key, in contrast, can only be used to verify the authenticity of a message. This is important in one-to-many signing scenarios, like Single-Sign On, where there’s a only one producer of the message and many consumers. If, for example, a legitimate consumer turns malicious, it is impossible for it to modify a message without the other parties noticing.
Encryption
While signing a JWT provides a means to establish the authenticity of the JWT contents, encryption provides a way to keep the contents of the JWT unreadable to third parties.
An encrypted JWT is known as JWE (JSON Web Encryption) and, unlike JWS, its compact serialization form has 5 elements separated with a dot. Additionally to the encrypted header and payload, it includes the encrypted key, initialization vector and authentication tag.
Similarly to JWS it can use two cryptographic schemes: a shared secret scheme and a public/private-key scheme.
The shared secret scheme is analogous to the signing mechanism where all parties know the secret and can both encrypt and decrypt a token.
The private/public keys scheme, however, works differently. In JWE, all public-key holders can encrypt the data, but only the party holding the private key can decrypt it. What that means is that JWE cannot guarantee the authenticity of the JWT when public/private key scheme is used. To have the guarantee of authenticity both JWS and JWE should be used. Note that this restriction only applies in situations where consumers are different entities from producers. If the producer of the data and the consumer is the same entity, then a shared secret encrypted JWT provides the same guarantees as an encrypted and signed JWT.
Learn more about AG Grid — A high performance JavaScript Data Grid. Full enterprise support and regular updates. We support multiple frameworks: Angular, Vue, React so you can pick the best framework for your needs.