

In this post we'll show how to implement CRUD operations in AG Grid, Angular and Sequelize. You'll see how easy it is to integrate AG Grid, a Node.js server with Express, Sequelize and a PostgreSQL database.
What is Sequelize?
According to the Sequelize website, it is a promise-based Node.js ORM for Postgres, MySQL, MariaDB, SQLite and Microsoft SQL Server. It features solid transaction support, relations, eager and lazy loading, read replication and more.
In this post, we'll go through the steps of configuring the database, the backend and the frontend containing AG Grid to display and create data. Use the table of contents to skip ahead to the relevant section if you need to.
Database Setup
I'll be using PostgreSQL for this blog because it’s feature-rich, has extensive documentation, is free and compatible with Sequelize. It also has an excellent GUI tool in the form of pgAdmin.
Because we’re going to be using Sequelize, the choice of database doesn’t really matter as long as the database is a recognised dialect in Sequelize. I’d recommend you stick with me on Postgres, but if you prefer you can swap it out for another technology; check out the Sequelize docs here for more information on compatible databases.
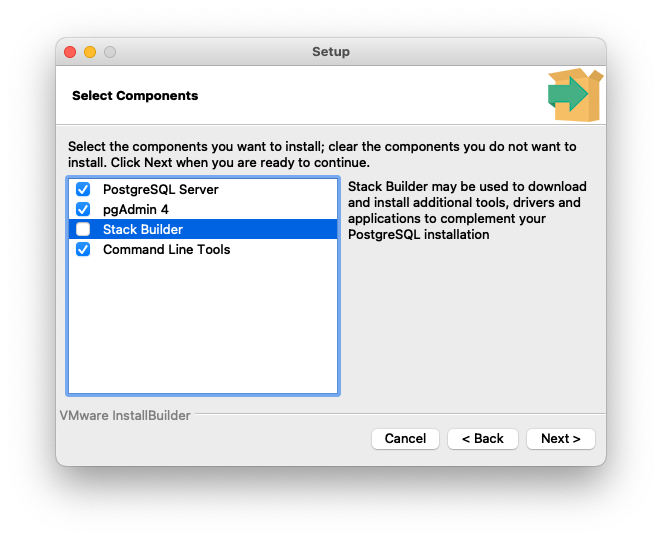
Please download the latest version of PostgreSQL, pgAdmin4 & Command Line Tools (optional but useful if you want to go further into Postgres outside of this blog). You can find these here, they're all part of the same installer.
Make sure to remember your password!
Server Setup
Now that you have a database up and running, let's configure the server needed to host the application code.
If you haven’t built a server before, this short introduction is extremely useful and it’s what I used as a base for my server.
If you’re already confident with servers or have finished the above guide, then you’re ready for my server code which you'll find here. Please clone or download the repo and run yarn install OR npm i.
Note: At this point you won't be able to run the project as there are parts you'll need to fill in.
Before we can get to the Sequelize bit, I’m going to run you through a couple of additions I made to the EDB guide:
CORS (essential): We’ll use this tool to prevent security issues between the browser and server (in real applications, this is a major vector for attack). In our case, we’re setting it up as follows:
const cors = require("cors");
app.use(cors());
nodemon (optional): Programming a server can quickly become excruciating if you have to terminate and rerun your server each time you make a change (purists may disagree), if you want to have an easier life, install nodemon and augment your start script thusly:
"scripts": {
  "start": "nodemon ./server.js"
},
Sequelize Setup
Sequelize is a wonderful tool, especially for JavaScript developers, as it translates syntactically rich JavaScript into different dialects of database.
For those who aren’t familiar with Sequelize, let me quickly explain: There are many databases out there, some quite simple “I need this from this table” affairs and others capable of handling massive datasets spread across multiple tables with granular security configurations. And although most SQL frameworks look syntactically similar to our human eyes—we humans can usually get by with learning one and jerry-rigging the rest with a little help from documentation and forums —computers can’t just fudge it…
Cue Sequelize: A neat translation tool that allows for relatively easy promise-based interaction with supported databases.
In a non-Sequelize CRUD, you would have to program your server to specifically make database calls in the language of the database; for example, if we had a table of cars and wanted to see all of its data, we would use the following query:
SELECT * FROM cars;Here’s the same query using Sequelize:
const allCars = await Cars.findAll();On the back-end, Sequelize is turning your JavaScript into SELECT * FROM cars; and asynchronously popping the result into a const called allCars.
Now that we have a database set up and ready, we need to connect our server to it. At the top of the server.js page, you’ll note the following:
const environment = require('./config/config.json').test;If you look in the files however, you’ll note that there isn’t a config folder containing a config.json file. This is because this file is different for each user, and you’ll have to make it yourself. So add a config folder at the root directory, call it “config” and inside it create a “config.json” file.
Within you’ll need to add code like this:
{
  "development": {
  },
  "test": {
    "username": "postgres",
    "password": “PASSWORD_FOR_YOUR_OWN_DATABASE”,
    "database": "olympic_data_test",
    "host": "127.0.0.1",
    "dialect": "postgres"
  },
  "production": {
  }
}
Note that these are MY details, remember the password you originally used to make your database? This is where it’ll come in handy.
Also note that for the sake of this blog, I’m only using the “test” profile.
Lastly, see the last line in the test object? We’re defining our dialect as “postgres”—more on this in a minute.
Once you’re done, your server should have access to all the information needed to access the database, and we can pass the information from our config file to Sequelize like so:
const sequelize = new Sequelize(environment.database, environment.username, environment.password, {
    host: environment.host,
    dialect: environment.dialect,
    additional: {timeStamps: false}
});
You can see I’m passing the database name, username, password and host address to Sequelize. I’m also telling Sequelize what database language to translate my JS to and lastly, I’m telling it I don’t want timestamps (optional).
The next couple lines of code are for authentication, establishing a stable connection to the database (not the table, as we haven’t even defined it yet), if you get an error here, chances are you misspelled something.
sequelize
    .authenticate()
    .then(() => {
        console.log('Connection has been established successfully.');
    })
    .catch(err => {
        console.error('Unable to connect to the database:', err);
    });
After this, we define our Athlete table:
const Athlete = sequelize.define('athlete', {
    athlete: {type: Sequelize.STRING, allowNull: false},
    age: {type: Sequelize.INTEGER, allowNull: false},
    country: {type: Sequelize.STRING, allowNull: false},
    sport: {type: Sequelize.STRING, allowNull: false},
    gold: {type: Sequelize.INTEGER, allowNull: false},
    silver: {type: Sequelize.INTEGER, allowNull: false},
    bronze: {type: Sequelize.INTEGER, allowNull: false}
});
This code defines a model for Sequelize, so it understands what an “athlete” looks like. This is all bread-and-butter, each field has a type and I’ve coded it so no field can be null.
Next, I'm force-synchronising our Sequelize model with the database. This means Sequelize will check the database to see if a table with the name "athlete" exists, if it does it will be dropped and recreated (the "force" part) and if it doesn’t it will just be created.
Athlete.sync({force: true})
    .then(() => {
        const rowData = require('./rowData/rowData');
        async function addDataToDB(rowData) {
            for (let row of rowData) {
                await Athlete.create(row);
            }
        }
        addDataToDB(rowData).then(() => {});
    });
Once this is done, the then clause comes into play, taking the data from ./rowData/rowData and creating an entry in the database’s athlete table for each object.
Note: What I’ve just done above is the simplest database setup workflow. This is not best practice, it’s just the quickest way I can explain/show the process. This would be pretty useless for most real-world deployments because each time the server is instantiated, the table is dropped (all data lost) and a new one made (with fresh data). If you want to prevent this for educational purposes, you can change the value of the force parameter to false. This will persist your database.
Angular and AG Grid Setup
Now that we've configured the backend, let's move to building the frontend. For the sake of this blog, I’ve decided to go with Angular 12, though any modern version should work. If you’re new here, I’d recommend following the Angular guide from AG Grid's documentation to get started. I’m going to be using an almost-identical setup for this blog, the only addition here is the material theme which allows me to have nice-looking buttons for the ‘create’ & ‘delete’ functions and a pretty modal interface for the former.
Once you're familiar with Angular & AG Grid, you're ready to download the front-end project here.
If you’re already familiar with AG Grid or used the getting started guide from our docs, there are a few things to note:
- I’m importing AG Grid using modules, because I like the practice of keeping things tight and minimal, importing only what’s needed:
public readonly modules: Module[] = [ServerSideRowModelModule, ColumnsToolPanelModule, MenuModule, SetFilterModule];- I’m using the server-side row model type to load the data from the server in pages, as data-manipulations are done server-side. The code below activates the use of the server-side row model:
public readonly rowModelType = 'serverSide';- I’ve also decided to have both partial & full store types. This means that the grid will use the “full” store type when querying for grouped rows and the “partial” type when no grouping is active, as shown below:
public getServerSideStoreParams: (params: GetServerSideStoreParamsParams) => ServerSideStoreParams = params => {
  const groupingActive = !(params.rowGroupColumns.length === 0);
  if (groupingActive) {
    return {
      storeType: 'full',
    };
  } else {
    return {
      storeType: 'partial',
      cacheBlockSize: 20,
      maxBlocksInCache: 3,
    };
  }
}
Reading records
The AG Grid server-side row model loads data from the server using the getRows API method. You’ll find this data getting bound via setServerSideDatasource in the onGridReady event handler:
  this.gridApi.setServerSideDatasource({
    getRows(params: IServerSideGetRowsParams) {
      const {startRow, endRow, rowGroupCols, groupKeys, filterModel, sortModel} = params.request;
      const body = {startRow, endRow, rowGroupCols, groupKeys, filterModel, sortModel};
      that.http.post('http://localhost:3000/read', body)
        .subscribe((dataAndCount) => {
          const receivedData = dataAndCount as { rows: {}[], count: number }
          params.success({
            rowData: receivedData.rows,
            rowCount: receivedData.count
          });
        })
      return;
    }
  })
}
Here you can see how I'm making a POST request in each getRows call, the body of which is furnished with relevant information from the request object provided by AG Grid. This information is then used by server to generate the relevant query for database.
The route used here ends with /read . That’s because this is the ‘Read’ operation in CRUD.
Creating records
Let’s look at how to add records. In our sample click the Create button above the grid:
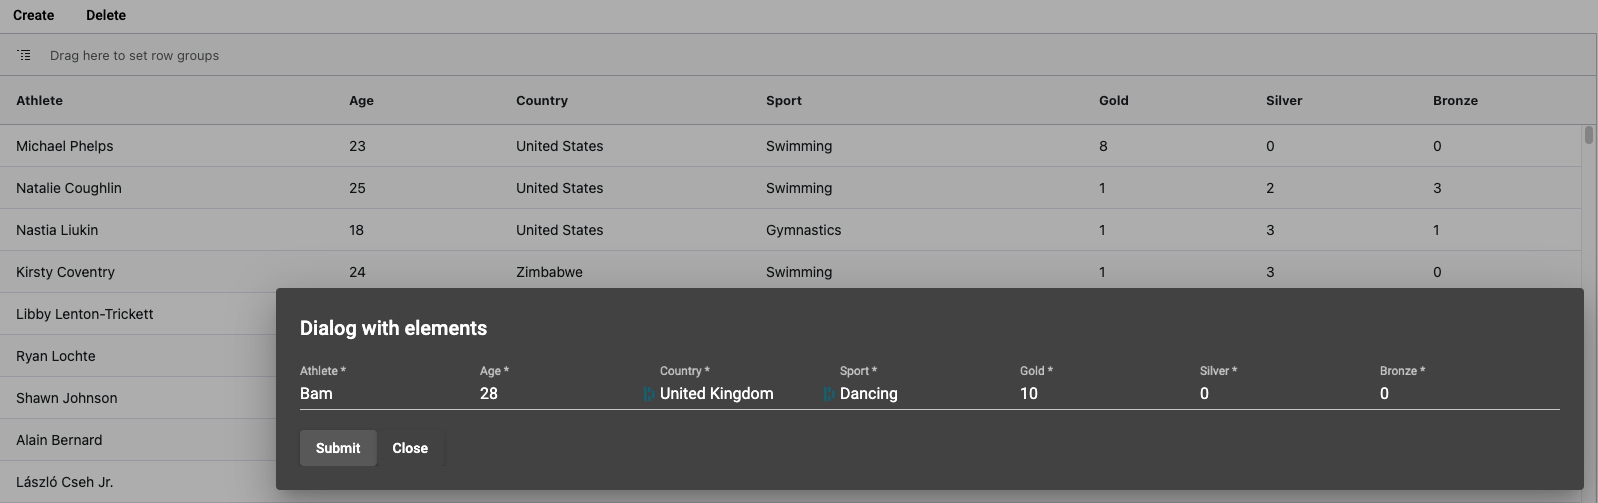
This brings up a modal, and once all the fields are populated (remember from earlier, no nulls are allowed in any column of our table), the Submit button becomes clickable. Once a user clicks the Submit button, the following function is called:
private createServerSideData(newRowData: {}): void {
  this.http.post('http://localhost:3000/create', newRowData)
    .subscribe((resMsg) => {
        console.log(resMsg)
      }
    )
  if (this.isGroupingActive()) {
    const result: ServerSideTransactionResult = this.gridApi?.applyServerSideTransaction({
        add: [newRowData],
      },
    ) as ServerSideTransactionResult
    console.log(result)
  } else {
    this.noGroupingRefresh();
  }
}
Here you can see our route ends with "create", the “C” in “CRUD”, and the body is all the information captured by the modal.
Server-side logic
Now that we've covered the front-end code, let’s work backwards to the server and see how this circle closes. In our server.js file, we have the following four lines of code:
app.post('/create', (request, response) => createHandler(Athlete, request, response));

app.post('/read', (request, response) => readHandler(Athlete, request, response));

app.post('/update', (request, response) => updateHandler(Athlete, request, response));

app.post('/delete', (request, response) => deleteHandler(Athlete, request, response));Note: If you’re wondering where app.post is from, this is all handled by Express, a node.js routing library—explained in the linked guide from Part 2.
As you’ve probably noticed, each line above refers to one of the four letters/functionalities of CRUD. In keeping with the above chapter let’s focus on the READ path:
app.post('/read', (request, response) => readHandler(Athlete, request, response));The request comes in, and along with the table/model (‘Athlete’), is passed to a handler function. If you have a look at the ~/handlers/readHandler.js file, you'll note that it's quite large so let's break it down in sections and hopefully it'll make sense.
module.exports.readHandler = function (database, request, response) {
    const {startRow, endRow, rowGroupCols, groupKeys, filterModel, sortModel} = request.body;
    let options = {
        offset: startRow,
        limit: endRow,
        where: {
            [Op.and]: []
        }
    };
    const AND_ARRAY = options.where[Op.and];
In the code above, I've extracted all the variables that could affect our query into const objects read from the request object. Remember, this is information provided as params to getRows() from AG Grid.
Next I'm creating an object called options. This object is provided to Sequelize to help it build the eventual query for the database. The first two properties should be quite self-explanatory, using server-side data often means you don't want the whole dataset at once, offset and limit allow us to declare which slice of the total dataset we're after—for instance, rows 250 to 400.
I've also built a where clause and within it used the Sequelize Op.and operator which takes an array of conditions—for instance "car = Volkswagen". This may look quite complicated but is one of Sequelize's main benefits; once you start building queries like this, you're able to quickly deploy RESTful APIs to do what you want. To find out more about Sequelize and it's wonderfully flexible operators check out the documentation here.
The last line in the code is there for utility, due to the way I've designed the grid and its filters, all conditions for READ requests can be stacked inside the AND_ARRAY. Therefore, this reference allows me to easily add conditions later on.
Now let's look at sorting, filtering and grouping.
Column Sorting
To sort, we first need to find out if a sortModel exists. The request from AG Grid will always contain a sortModel array, and a sort is applied if the sort model has non-zero length:
    if (sortModel.length > 0) {
        options.order = getSortingOrder(sortModel);
    }
If a sortModel exists—the array is passed to a helper-function which turns AG Grid's sortModel into a Sequelize-consumable order which is set into the aforementioned options object as shown below:
module.exports.getSortingOrder = function (sortModel) {
    let order = [];
    for (let sort of sortModel) {
        const direction = sort.sort.toUpperCase();
        order.push([sort['colId'], direction]); // [column, direction]
    }
    return order;
}
Column Filtering
As with sorting, we need to find out if a valid filterModel exists. This is done using a similar approach:
    if (Object.keys(filterModel).length > 0) {
        AND_ARRAY.push(getFilteringAndArray(filterModel));
    }
If a valid model exists, a helper function is used to build the Sequelize-query. I'll spare you a copy & paste of the entire function from ~/helper_functions/getFilteringAndArray.js and just explain the different parts.
AG Grid has different kinds of filters, Simple Column Filters, and Set Filters; each type is represented slightly differently in the filterModel object and thus will have to be treated differently. We can do this by checking if certain column names exists:
    if (filterColumns.includes('athlete')) {
        andArray.push({
            athlete: {
                [Op.substring]: filterModel.athlete.filter
            }
        });
    }
The first condition checks for the athlete column, this will require a like query—so when a user types "Yang" the query should work such that all rows with the substring "yang" in their "athlete" column should be returned. Here, the Sequelize Op.substring operator is used to get this result as shown below:
The country and Sport column both have setFilters which need to be handled differently.
Set filters in AG Grid allow users to select multiple filter values at once. This requires an OR operator between the different filter values:
    if (filterColumns.includes('country')) {
        andArray.push({
            country: {
                [Op.or]: filterModel.country.values
            }
        });
    }
Lastly, the simple number filters with greater-than/less-than operators:
Object.entries(filterModel).forEach(([columnName]) => {
        if (['age', 'gold', 'silver', 'bronze'].includes(columnName)) {
            const filterValue = filterModel[columnName].filter;
            const filterType = filterModel[columnName].type;
            const filterSign = filterType === "greaterThan" ? Op.gt : filterType === "lessThan" ? Op.lt : Op.eq;
            const query = {
                [columnName]: {
                    [filterSign]: filterValue
                }
            };
            andArray.push(query);
        }
    });
In the end, all of this returns an array which is added to our AND_ARRAY.
Row Grouping
In order to demonstrate row grouping, we display the AG Grid row group panel, which allows users to simply drag and drop columns to group by, as shown below:
The key here is knowing how to manage the 'attributes' you wish to show when grouping or when leaf-nodes are exposed.
For example, in the GIF above, when I initially group by "Country", the only attribute shown should be "Country". However, when I first open the "Italy" group, all the attributes should be provided.
If you look at the grouping section of readHandler.js, you'll note how I'm using if() statements to deduce what state of grouping is present in the grid. The comments in capitals in this file explain how this is implemented.
Querying the Database
Lastly, we have to actually query the database and send the data back to the grid:
    database.findAndCountAll(options)
        .then(dataAndCount => {
            if (Array.isArray(dataAndCount.count)) {
                dataAndCount.count = dataAndCount.count.length;
            }
            response.json(dataAndCount);
        });
You'll find code like the above at the bottom of each handler, this is the part where the query is dispatched. The last check is in case of grouping, where the count value is returned as an array of objects rather than a number—each object holding the count for a given group– for example: {Spain: 20}. In cases where row grouping is active, just count the number of objects in the array.
Once this check is out of the way, the data is sent as a JSON array back to the grid where the response is consumed and via params.success is set as rowData:
    this.gridApi.setServerSideDatasource({
      getRows(params: IServerSideGetRowsParams) {
        const {startRow, endRow, rowGroupCols, groupKeys, filterModel, sortModel} = params.request;
        const body = {startRow, endRow, rowGroupCols, groupKeys, filterModel, sortModel};
        that.http.post('http://localhost:3000/read', body)
          .subscribe((dataAndCount) => {
            const receivedData = dataAndCount as { rows: {}[], count: number }
            params.success({
              rowData: receivedData.rows,
              rowCount: receivedData.count
            });
          })
        return;
      }
    })
Summary
We hope you find this article helpful when using AG Grid with Angular, a Node.js server with Express, Sequelize and a PostgreSQL database. Feel free to fork the example from this blog and modify it according to your needs.
If you would like to try out AG Grid check out our getting started guides (JS / React / Angular / Vue)