

VueJS is a fantastic framework that has experienced amazing growth since it was first released in early 2014. We here at ag-Grid are proud to be able to announce support for VueJS, offering native support of VueJS components within the grid itself. In this post we create a sample application using VueJS and AG Grid.
Creating an Application with VueJS and AG Grid
We’ll walk through creating a simple VueJS application with ag-Grid at its core, using VueJS components to add dynamic functionality to the experience, making good use of what both VueJS and ag-Grid offers us.
A Munros Tracking Application
Wikipedia tells us that the Munros are:
A Munro top is a summit that is not regarded as a separate mountain and which is over 3,000 feet. In the 2012 revision of the tables, published by the Scottish Mountaineering Club, there are 282 Munros and 227 further subsidiary tops.
As a keen mountain walker I’ve always wanted to do the Munros. I haven’t managed to do any of them yet, but being optimistic let’s walk through the creation of an application that allows us to view information about Munros and track our progress in actually climbing them!
The code for this blog can be found at https://github.com/seanlandsman/ag-grid-vue-munros
Full information how to configure and VueJS components within ag-Grid can be found in the Getting Started guide.
Use Vue-cli to create a WebPack Configuration
First, we need to create the boilerplate for our application — for this we’ll use the vue-cli to spin up a simple Webpack configuration:
vue init webpack munro-appWe don’t need vue-router and for the purposes of this application we won't use ESLint or Karma/Mocha:
? Project name munro-app
? Project description A Vue.js project
? Author Sean Landsman <your@email.com>
? Vue build standalone
? Install vue-router?
No
? Use ESLint to lint your code?
No
? Setup unit tests with Karma + Mocha?
No
? Setup e2e tests with Nightwatch?
No
Once done follow the instructions that follow:
cd munro-appnpm installnpm run devAfter this we’ll end up with a simple folder structure and working skeleton application.
Install AG Grid Dependencies
Next let’s install the ag-Grid dependencies we’ll need:
npm install ag-grid --savenpm install ag-grid-vue --saveWe’ll also use whatwg-fetch to pull in our Munro.json data file:
npm install whatwg-fetch --saveOne last piece of housekeeping — delete src/components/Hello.vue.
Display Data and Information in a Grid
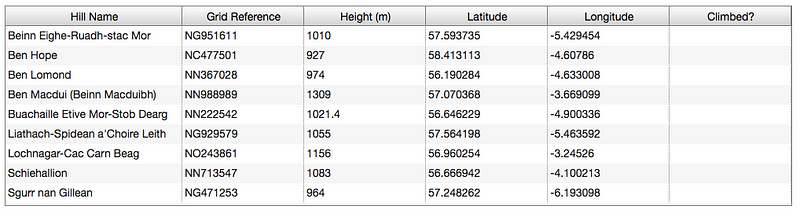
To start with let’s just display some basic Munro information in a simple grid.
Let’s create a Grid component that will retrieve the Munro information and render it.
The MunroGrid component looks like this:
The main parts of this component are:
import {AgGridVue} from "ag-grid-vue";: Here we import the ag-Grid Vue component - this is the ag-Grid component that provides the main grid functionality.createColDefs: Defines our columns. This is a simple table, so we simple list the header names and fields to use in the grid.loadRowData: Retrieves the Munro data and set's it as the Grid's rowData.onRowDataChanged: Automatically resizes columns so they fill out the available space nicely.
With our component ready, we now need to add it to our application. Update src/App.vue with the following:
Finally, we need to pull in the ag-Grid CSS. Update src/main.js to import the required files:
With all that in place we can spin up the application once again — this is what you should see:

Showing Images When Clicking on The Data Grid
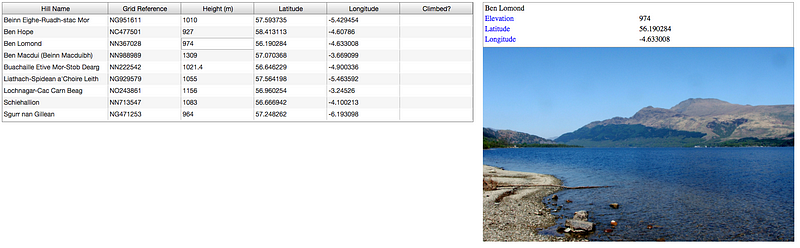
Ok, so far so good. But wouldn’t it be nice to get a view of a Munro when we clicked on it? I think so — let’s create a new component we’ll call MunroDetail that will show some key information about a Munro, as well as display an image of it:
Nothing too complicated here — we have a simple table that will present some key information about a Munro, and will show an image when a prompt is clicked on (@click="showImage=true").
Note we’re making use of a cool VueJS feature called scoped CSS - this will ensure any CSS we list here will only affect the component we're working on. Very nice indeed.
Now let’s update MunroGrid so that when a row is clicked on we emit an event to let users know:
The only change we’ve made here to listen for rowClicked event from the Grid and then to emit these events up:
onRowClicked(params) { this.$emit("munroSelected", params.node.data)},Easy!
So now we have have a component to display the Munro and have updated our Grid component to broadcast Munro selection. Let’s add our MunroDetailto our main App.vue, as well as tie up a row being selected in MunroGrid to displaying the information in MunroDetail:
Key parts of our updates are:
<munro-grid @munroSelected="munroSelected"></munro-grid>: Listen for themunroSelectedevent fromMunroGridand store the selected Munro in a variable calledthis.selectedMunro = munro;.<munro-detail :selectedMunro="selectedMunro"></munro-detail>: Pass in a selected Munro (if any) to theMunroDetailcomponent for rendering.
The rest of the new code is layout code to ensure that MunroGrid and MunroDetail display side-by-side and that MunroDetail can "flex" as the window changes size.
If we spin the application up now we’ll see this:
When a row is clicked on we’ll then see this:

And finally, when the prompt is clicked on we’ll see this:
So far so good — we have two VueJs components talking to each other, and are able to see the detail we wanted to see!
Create a VueJS Component for AG Grid Filtering
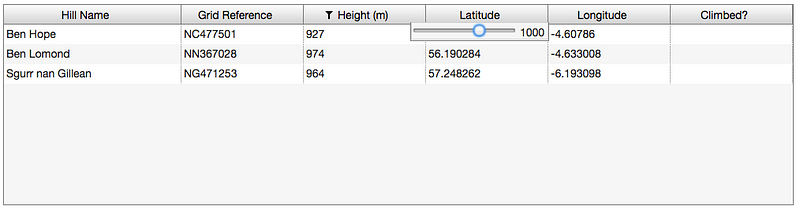
But I think we can do more here. How about we write a new VueJS component that will allow us to filter based on Munro height?
I’d like to have this as a horizontal slider with the grid filtering as we slide — let’s see what we can come up with.
Here we have a simple slider control — it takes in a few properties to control its behaviour and initial state, and fires an event when the user changes its value.
Now let’s create a new Filter component for use in the Grid. This new Filter will make use of the SliderComponent we've just created.
This too is a simple component — we remember to enclose our logic with Vue.extend as this is what allows the Grid to create components dynamically, and the rest is normal ag-Grid logic.
Note here that we’re being passed in the SliderComponent initial values via the params value - this is how ag-Grid passes in information to a Dynamic Vue component.
Note too that we’re listening for events from SliderComponent in order to update the reflect the filtered state in filterValueChanged.
And finally, let’s add the new SliderFilter to MunroGrid:
Sample Application Summary
So with very little time we have an application that downloads and renders data in ag-Grid, renders chosen information in another VueJS component, and finally allow us to dynamically filter our data with a very quick and easy slider control.
Brilliant! I’ve found VueJS to be a really fun framework to use — it was very quick to ramp up and write something like this, so I encourage you to give it a go.
Our documentation has full support for Vue including a Getting Started Guide and all the examples have Vue versions.