

This Webpack tutorial is my attempt to document what I learnt and is the blog I wish I’d found when I first started my Webpack journey, all those months ago.
When I first started working at ag-Grid (which is a great place to work!) I had to ramp up on many technologies and frameworks that I hadn’t used before. One of these was Webpack — a powerful bundler used in many applications & frameworks.
We here at ag-Grid use Webpack to bundle our own products, as well as using it with some of our framework examples. Although there are alternatives to Webpack, it is still very popular and with version 2.2 recently released I believe it will remain so for quite a while yet.
- Introduction to Webpack
- How can Webpack help us?
- Making Dependencies Available, And Linking Them
- Making Webpack Look Good — CSS & Styling
- Image Processing with WebPack
Introduction to Webpack
Webpack is a module bundler. It takes disparate dependencies, creates modules for them and bundles the entire network up into manageable output files. This is especially useful for Single Page Applications (SPAs), which is the defacto standard for Web Applications today.
All code for the blog can be found at the Webpack Tutorial: Understanding How it Works repository on GitHub.
Let’s assume we have an application that can perform two simple mathematical tasks — sum and multiply. We decide to split these functions into separate files for easier maintenance:
index.html
<html>
<head>
    <script src="src/sum.js"></script>
    <script src="src/multiply.js"></script>
    <script src="src/index.js"></script>
</head>
</html>
index.js
var totalMultiply = multiply(5, 3);
var totalSum = sum(5, 3);
console.log('Product of 5 and 3 = ' + totalMultiply);
console.log('Sum of 5 and 3 = ' + totalSum);
multiply.js
var multiply = function (a, b) {
    var total = 0;
    for (var i = 0; i < b; i++) {
        total = sum(a, total);
    }
    return total;
};
sum.js
var sum = function (a, b) {
    return a + b;
};
The output of this would be:
Product of 5 and 3 = 15
Sum of 5 and 3 = 8
How can Webpack help us?
We don't just use tools without understanding what they can do for us, so how can Webpack help us?
Dependencies — Modules To the Rescue!
From the above code you can see that both multiply.js and index.js depend on sum.js. We can show the dependency hierarachy in a simple diagram here:

If we get the order wrong in index.html our application won’t work. If index.js is included before either of the other dependencies, or if sum.js is included after multiply.js we will get errors.
Now imagine that we scale this up to an actual fully blown Web Application — we may have dozens of dependencies, some of which depend on each other. Maintaining order would become a nightmare!
Finally, by using global variables, we risk other code overwriting our variables, causing hard to find bugs.
Webpack can convert these dependencies into modules — they will have a much tighter scope (which is safer). Additionally by converting our dependencies into Modules, Webpack can manage our dependencies for us — Webpack will pull in the dependant Modules at the right time, in the correct scope (we’ll see this in more detail later).
Reducing Dependency HTTP Traffic with Bundling
If we take a look at index.html, we can see that we’ll need to pull down 3 separate files. This is fine but now imagine again that we have many dependencies — the end user would have to wait until all of the dependencies had been downloaded before the main application could run.
The other main feature Webpack offers is bundling. That is, Webpack can pull all of our dependencies into a single file, meaning that only one dependency would need to be downloaded.
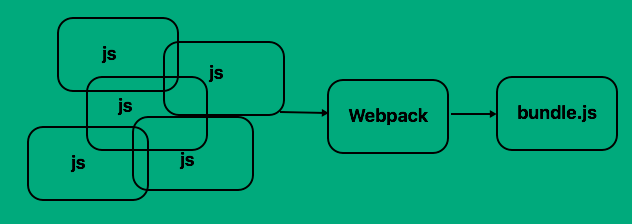
Bundling and Modularisation are Webpack’s main features. Through plugins & loaders we can further extend this (we’ll see this later) but primarily this is what Webpack is for.
Making Dependencies Available, And Linking Them
For our initial setup, we’ll use the CommonJS module syntax. There are other options (AMD, ES2015) but for now we’ll use CommonJS and later move to ES2015.
CommonJS uses module.exports to export - or make available - functions or variables to other code. It uses require to then pull in these exported values.
index.html
<html>
<head>
    <script src="./dist/bundle.js""></script>
</head>
</html>
index.js
var multiply = require('./multiply');
var sum = require('./sum');
var totalMultiply = multiply(5, 3);
var totalSum = sum(5, 3);
console.log('Product of 5 and 3 = ' + totalMultiply);
console.log('Sum of 5 and 3 = ' + totalSum);
multiply.js
var sum = require('./sum');
var multiply = function (a, b) {
    var total = 0;
    for (var i = 0; i < b; i++) {
        total = sum(a, total);
    }
    return total;
};
module.exports = multiply;
sum.js
var sum = function (a, b) {
    return a + b;
};
module.exports = sum;
Notice that we’ve made both sum and multiply available to other code and we've pulled in these exported functions in both multiple.js and index.js.
Notice too that our index.html now only needs to pull in a single file — bundle.js.
This is great! We now no longer have to worry about dependency order. We can expose what we want and keep other code effectively private. We also reduce web calls from 3 (sum.js, multiply.js and index.js) to a single call — this will help speed loading times.
Webpack — Initial Configuration
For the above to work, we need to do some initial Webpack configuration:
var path = require('path');
module.exports = {
  entry: './src/index.js',
  output: {
    path: path.resolve(__dirname, './dist/),
    filename: 'bundle.js
  }
}
At a minimum, we need to tell Webpack what our application entry point is and what the resulting output should be.
entry: This is the main entry point of our application. This is where our initial loading and application logic will be. Webpack uses this as a starting point for its dependency tree walking. It will build up a dependency graph and create modules as necessary.
output.path: An absolute path for the resulting bundle. To make this cross platform and easy to use, we use a built-in Node.js function (path). This will help us to dynamically create an absolute path, relative to where we are.
output.filename: The filename of the resulting bundle. This can be anything, but by convention it's called 'bundle.js'
Note: __dirname is a Node.js utility variable - it is the directory name of the current file.
Looking at bundle.js
Looking at the resulting bundle.js can be very instructional (prettified and commented for easier navigation):
// the webpack bootstrap
(function (modules) {
    // The module cache
    var installedModules = {};
    // The require function
    function __webpack_require__(moduleId) {
        // Check if module is in cache
        // Create a new module (and put it into the cache)
        // Execute the module function
        // Flag the module as loaded
        // Return the exports of the module
    }


    // expose the modules object (__webpack_modules__)
    // expose the module cache
    // Load entry module and return exports
    return __webpack_require__(0);
})
/************************************************************************/
([
    // index.js - our application logic
    /* 0 */
    function (module, exports, __webpack_require__) {
        var multiply = __webpack_require__(1);
        var sum = __webpack_require__(2);
        var totalMultiply = multiply(5, 3);
        var totalSum = sum(5, 3);
        console.log('Product of 5 and 3 = ' + totalMultiply);
        console.log('Sum of 5 and 3 = ' + totalSum);
    },
    // multiply.js
    /* 1 */
    function (module, exports, __webpack_require__) {
        var sum = __webpack_require__(2);
        var multiply = function (a, b) {
            var total = 0;
            for (var i = 0; i < b; i++) {
                total = sum(a, total);
            }
            return total;
        };
        module.exports = multiply;
    },
    // sum.js
    /* 2 */
    function (module, exports) {
        var sum = function (a, b) {
            return a + b;
        };
        module.exports = sum;
    }
]);
From this you can see that Webpack wraps each of our files into a module and passes them into the Webpack bootstrap as an array of Modules. For each module, it adds them to the Webpack, executes them and makes them available to other modules.
It executes __webpack_require__(0) which looking at the array of modules is our index.js. The result is the output we started with, but with far easier dependency management and less web traffic! Brilliant!
Loaders — Making Webpack Smarter
Webpack understands JavaScript. It can create modules and bundle JavaScript out of the box, but if you want to use something other than JavaScript, or want to write in something like ES2015/ES6, then you’ll need to tell Webpack how to process this.
More accurately, we need to pre-process these other languages/versions into JavaScript ES5 — the version that Webpack can understand.
Here at ag-Grid, we’re big fans of TypeScript, but for the purposes of this example we’re going to convert our example code into ES2015 and use Babel to convert — or transpile — our ES2015 code into s=ES5 compatible JavaScript.
Babel can do a great deal other than simply transpiling ES2015 code into ES5, but covering that is beyond the scope of this blog. Please refer to the Babel site for more information about Babel.
First, let’s convert our ES5 code into ES2015:
index.js
import multiply from './multiply';
import sum from './sum';
const totalMultiply = multiply(5, 3);
const totalSum = sum(5, 3);
console.log(`Product of 5 and 3 = ${totalMultiply}`);
console.log(`Sum of 5 and 3 = ${totalSum}`);
multiply.js
import sum from './sum';
const multiply = (a, b) => {
    let total = 0;
    for(let i=0;i<b;i++) {
        total = sum(a, total);
    }
    return total;
};
export default multiply;
sum.js
const sum = (a, b) => a + b;
export default sum;
Here we’re using Arrow Functions, the const keyword, Template Strings and the es2015 import/export module format, all of which are ES2015 features.
In order to use Babel, we need to use the Babel Loader. Loaders are how Webpack can process content other than JavaScript. With Loaders we can get Webpack to process many types of files — CSS, Images, TypeScript and ES2015 code and so on.
We need 3 Babel dependencies in order to use it with Webpack:
babel-loader: The interface between Babel and Webpackbabel-core: Understands how to read & parse code, and generate corresponding outputbabel-preset-es2015: Rules for Babel on how to process ES2015 code and convert it into ES5
The webpack configuration with the Babel Loader in place looks like this:
const path = require('path');
module.exports = {
    entry: './src/index.js',
    output: {
        path: path.resolve(__dirname, './dist/'),
        filename: 'bundle.js'
    },
    module: {
        loaders: [
            {
                test: /\.js$/,
                loader: 'babel-loader',
                exclude: /node_modules/,
                query: {
                    presets: ['es2015']
                }
            }
        ]
    }
};
Above code is found in webpack.config.js
As we can have a number of Loaders in Webpack, the values provided are in an array — in our case we’re only providing one Loader initially.
test: We need to tell the Loader that we only want it to process JavaScript files. We don't want it to look for CSS, HTML, images and so on - only JavaScript (.js) files. In order to do so, we provide a regex expression that will match .js filesloader: The loader to use - in this case the Babel Loaderexclude: We don't want Babel to process any files under node_modulesquery.presets: which Babel Preset (or rules) we want to apply - in our case we're looking for Babel to convert ES2015 code
Looking at our bundle.js again (and this time only looking at the part that contains sum.js) we can see the following:
/* 2 */
function(module, exports) {
  var sum = function sum(a, b) {
    return a + b;
    };

    module.exports = sum;
}
So the Babel Loader has converted our ES2015 code back into ES5 code — great! The best of both worlds.
Making Webpack Look Good — CSS & Styling
Let’s expand our example to actually output the results of our calculations. We’ll create a body on the page, and then add the results of the product and sum to spans, which we’ll add to the body:
import multiply from './multiply';
import sum from './sum';

const totalMultiply = multiply(5, 3);
const totalSum = sum(5, 3);

// create the body
const body = document.createElement("body");
document.documentElement.appendChild(body);

// calculate the product and add it to a span
const multiplyResultsSpan = document.createElement('span');
multiplyResultsSpan.appendChild(document.createTextNode(`Product of 5 and 3 = ${totalMultiply}`));

// calculate the sum and add it to a span
const sumResultSpan = document.createElement('span');
sumResultSpan.appendChild(document.createTextNode(`Sum of 5 and 3 = ${totalSum}`));

// add the results to the page
document.body.appendChild(multiplyResultsSpan);
document.body.appendChild(sumResultSpan);
The output would be the same as before, but on a page:
Product of 5 and 3 = 15 Sum of 5 and 3 = 8We can improve this with CSS — let’s ensure each result is on a new line, and add a border around each result.
Our CSS will look like this:
span {
    border: 5px solid brown;
    display: block;
}
We need to pull this CSS into our application. We could of course simply add a link tag to our html, but if we import it and then use Webpack to process it, we'll benefit from what Webpack can offer.
An additional benefit of importing the CSS in our code is that we (developers) can see where the association between the CSS and its usage is. It’s worth noting that the CSS is not scoped to the module it’s imported to (it’s still global), but from a developers perspective the relationship is clearer.
import multiply from './multiply';
import sum from './sum';

// import the CSS we want to use here
import './math_output.css';

const totalMultiply = multiply(5, 3);
const totalSum = sum(5, 3);

// create the body
const body = document.createElement("body");
document.documentElement.appendChild(body);

// calculate the product and add it to a span
const multiplyResultsSpan = document.createElement('span');
multiplyResultsSpan.appendChild(document.createTextNode(`Product of 5 and 3 = ${totalMultiply}`));

// calculate the sum and add it to a span
const sumResultSpan = document.createElement('span');
sumResultSpan.appendChild(document.createTextNode(`Sum of 5 and 3 = ${totalSum}`));

// add the results to the page
document.body.appendChild(multiplyResultsSpan);
document.body.appendChild(sumResultSpan);
The only change from before is that we’re now importing the CSS.
We need two Loaders to process our CSS:
css-loader: Knows how to process CSS imports - takes the imported CSS and loads the file contentsstyle-loader: Takes CSS data(from imports) and adds them to the HTML document
Our Webpack config in webpack.config.js now looks like this:
const path = require('path');
module.exports = {
    entry: './src/index.js',
    output: {
        path: path.resolve(__dirname, './dist/'),
        filename: 'bundle.js'
    },
    module: {
        loaders: [
            {
                test: /\.js$/,
                loader: 'babel-loader',
                exclude: /node_modules/,
                query: {
                    presets: ['es2015']
                }
            },
            {
                test: /\.css$/,
                loaders: ['style-loader', 'css-loader']
            }
        ]
    }
};
test: as before, we need to tell the Loaders that we only want it to process CSS files - this regex will only process .css filesloaders: the loaders to use. Note that this time it's plural as we're supplying an array of Loaders. Also note that Webpack processes Loaders from right to left, so the results ofcss-loader(the file contents) are passed tostyle-loader(adding the styles to the HTML document)
If we now run Webpack and reload our application the results will look like this:

Behind the scenes these two Loaders have dynamically added the styles to the HTML document. If we inspect the resulting HTML in Chrome we can see the following:
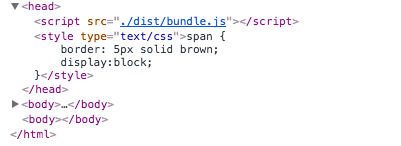
This is clever, but there are other ways for us to process the CSS. We can split the CSS in cache busting (files with unique hashes) and then include these files into our resulting bundle.
For now, let’s just extract the CSS and output it into a file that we can then import. To do this, we’re going to make use of a Plugin: ExtractTextPlugin.
Loaders are used for pre-processing data before it’s output into our bundle. Plugins however can keep output from appearing in our bundle.
Our Webpack config now looks like this:
const path = require('path');
const ExtractTextPlugin = require('extract-text-webpack-plugin');
module.exports = {
    entry: './src/index.js',
    output: {
        path: path.resolve(__dirname, './dist/'),
        filename: 'bundle.js'
    },
    module: {
        loaders: [
            {
                test: /\.js$/,
                loader: 'babel-loader',
                exclude: /node_modules/,
                query: {
                    presets: ['es2015']
                }
            },
            {
                test: /\.css$/,
                loader: ExtractTextPlugin.extract('css-loader')
            }
        ]
    },
    plugins: [
        new ExtractTextPlugin('style.css')
    ]
};
At the top we’re importing the ExtractTextPlugin. We’ve also changed the loader for CSS to use this plugin:
{
    test: /\.css$/,
    loader: ExtractTextPlugin.extract('css-loader')
}
This tells Webpack to pass the results off the css-loader to the ExtractTextPlugin. At the bottom we configure the plugin:
plugins: [
    new ExtractTextPlugin('style.css')
]
What this does is tell the plugin that for all data passed to it, save it down to a file called style.css. This may not seem immediately useful, but as before with many separate JavaScript files, imagine we had many CSS files. By doing the above, we can combine many separate CSS files into one file, reducing the number of web calls required at load time.
Looking at dist/style.css we can see:
span {
    border: 5px solid brown;
    display:block;
}
Which of course is the content of our CSS. To make use of this we need to modify our index.html to import this CSS:
<html>
  <head>
    <link rel="stylesheet" href="dist/style.css"/>
    <script src="./dist/bundle.js""></script>
  </head>
</html>
The output will be the same as before.
Image Processing with WebPack
Let’s add some images to our application — and get Webpack (together with a suitable loader) to process them for us.
Let’s add two new images to our project a small one and a large one — one for summing and one for multiplication, just to add a little colour to our output.
In order to process these images we’re going to make use of two Loaders:
image-webpack-loader: will try to automatically compress large images for usurl-loader: will inline the results fromimage-webpack-loaderif the results are small, and include the image in the output directory if they are large
We have two new images we want to add — multiply.png which is relatively large (about 32kb) and sum.png which is relatively small (about 13kb).
First, let’s add a new image utility class — this will create a new image for us and add it to the document, we will call this image_util.js:
const addImageToPage = (imageSrc) => {
    const image = document.createElement('img');
    image.src = imageSrc;
    image.style.height = '100px';
    image.style.width = '100px';
    document.body.appendChild(image);
};
export default addImageToPage;
Let’s import both the new image utility as well as the images we want to add to our application index.js:
import multiply from './multiply';
import sum from './sum';

// import our image utility
import addImageToPage from './image_util';

// import the images we want to use
import multiplyImg from '../images/multiply.png';
import sumImg from '../images/sum.png';

// import the CSS we want to use here
import './math_output.css';

const totalMultiply = multiply(5, 3);
const totalSum = sum(5, 3);

// create the body
const body = document.createElement("body");
document.documentElement.appendChild(body);

// calculate the product and add it to a span
const multiplyResultsSpan = document.createElement('span');
multiplyResultsSpan.appendChild(document.createTextNode(`Product of 5 and 3 = ${totalMultiply}`));

// calculate the sum and add it to a span
const sumResultSpan = document.createElement('span');
sumResultSpan.appendChild(document.createTextNode(`Sum of 5 and 3 = ${totalSum}`));

// add the results to the page
addImageToPage(multiplyImg);
document.body.appendChild(multiplyResultsSpan);
addImageToPage(sumImg);
document.body.appendChild(sumResultSpan);
Finally, let’s configure Webpack to process these images with the two new Loaders by amending webpack.config.js:
const path = require('path');
const ExtractTextPlugin = require('extract-text-webpack-plugin');
module.exports = {
    entry: './src/index.js',
    output: {
        path: path.resolve(__dirname, './dist/'),
        filename: 'bundle.js',
        publicPath: 'dist/'
    },
    module: {
        loaders: [
            {
                test: /\.js$/,
                loader: 'babel-loader',
                exclude: /node_modules/,
                query: {
                    presets: ['es2015']
                }
            },
            {
                test: /\.css$/,
                loader: ExtractTextPlugin.extract('css-loader')
            },
            {
                test: /\.png$/,
                loaders: [
                    'url-loader?limit=5000',
                    'image-webpack-loader'
                ]
            }
        ]
    },
    plugins: [
        new ExtractTextPlugin('style.css')
    ]
};
output.publicPathAllows the url-loader to know what prefix to add for files that will be saved to disk. For example, a resulting img.src would be img.src='dist/output_file.png'test: as before, we need to tell the Loaders that we only want it to process image files - this regex will only process .png files. We can make this more complicated by adding support for other image formats, for our purposes this simple regex will doloaders: our loaders to use - remember that Webpack processes Loaders from right to left, so the results ofimage-webpack-loaderwill be passed tourl-loader
If we now run Webpack we will see something like the following:
38ba485a2e2306d9ad96d479e36d2e7b.png
bundle.js
style.css
If we open 38ba485a2e2306d9ad96d479e36d2e7b.png we should find that it is our large image — multiply.png. The smaller image, sum.png, has been inlined in bundle.js as follows:
module.exports = "data:image/png;base64,iVBORw0KGgoAAAANSUhEUgAAAoAAAAHgCAMAAAACDyzWAAAC6FBMVEUAuv8AgL...."Which would be equivalent to having:
img.src="data:image/png;base64,iVBORw0KGgoAAAANSUhEUgAAAoAAAAHgCAMAAAACDyzWAAAC6FBMVEUAuv8AgL...'When we run our application output is:

From this Webpack Tutorial, you can see what Webpack can offer us as application developers. With a fairly small amount of configuration we’ve been able to process ES2015 code, bundle it, handle CSS and process both large and small images, all in an easy to understand method.
We’ve achieved all this and we’ve only just scratched the surface of what Webpack can do. We can minify & uglify code, split code into cache busting filename, process TypeScript and Angular — there are so many options!
Give Webpack a go — I’m sure you’ll find it an indispensable tool in your developer toolkit.
Learn more about AG Grid — an Enterprise JavaScript Data Grid used by the Fortune 500. Support for multiple frameworks: Angular, Vue, React so you can use the best technology for your business.