
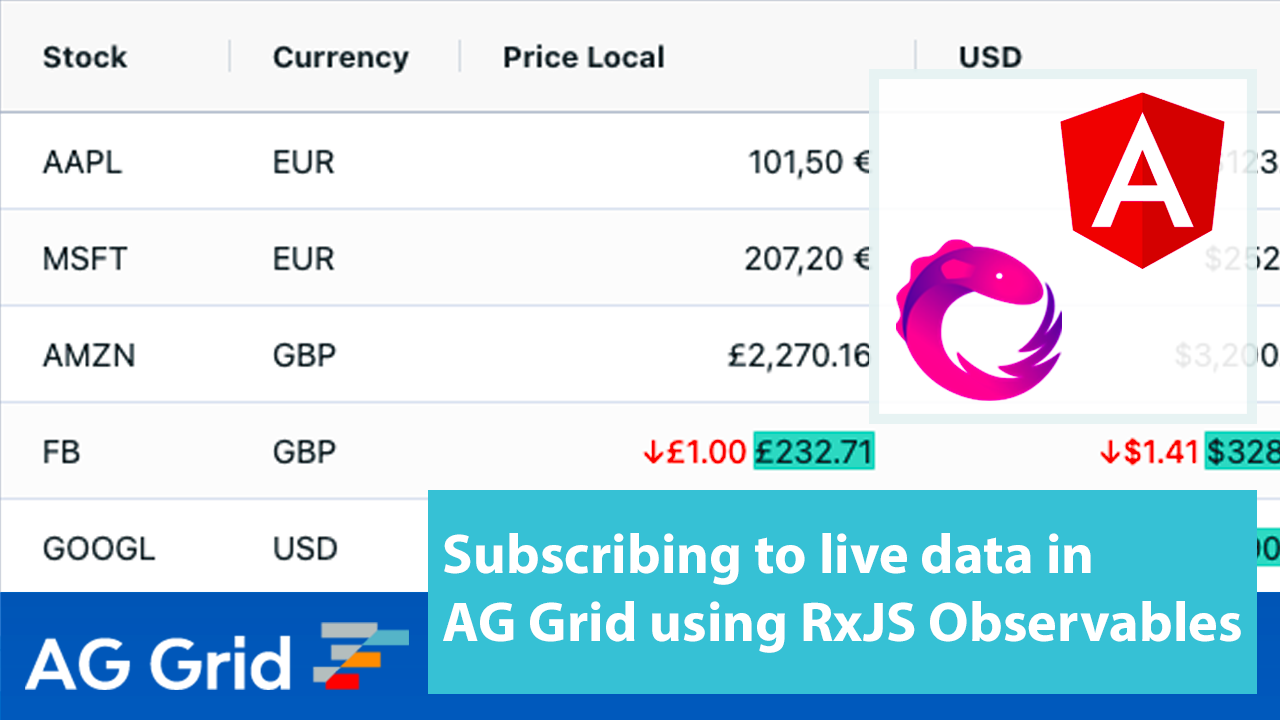
In this post, we will show you how to bind AG Grid to a live data stream. We will implement this with RxJS Observables to add columns, a data store and other data to build a simple Stock Ticker application with AG Grid based on Angular.
See the sample in action below and note the cell values are updated live:
See the live Angular sample shown below:
Contents
- Why use RxJS Observables
- Creating a Data Service and Immutable Store
- Loading Observables into the Grid
- Refreshing Column Properties based on Currency
- Adding Column Definition Properties
Why use RxJS Observables?
The advantage of using RxJS Observables is that our component only needs to subscribe to the data stream once. This means that the stream can continually push data to the grid component at any time period. So from our grid component, all we have to tell the grid is that there’s this observable stream, and bind it to something the grid can use e.g. rowData/columnDefs.
The grid is not aware whether the stream changes over time, it will just show what’s currently getting pushed from the observable. Our example below will use three observables to showcase different ways of integrating them. One of the observables for the rowData will update the row data every second.
This approach greatly simplifies the implementation and is easy to maintain.
Let's now look at the details.
Creating a service and immutable store
Let's start by building a data backend with three methods to return row data, a currency list, and column definitions for our grid as observables.
See this in the code below:
@Injectable()
export class MockServerService {
  private stocksUrl: string = 'assets/data.json';
  private columnUrl: string = 'assets/column.json';
  private currencyUrl: string = 'assets/currency.json';

  private immutableData: Stock[];

  constructor(private http: HttpClient) {}

  getDataObservable(): Observable<Stock[]> {
    return new Observable<Stock[]>(observer => {
      this.http.get<Stock[]>(this.stocksUrl).subscribe((data: Stock[]) => {
        this.immutableData = data;
        observer.next(this.immutableData);

        setInterval(() => {
          this.immutableData = this.immutableData.map((row: Stock) =>
            this.updateRandomRowWithData(row)
          );

          observer.next(this.immutableData);
        }, 1000);
      });
    });
  }

  getCurrencyObservable(): Observable<Currency[]> {
    return this.http.get<Currency[]>(this.currencyUrl);
  }

  getColumnObservable(): Observable<ColDef[]> {
    return this.http.get<ColDef[]>(this.columnUrl);
  }

  updateRandomRowWithData(row: Stock): Stock {
    const shouldUpdateData = Math.random() < 0.3;
    if (shouldUpdateData) {
      let delta = Math.floor(30 * Math.random()) / 10;
      delta *= Math.round(Math.random()) ? 1 : -1;
      const newValue = row.amount + Math.floor(delta);
      let newRow = { ...row, amount: newValue };
      return newRow;
    } else {
      return row;
    }
  }
}
Let's now take a look into the three methods in this service:
getDataObservable method
This method returns an observable which fetches the data from assets/data.json and then assigns it to immutableData which is pushed to the observer every second with an updated row. Note that we are passing an array of rows for each update - this is so we can mock data coming from a store which will be kept in sync with the grid's rowData.
Here's a sample records in the JSON file:
[
  {
    "id": 0,
    "stock": "AAPL",
    "currency": "EUR",
    "amount": 103.50
  }
]
getCurrencyObservable method
This method simply returns an observable of the data from assets/currency.json. See a sample record below:
[
  {
    "code": "USD"
  }
]
getColumnObservable method
Similar to the method above, this method returns an observable of the column data:
[
  {
    "colId": "amount",
    "field": "amount",
    "type": "currencyColumn"
  }
]
Loading Observables into the Grid
Now that we've created a service to return observables for our data, let's set up our grid component to subscribe to these observables:
@Component({
  selector: 'my-app',
  templateUrl: './app.component.html',
  styleUrls: ['./app.component.css'],
  providers: [MockServerService]
})
export class AppComponent {
  // [...]
  public currencies$: Observable<Currency[]>;
  public columnDefs$: Observable<ColDef[]>;
  public rowData$: Observable<Stock[]>;
  public immutableData: boolean;

  constructor(private mockServerService: MockServerService) {
    // [...]
    this.immutableData = true;
    this.getRowNodeId = (data: any): string => data.id;
  }

  ngOnInit() {
    this.currencies$ = this.mockServerService.getCurrencyObservable();

    this.rowData$ = this.mockServerService.getDataObservable();

    this.columnDefs$ = this.mockServerService.getColumnObservable();
  }

}
The above code fetches the observables from our service inside the ngOnInit method, which are then assigned to currencies$, columnDefs$ and rowData$.
To supply columns and rows to the grid, we'll be using the AsyncPipe to subscribe to rowData$ and columnDefs$ (in the next section we'll look at how currencies$ is used, as it's not fed directly to the grid).
<ag-grid-angular
  #agGrid
  [columnDefs]="columnDefs$ | async"
  [rowData]="rowData$ | async"
  [immutableData]="immutableData"
  [getRowNodeId]="getRowNode"
>
</ag-grid-angular>
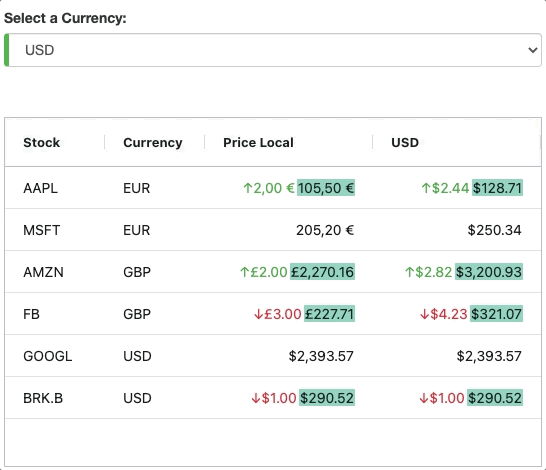
As you can see we've enabled Immutable Data which will bind the rowData property to our store that is pushed from mockServerService.getDataObservable(), so the grid's data is kept in sync with the store. This allows the grid to display the updated data, as shown below:

Refreshing Column Properties based on the selected Currency value
Let's now allow the user to change the currency in the dropdown above the grid, updating the last column in the grid to display the values in the selected currency.
We'll use the currencies$ observable for this. It's not used by the grid, but instead passed to the drop-down list above it to render the currency values:
<select
  [(ngModel)]="selectedCurrency"
  (ngModelChange)="onChange($event)">
  <option
    *ngFor="let currency of currencies$ | async"
    [ngValue]="currency.code">
    {{currency.code}}
  </option>
</select>
When the user selects a new option from the drop-down list, the selected option will be stored by the selectedCurrency because we've bound it to ngModel.
We've also bound the event (ngModelChange) to the method onChange to handle the user selecting a new currency on the drop-down. When the onChange event is fired, we tell the grid to update the formatting and column header names for the new currency via the Refresh API methods.
  onChange(event) {
    this.gridApi.refreshCells();
    this.gridApi.refreshHeader();
  }
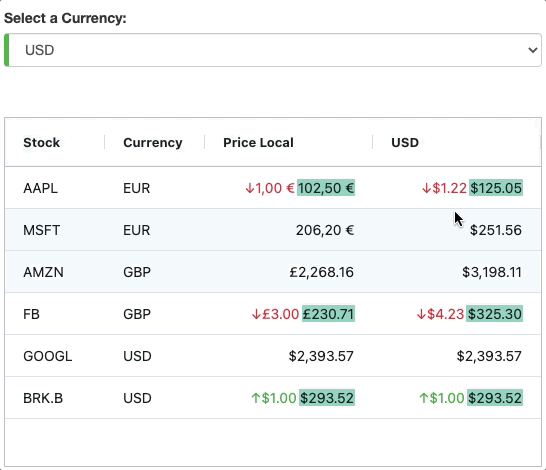
So now, whenever a new currency is selected in the list above the grid, the grid will refresh the column header and cells, which will update the headerName and formatting in the last column as shown below:
Adding Column Definition Properties
In order to simplify column setup, we're using custom column types to share column configuration properties. This is how we're adding Cell Renderers, Value Formatters and Cell Styling to the Columns. AG Grid makes this very simple, using Custom Column Types.
In the columns where we want to add multiple column properties, we've set the type property to the record which you can see in assets/column.json. This type value references the custom column types. In our example, we've defined two custom column types: currencyColumn and reportColumn.
Please see the custom column type definitions shown below:
this.columnTypes = {
  currencyColumn: {
    flex: 2,
    headerName: 'Price Local',
    cellRenderer: 'agAnimateShowChangeCellRenderer',
    cellStyle: { 'text-align': 'right' },
    valueFormatter: simpleCurrencyFormatter.bind(this)
  },
  reportColumn: {
    headerValueGetter: params => this.selectedCurrency,
    valueGetter: reportingCurrencyValueGetter.bind(this)
  }
};
Summary
I hope you this article helps illustrate how to use Observables in AG Grid using the RxJS library. If you're using a different framework, don't worry - the core principles here are framework-agnostic and the logic is the same. You only need to make a few tweaks to make this work in your chosen framework.
You can also find more examples of RxJS with AG Grid here.
If you would like to try out AG Grid check out our getting started guides (JS / React / Angular / Vue)
Happy coding!