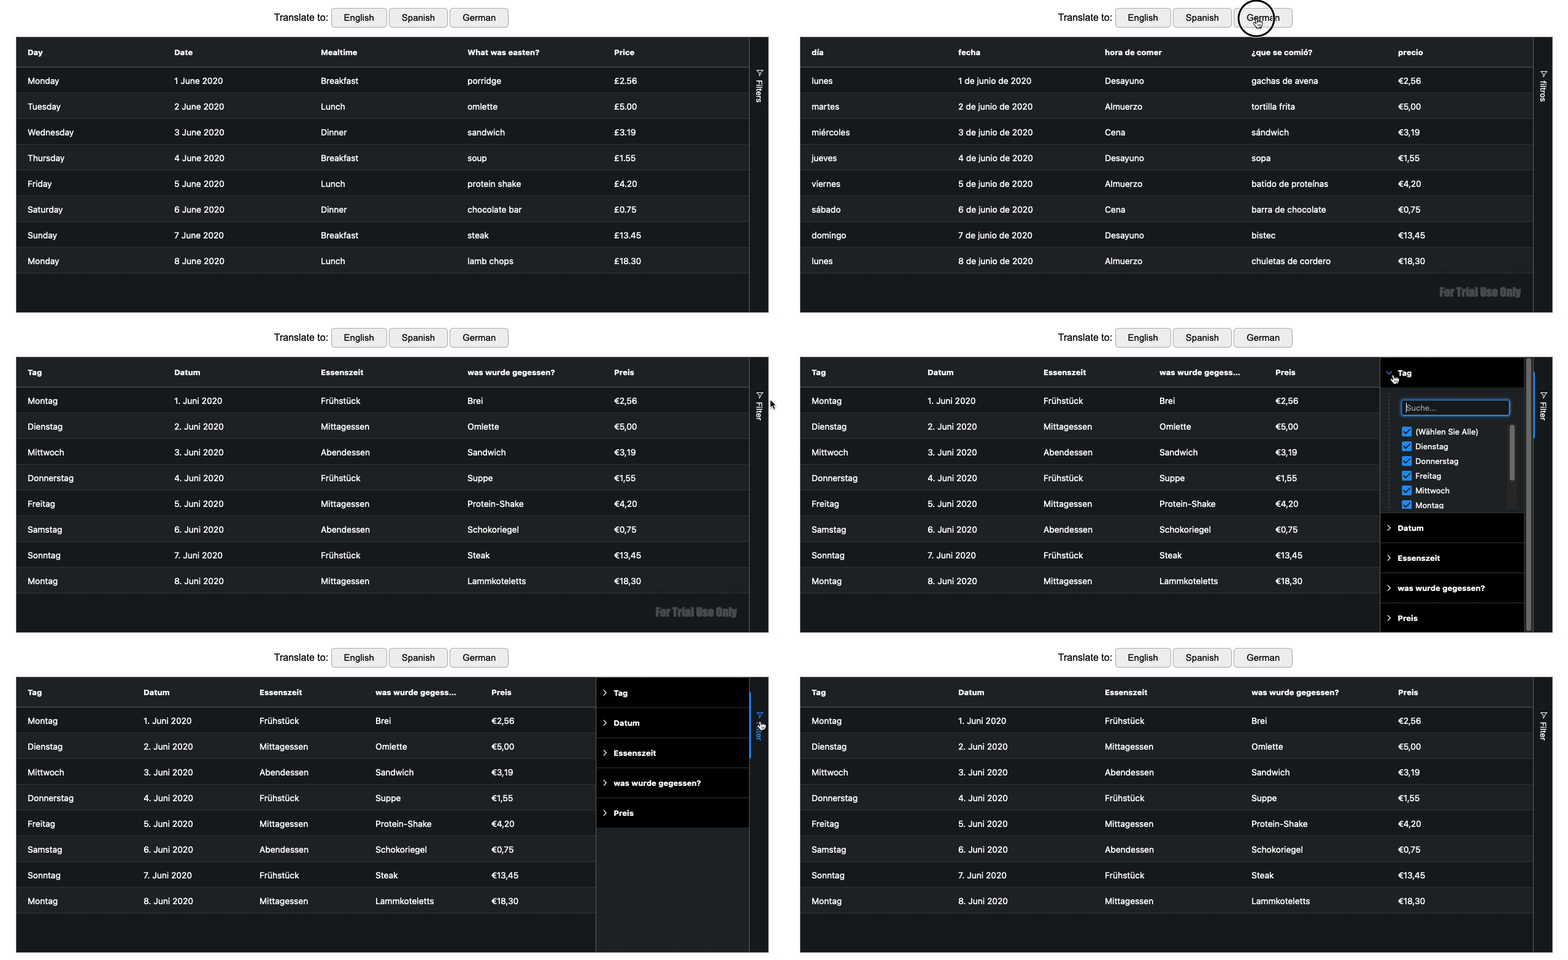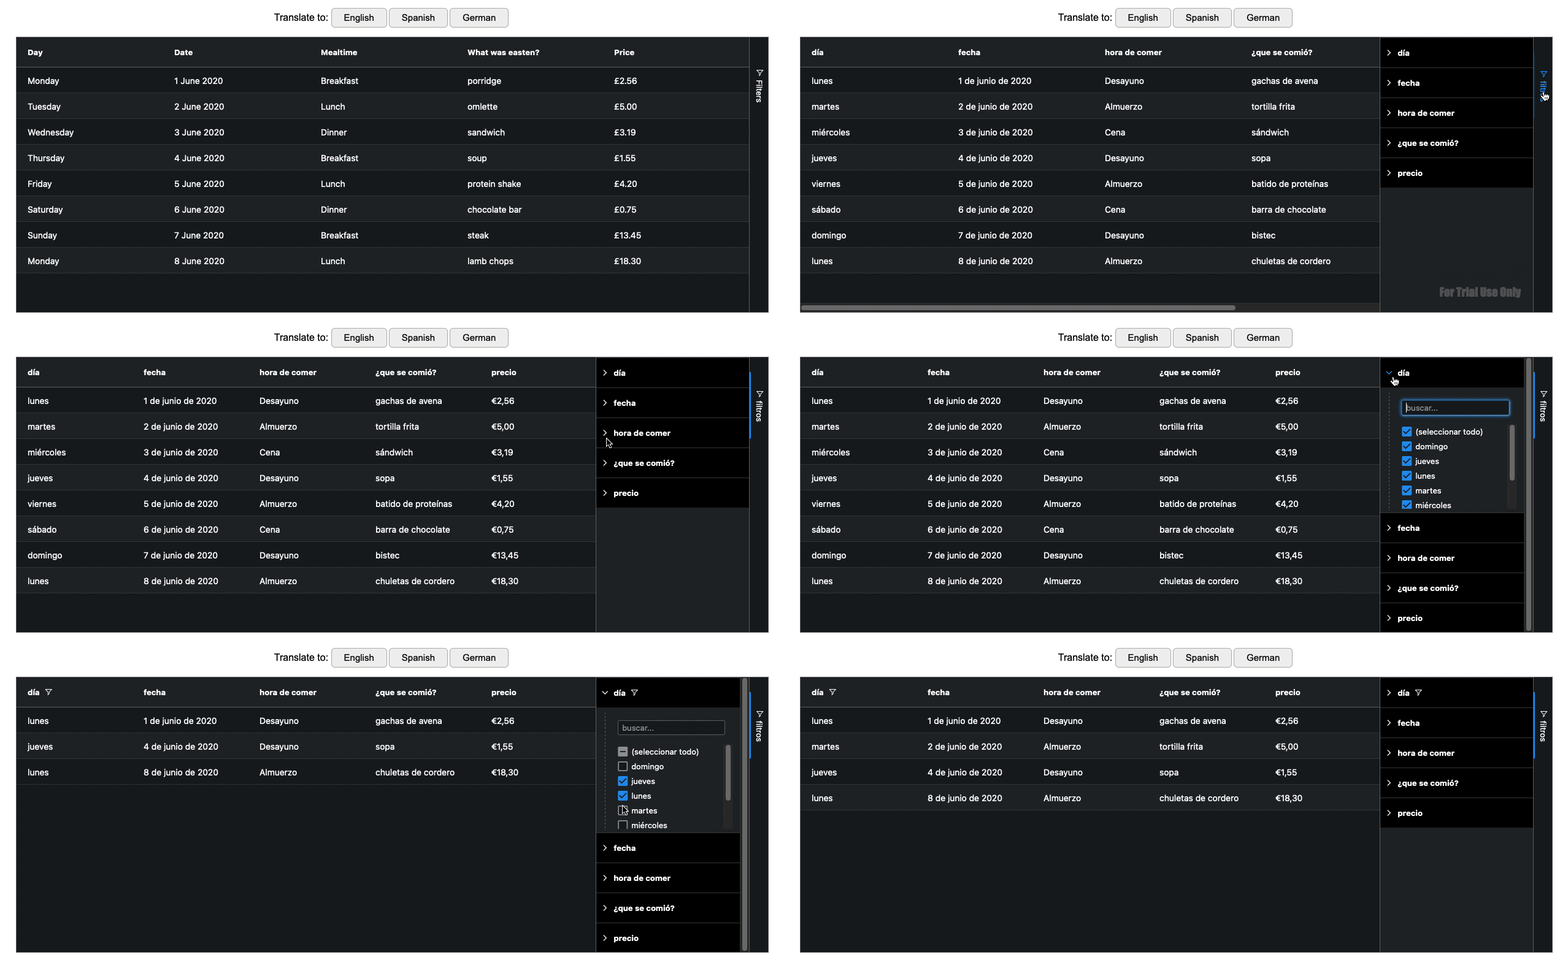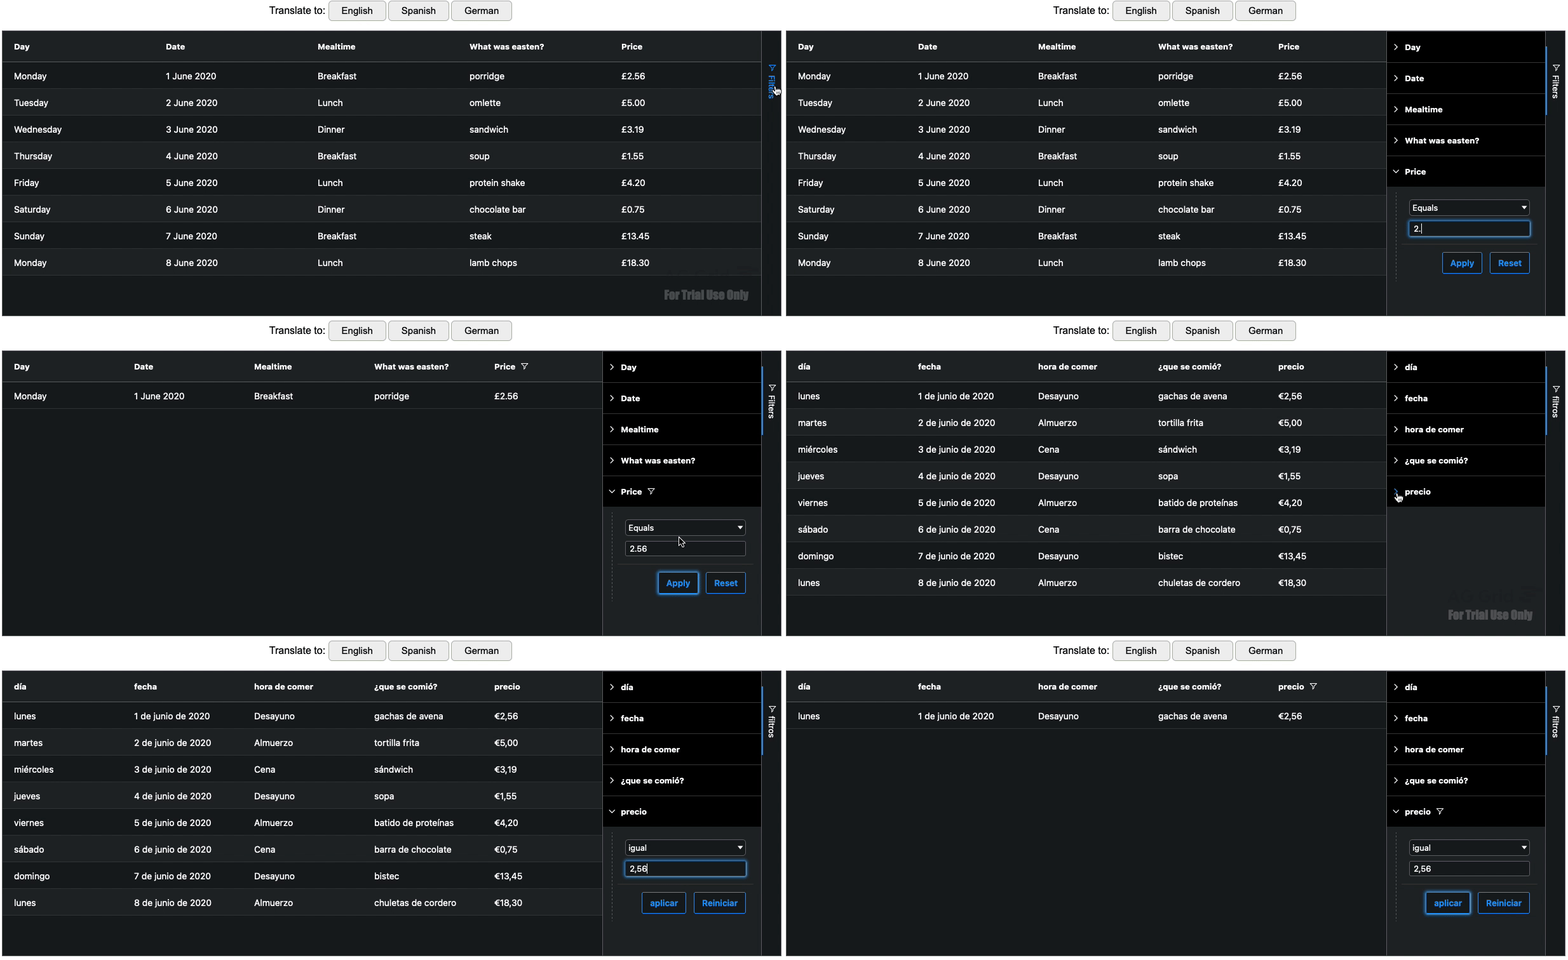
For as long as global communication exists, software localisation will be a non-trivial problem. Although there is software out there that can automatically translate signs and menus in live augmented reality, some things are just too important to leave to Google’s best approximations. Sometimes as programmers we have to get our hands dirty and hard-code the translations ourselves, because getting an omelette when you wanted lamb-chops is annoying but mistranslating mission-critical data is...potentially dangerous and could get you fired!
In this blog I’ll be showing how to switch the localization language on the fly in AG Grid to easily support users for different cultures. We will translate not only the grid UI strings, but also the grid column names and cell values for a fully-localized experience.
I've illustrated this approach in a live sample with React and TypeScript, but the approach is applicable to all frameworks. See this in action below:

Contents
- Translation Approach in a Nutshell
- Providing the Translations
- Providing Columns
- The Columns Factory
- The getColumnDefs() Method
- The translateColumnFactory() Method
- The columnFactory() method
- valueGetters() vs valueFormatters() - The Language State
- Summary
See the live React sample here:
Translation Approach in a Nutshell
Let's start with an example to illustrate the core concept here. Let's say that two rows in the grid are represented by the following code:
const rowData = [{food: "PORRIDGE"}, {food: "EGGS"}];As you can see, the values are in plain English — how much more plain can you get than porridge and eggs? Note that these values are in capitals - that’s because these strings will not be rendered; their purpose is to be used as a keys to return translated values from a data-structure containing value translations. This allows only translated values to be rendered in the grid.
Here's the data structure we're using to store translated values into different languages:
const TRANSLATIONS = {
	'en-GB': { PORRIDGE: 'porridge', EGGS: 'eggs'},
	'es-ES': { PORRIDGE: 'gachas de avena', EGGS: 'huevos'}
	};
This data structure is a set of dictionaries with a language key and a word key for each language. The inner key values correspond to the data values of the row. With this structure, all we have to do to render the translated value is to create a function that given a language key and a word key, returns its translation as shown below:
function translate(language, key){
  return TRANSLATIONS[language][key];
}
e.g: translate('en-GB','PORRIDGE') will return: 'porridge'
Now you know the basics, let's dive into the detail. In this blog I'll be using React + Typescript but don't worry if you're using another framework, the concepts and principles are almost identical across the board!
Providing the Translations
Let’s start with localising the user-interface of the grid. You can easily localise all of the messages that AG Grid uses as illustrated in our documentation.
As described in the documentation above, the file storing these translations is a list of key-value pairs: for instance, if the grid needs a translation for "(Select All)", it looks into the localisation object for the "(Select All)" key and uses the corresponding value.
As this translation file is an object, we'll extend it to support multiple languages - indexing by language first, then by value to get the localised value. In TypeScript, this data structure is declared like this:
type TranslationsType = Record<string, Record<string, string>>;
A Record of Records: the outer for the language language, the inner for translations.
Here's an example with multiple languages and translated values:
const TRANSLATIONS: TranslationsType = {
  "en-GB": {...},
  "es-ES": {...},
  "de-DE": {
    ...
    PORRIDGE: "Brei",
    OMLETTE: "Omlette",
    SANDWICH: "Sandwich",
    SOUP: "Suppe",
    PROTEINSHAKE: "Protein-Shake",
    CHOCOLATEBAR: "Schokoriegel",
    SAUSAGES: "Würstchen",
    STEAK: "Steak",
    LAMBCHOPS: "Lammkoteletts",
    ...
    // Start of ag-Grid locale translations
    selectAll: "(Wählen Sie Alle)",
    searchOoo: "Suche...",
    blanks: "(Leerzeichen)",
    noMatches: "Keine Treffer",
    ...
  }
Note: I'm using "..." to denote code that has been omitted for brevity.
To separate AG-Grid keys from the ones used in the application, I have capitalised all non-AG Grid keys.
The Translations File
While it's possible to keep all this in our main Grid.tsx file, because it’s only going to be a reference-object, it’s better to create a separate Translations.tsx file where we keep all our reference/translation-related stuff. This way, we can maintain the separation of concerns and prevent our other files from getting needlessly bloated and import only what we need from Translations.tsx.
We’ll be adding more to this file later.
Binding the Translations
Now that we’ve set up the translations file, now let's look into how we can use it.
For the sake of everyone's sanity – mostly mine – I'm going to ask you to keep three things in mind which will be explained later on. For now, you just need to accept them:
- Each time the language is changed, the grid is destroyed and recreated.
- Each time the grid is created columns are dynamically created via a
getColumnDefs()factory method in Columns.tsx - The language argument is passed down from the App -> Grid -> getColumnDefs.
I'll be going through these later.
The first thing we need to tackle is translating the grid and its UI, things like labels and filter options, the stuff you see in the side bar. It's one thing translating 'lamb chops' into 'Lammkotletts', but unless the user knows the name of the column is 'was wurde gegessen?' and that they can filter for 'Preis' (price), then they're not really able to use the grid.
We can solve this issue accordingly:
      <AgGridReact
        localeText={TRANSLATIONS[props.language]}
        ...
        />
Providing our grid with all it needs to translate its UI.
This way each time AG Grid is loaded, it gets the object holding all the localisation values required by a user in the current language.

And that's it! Translating AG Grid's UI couldn't be easier.
Next let's tackle our rowData. In the linked CodeSandbox in the Columns.tsx file, see the translate function:
const translate = (key: string, language: string): string => {
  return TRANSLATIONS[language][key];
};
Haven't I seen you before somewhere?
Now, I'm guessing you'll be thinking one of three things:
- "Oh! This is almost the same code as the snippet from the beginning."
- "Ew! Code duplication!"
- "This is essentailly just a template for querying the
TRANSLATIONSobject."
And you'd be right on all three, but the important one here is point 3. This little function will be doing most of the heavy lifting from here on: If the rowData value is translated in the TRANSLATIONS object, we'll get the translated value via this little beauty.
There are additional value types that aren't translated via the TRANSLATIONS /translate() route, such as date and price values.
Date Translations
The JavaScript Date object API includes the toLocaleDateString() method which allows to translate a JavaScript date object in any format into any language!
Since our grid will be using the same date object for both the Day & Date columns, all we need to do to extract the relevant data for each column is provide it with the correct arguments. Let's declare these in our Translations.tsx file as such:
const DAY_OPTION: { weekday: string } = { weekday: "long" };

const DATE_OPTION: { year: string; month: string; day: string } = {
  year: "numeric",
  month: "long",
  day: "numeric"
};
No prizes for guessing what belongs to which column!
Now these options can be exported and provided – along with language – to the following function:
const translateDateTime = (
  date: Date,
  language: string,
  options: {}
): string => {
  return date.toLocaleDateString(language, options);
};
Can return 'Tuersday' OR '2 June 2020'.
Price Translations
For the purposes of this blog, I won't be doing price conversions however, I would like the grid to prepend my prices with the correct currency symbol depending on the country and language – let's just assume Apple started selling food and that's why the numbers don't change across regions.
Luckily since my chosen Regions are the UK, Germany and Spain, I only need to worry about whether the language is "en-GB". The rest can be handled by JavaScript:
const translatePrice = (value: number, language: string): string => {
  let currency = language === "en-GB" ? "GBP" : "EUR";
  return value.toLocaleString(language, {
    minimumFractionDigits: 2,
    style: "currency",
    currency: currency
  });
};
If in the UK; use "£" & "." – easy
As you can see, it couldn't be simpler, and if you wanted to apply conversions, you could do it here as well. For more about this method of translating decimal numbers and currencies please check out the Number.prototype.toLocaleString() documentation.
Providing Columns
Now let's take a look at our grid's columns and how they're set up. As stated before, we generated the grid column each time the grid is loaded. This method allows us to take the language as an parameter and ensure we're rendering the correct values.
The Columns File
Just as we did with all the translations, we're going to create a separate Columns.tsx file for column-related methods. The purpose this is to provide our grid with a single columnDefs object and keep our grid-code simple:
 <AgGridReact
        ...
        columnDefs={getColumnDefs(props.language)}
        ...
        />
This should do the trick.
The Columns Factory
Let's now look at providing the AG Grid column definitions with the correct localized column header values. To avoid repetitive code in the column definitions, we will use a factory method and call it multiple times with different arguments to generate column definitions. Let's now look into how to implement this.
The getColumnDefs() Method
This method will be our entry point to the column generation factory from our grid. As shown above, it takes one argument: language, and it churns out columns. Before we go any further, let's quickly run through our required columns:
- A Day column representing the days of the week
- A Date column with dd-Month-YYYY formatting e.g: 2 May 2022
- A Mealtime column telling us whether a meal was for Breakfast, Lunch or Dinner
- A What was eaten column which will show the food names
- A Price column which shows the price with either a £ or € depending on language/country
Each column will also have its own filtering functionality accessible via the sidebar.
Since the columns will never change, we can hard-code them into our getColumnDefs() function. This function calls the translateColumnFactory() method five times – once for each column from the list above.
The translateColumnFactory() Method
This function may at first look superfluous as most of the column generation actually happens in columnFactory(). However, what's crucial is the Object.assign() near the end which enables us to declare filterParams only for the columns that need it, as shown below:
const translateColumnFactory = (
  colId: string,
  field: string,
  filterType: string,
  language: string,
  valueFormatter?: WithValueFormatter,
  valueGetter?: WithValueGetter,
  other?: object
) => {
  let column = columnFactory(
    colId,
    field,
    filterType,
    language,
    valueFormatter,
    valueGetter
  );

  Object.assign(column, other);
  return column;
};
The columnFactory() method
This is where the majority of each column's definitions are generated. This is where user-facing headerNames are translated into the correct language.
const columnFactory = (
  colId: string,
  field: string,
  filterType: string,
  language: string,
  valueFormatterFn?: WithValueFormatter,
  valueGetterFn?: WithValueGetter
) => {
  return {
    colId,
    field,
    headerName: translate(colId.toUpperCase(), language),
    filter: filterType,
    ...(valueFormatterFn == null
      ? undefined
      : { valueFormatter: valueFormatterFn.valueFormatterFn(language) }),
    ...(valueGetterFn == null
      ? undefined
      : { valueGetter: valueGetterFn.valueGetterFn(language) })
  };
};
AG Grid valueFormatter or valueGetter can only take one argument at runtime – to understand more about this check out documentation on valueFormatters and valueGetters. This means that there is no way to provide these functions with language as an argument, all they get is a params object via the grid.
This is why in the functions return, depending on whether the column requires a valueGetter or valueFormatter, we use currying to prepare the required function with the language pre-declared.
That's why you're seeing valueGetterFn() & valueFormatterFn() - these are the preparation steps. This becomes a clearer when we look at their interfaces, for example the withValueGetter interface as shown below:
interface WithValueGetter {
  valueGetterFn(language: string): (params: ValueGetterParams) => string;
}
`valueGetterFn()` takes a language, the params come later.
Now let's look at the valueGetter code in detail:
const TEXT_VALUEGETTER: WithValueGetter = {
  valueGetterFn: (language) => (params) => {
    let field = params.column.getColDef().field as string;
    return translate(params.data[field], language);
  }
};
Here, we can see a function within another function. The purpose of the first function is to pre-populate the inner – actual AG Grid valueFormatter function – with a language. Just as before, we do this by currying - reducing the arity of a JavaScript function.
Once the current language value is passed down to the getter, we invoke the translate() method which gives us the localized value for the string.
And that's almost it! Now you should have a pretty good idea of how the row data and the grid's UI are translated. Let's now see how our grid and all these functions get their language.
valueGetters() vs valueFormatters()
You'll notice that the grid uses both valueGetters for every column except price. You can see why by looking at the other? arguments of each column. Notice how the price column has a filterParams with a numberParser and allowedCharPattern?
  translateColumnFactory(
    "price",
    "price",
    "agNumberColumnFilter",
    language,
    PRICE_VALUEFORMATTER,
    undefined,
    {
      filterParams: {
        filterOptions: ["equals", "lessThan", "greaterThan"],
        buttons: ["apply", "reset"],
        suppressAndOrCondition: true,
        allowedCharPattern: "\\d\\,\\.",
        numberParser: (value?: string) => {
          if (value == null) {
            return null;
          }
          let filterVal = value.replace(",", ".");
          return Number(filterVal);
        }
      }
    }
  )
The reason for this is actually to do with the filter; when using a valueGetter, filter inputs are directly compared with the getter's outputs. However, where formatters are used, another step needs to occur to prepare the filter input for comparison. Above we can see how when the European-style "," is used, it is translated into the English style "." for comparison. Thus, allowing us to filter for numbers with both styles of input.

The Language State
Our grid allows users to select their language via three buttons at the top of the page. Each time a user presses one of these buttons, the grid is destroyed and recreated in the clicked language.
The first step to achieving is creating a stateful space for the language variable to be held. Since we're using React, we use the useState hook:
const [language, setLanguage] = useState<string>(LANGUAGE_OPTIONS.EN);Defaulting to English.
This way, we can easily change the language as shown below:
 <span style={buttonSpanStyles}>
        <label style={{ fontFamily: "Arial" }}>Translate to: </label>
        <button
          style={buttonStyles}
          onClick={() => setLanguage(LANGUAGE_OPTIONS.EN)}
        >
          English
        </button>
        <button
          style={buttonStyles}
          onClick={() => setLanguage(LANGUAGE_OPTIONS.ES)}
        >
          Spanish
        </button>
Buttons clicks use setLanguage() to change the language.
We can then pass this value down to the grid just as easily like this:
<Grid language={language} />
Accessed in grid via props.language
Destroying & Recreating the Grid
So now the Grid has access to the language, and it passes that down to the column-factory each time it is loaded. The only thing left to do is program it to destroy itself and reload whenever a language is selected.
Luckily for us, React hooks come in very handy here. By using the useEffect hook, we can react to a change in language to destroy and reload the gird.
To do this, we'll track the destroyed state of the grid, and create a useEffect hook with props.language as a dependency. When the language changes, we want to destroy the grid. Immediately after, we want the grid to reappear.
  const [destroyed, setDestroyed] = useState(false);

  useEffect(() => {
    setDestroyed(true);
    setTimeout(() => setDestroyed(false));
  }, [props.language]);
Always make sure the loop closes itself – You don't want to crash your browser tab.
The key to applying this to our grid in the DOM is shown below:
  return destroyed ? null : (
    <div
      id="myGrid"
      style={{
        height: "450px",
        width: "95vw"
      }}
      className="ag-theme-alpine-dark"
    >
      <AgGridReact
      ...
      ...
Checking the `destroyed` state to render `null` or the grid.
And there it all is! Each time a language button is pressed, the change triggers the useEffect hook which causes the DOM to render `null` for a moment before rendering a new grid with the newly chosen language being passed to a column-factory to get the correctly translated data and UI.
Summary
I hope that you found this article useful! If you're using a different framework, don't worry - the core principles here are framework-agnostic and the logic is the same. You only need to make a few tweaks to make this work in your chosen Framework. For example, in Angular, you could use NgIf to destroy and recreate your grid.
The key here is the columns-factory and the translations file/object. Once you understand how these two work, you can be the master of your own translations!
If you would like to try out ag-Grid check out our getting started guides (JS / React / Angular / Vue)
Happy coding!
