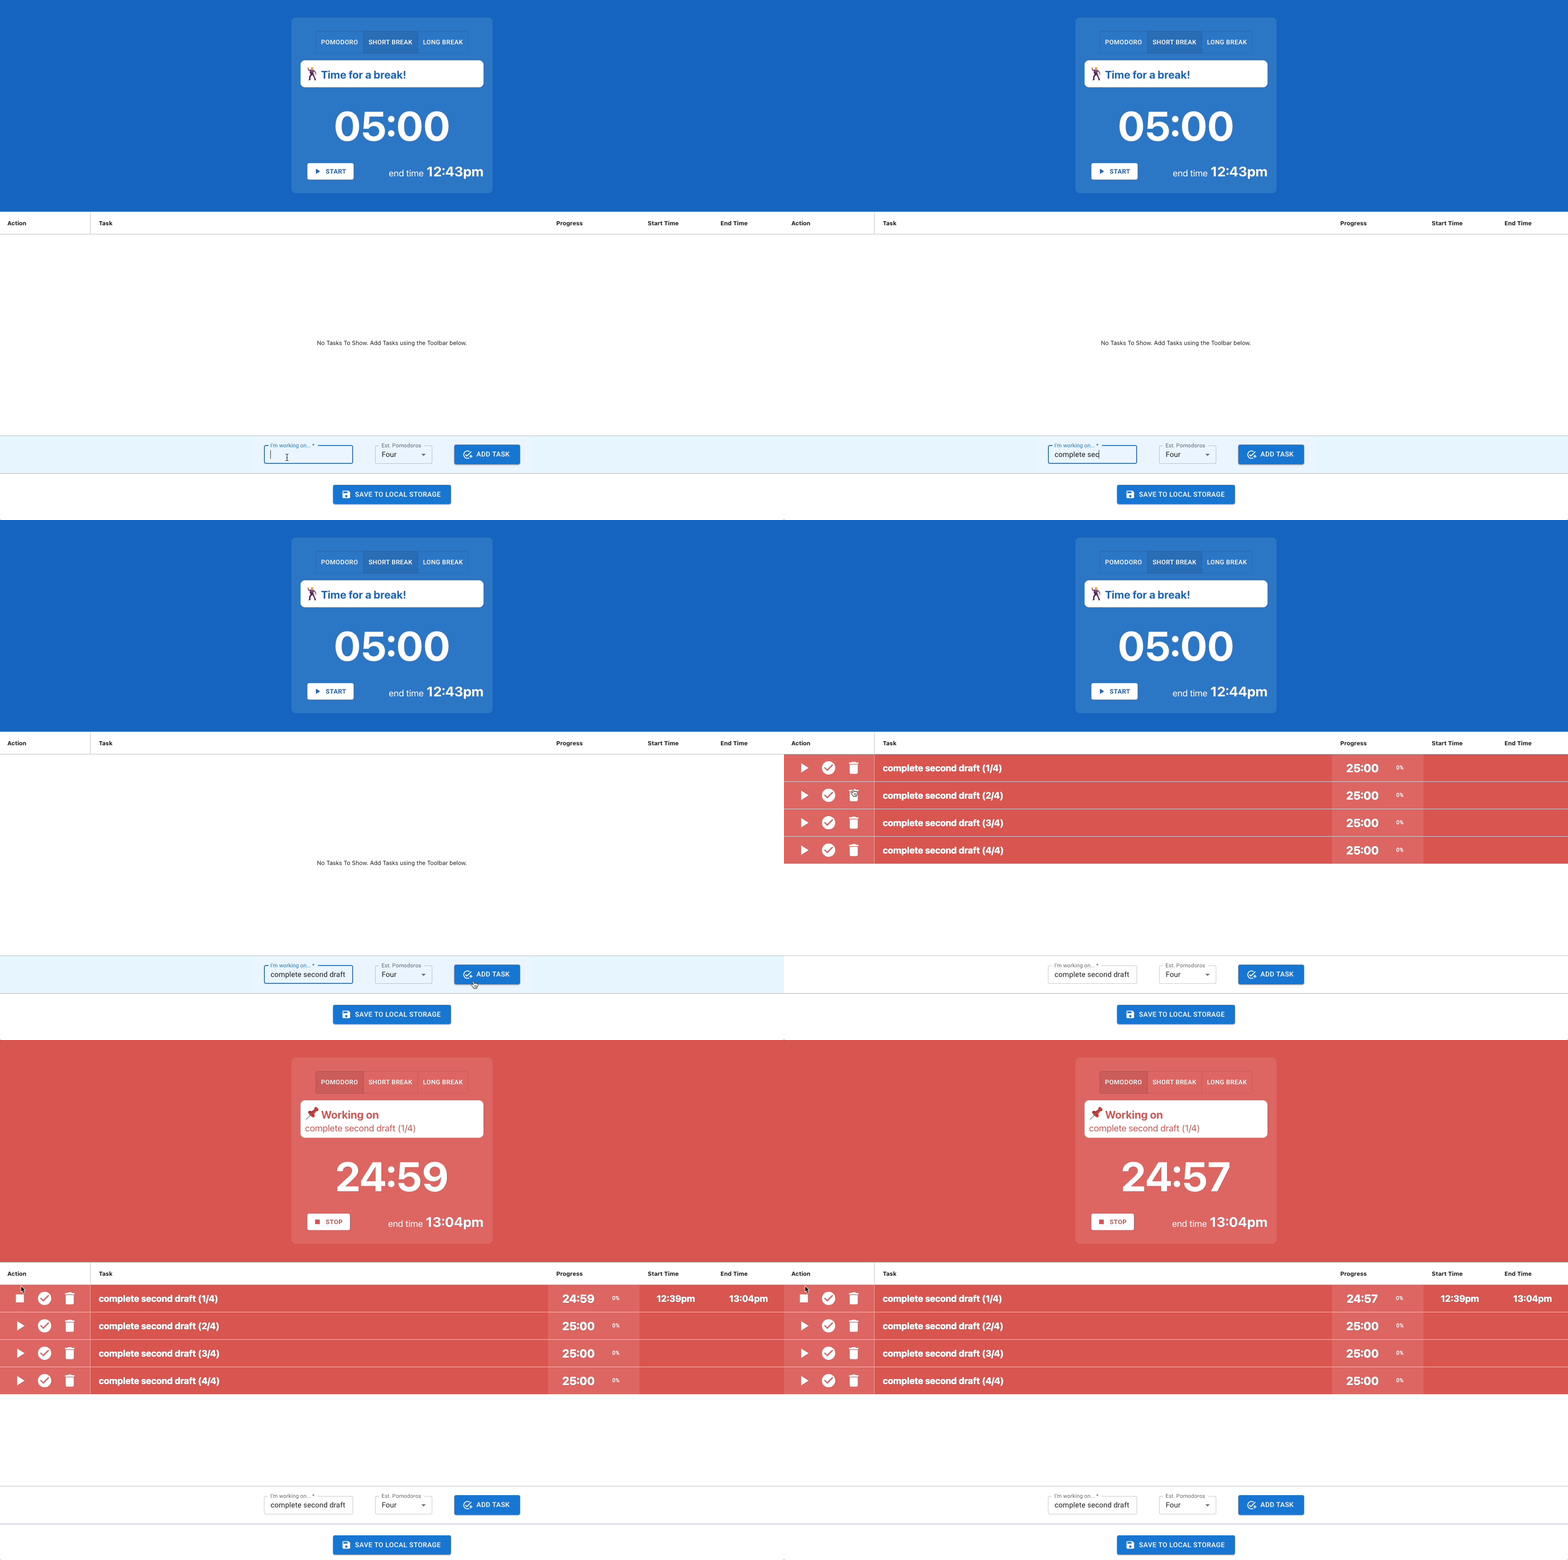
In this post we'll create a productivity app using React Hooks and AG Grid. We will cover the way React Hooks are used to build this application and with AG Grid specifically. You can see the finished Pomodoro App in action hosted here.
You can download the source code on Github and see how the application is built to better follow the discussion below.
What are React Hooks?
React Hooks are functions that are provided by React, which allow components to directly "hook into" React features (such as having as having a state variable, accessing a context) without writing a class for the purpose. React Hooks follow the naming convention of the use prefix.
The Pomodoro App uses the following React Hooks:
useState- allows adding a state variable to your component. In React, state is component-specific memory which the component "remembers" and is generally used to define the UI e.g. a counter state variable that can be incremented with a button on the pageuseEffect- allows performing side-effects in your component e.g. updating the Document title of the page when first rendereduseReducer- allows adding a reducer to your component. A reducer is essentially a state function/machine that contains all state update logicuseContext- allows reading and subscribing to context. Context is data that is available to any component in the tree below it, regardless of whether it's a direct child or notuseRef- allows referencing a value that's not needed for rendering e.g. grabbing a reference to a DOM Element, or storing the Grid API
To read about React Hooks in more depth, please visit the official React Docs and the React Docs (beta).
Source Code Overview
See below an overview of the codebase structure:
ag-grid-pomodoro
├── src
│   ├── components
│   │   ├── cell-renderers
│   │   │   ├── ActionCellRenderer.js
│   │   │   └── ProgressCellRenderer.js
│   │   ├── full-width-cell-renderers
│   │   │   └── AddTaskCellRenderer.js
│   │   ├── task-components
│   │   │   ├── TaskType.js
│   │   │   ├── TaskDetails.js
│   │   │   ├── TaskTimer.js
│   │   │   └── EndTime.js
│   │   ├── MainTask.js
│   │   ├── PomodoroGrid.js
│   │   └── SaveButton.js
│   ├── context
│   │   └── PomodoroContext.js
│   ├── reducers
│   │   └── reducers.js
│   ├── utils
│   │   ├── useTimer.js
│   │   └── date.js
│   ├── App.css
│   ├── App.js
│   └── index.js
├── README.md
└── package.json
The application code is in the /src/ directory. Here are the key files containing important components of the application:
src/index.jsrenders theAppcomponent in therootelement created bycreate-react-app.src/App.jsrendersMainTaskComponent,GridandSaveButtonwhich are all wrapped insidePomodoroProvidersrc/context/PomodoroContext.jscontainsPomodoroContextandPomodoroProviderwhich work together to provide a React Context across the entire application.src/components/MainTask.jscontains theMainTaskwhich displays the timer and its controls above thePomodoroGridcomponent. This component is further broken down into three separate components found insrc/components/task-componentssrc/components/PomodoroGrid.jscontains AG Grid component. Custom Cell Renderers used on the columns can be found insrc/components/cell-renderersandsrc/components/full-width-cell-renderers.src/SaveButton.jscontains theSaveButtonwhich is a button that calls the Grid API to save the current state of the grid to local storage.src/utils/useTimer.jsis a Custom Hook to create the timer.
App Overview
Let's now look into how the app works. See below a visual overview of the app UI, showing the three components (MainTask, PomodoroGrid and SaveButton) that it consists of:
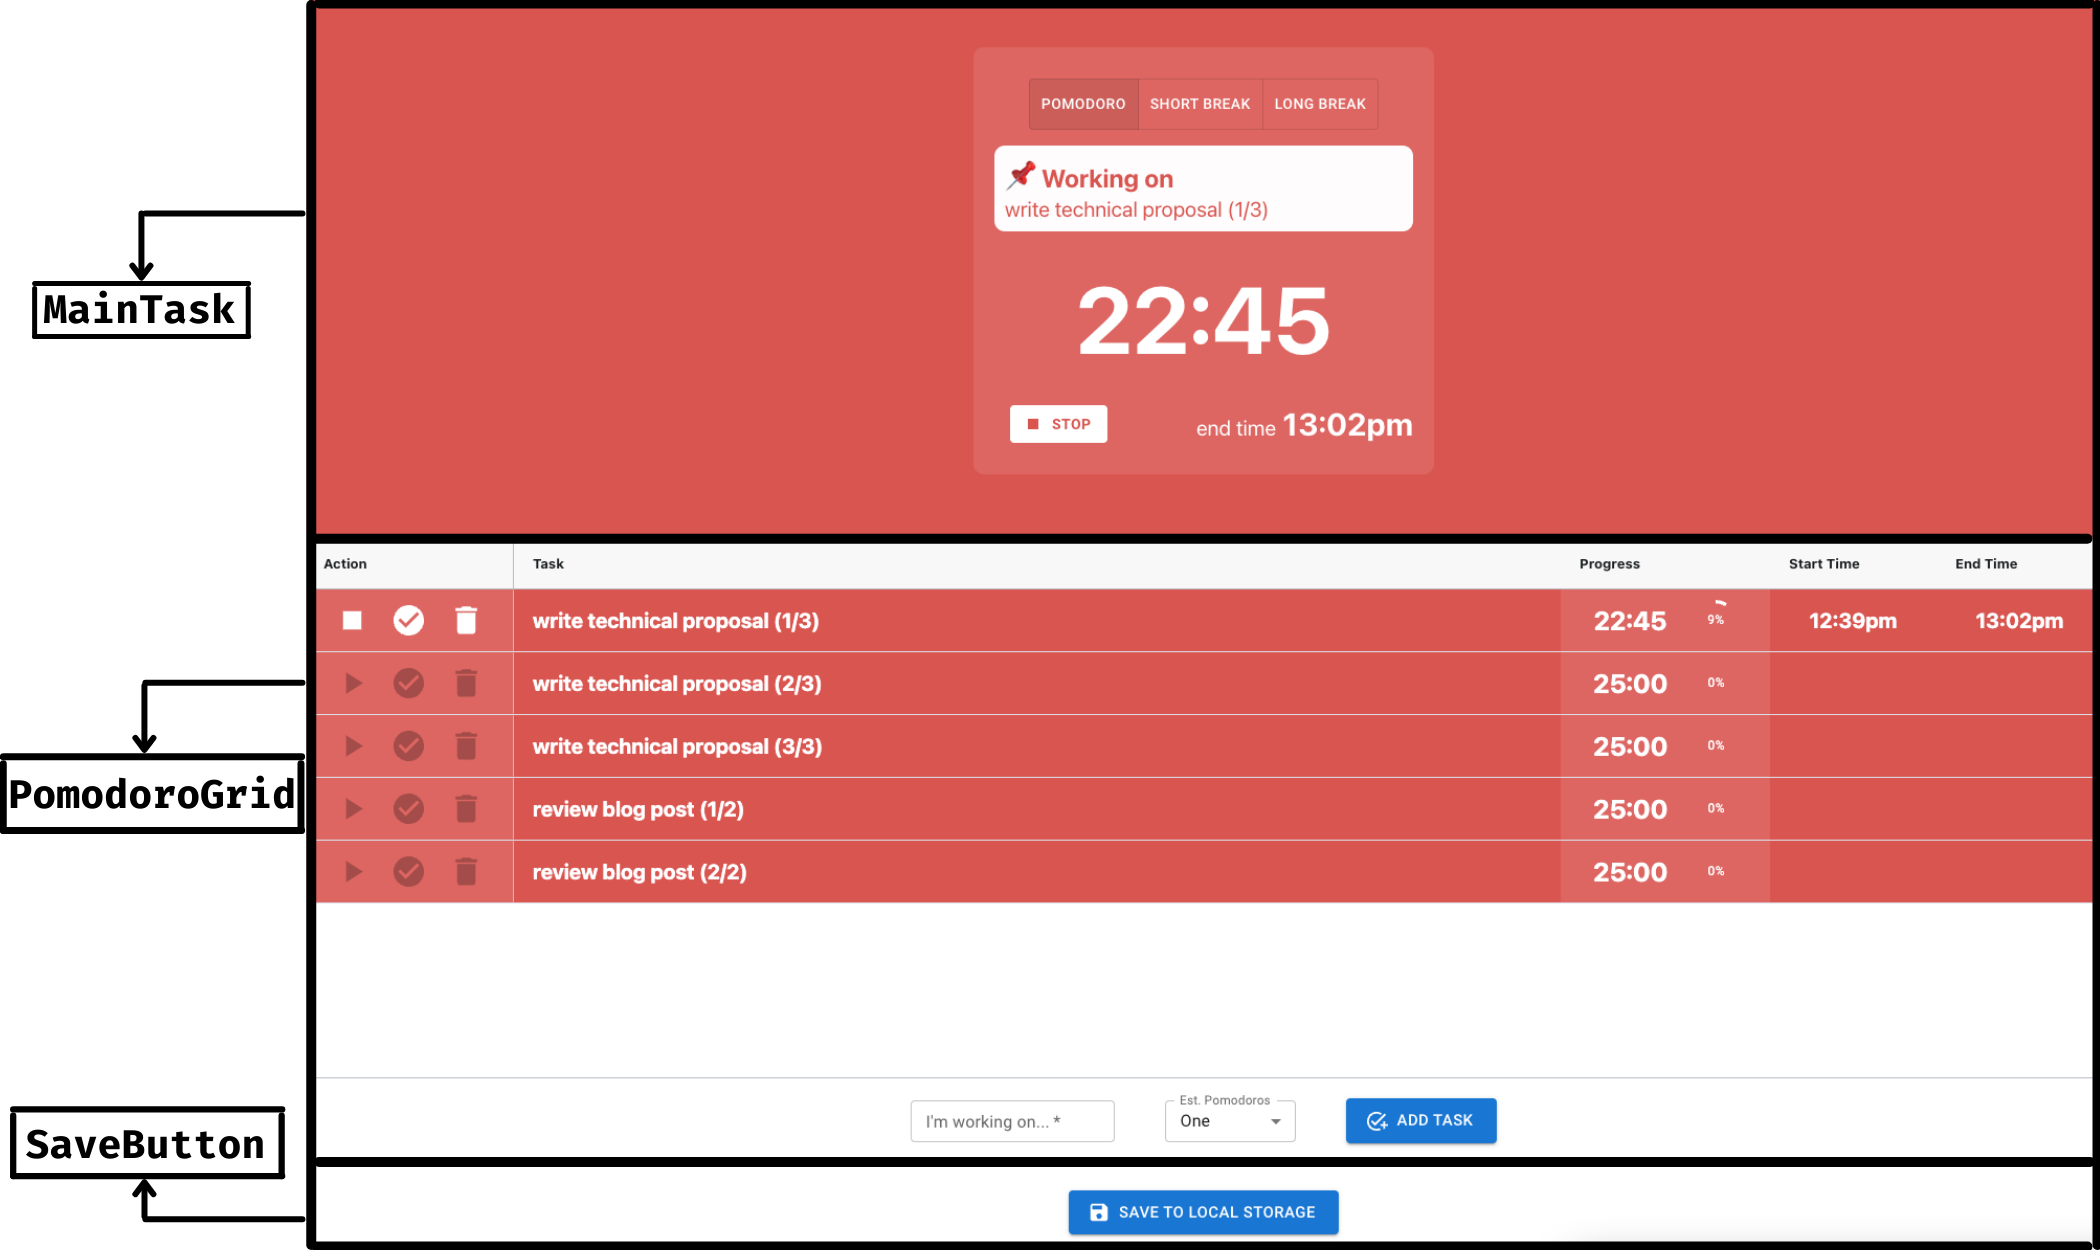
The app component is defined as shown below:
const App = () => {
  // [...]

  return (
    <>
      <PomodoroProvider>
        <MainTask />
        <PomodoroGrid />
        <SaveButton />
      </PomodoroProvider>
    </>
  );
}
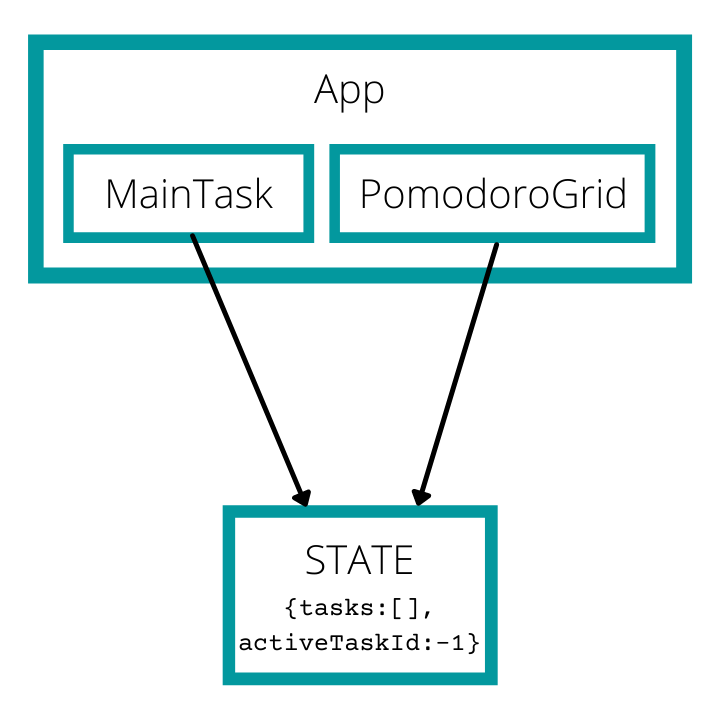
The application state is stored outside of App and is shared between its components MainTask and PomodoroGrid.
The state variable is an object which stores an array of tasks and the activeTaskId to store the ID of the task which is currently active i.e. the timer has been started for that task. See the state variable declaration below:
const state = {
    tasks: [],
    activeTaskId: -1
}
Here's a diagram showing how this works - note that that MainTask and PomodoroGrid have access to a shared state variable which they both can read and update. The implementation of the state and how App interacts with it is covered later in the section Managing State using useContext and useReducer.
MainTask component
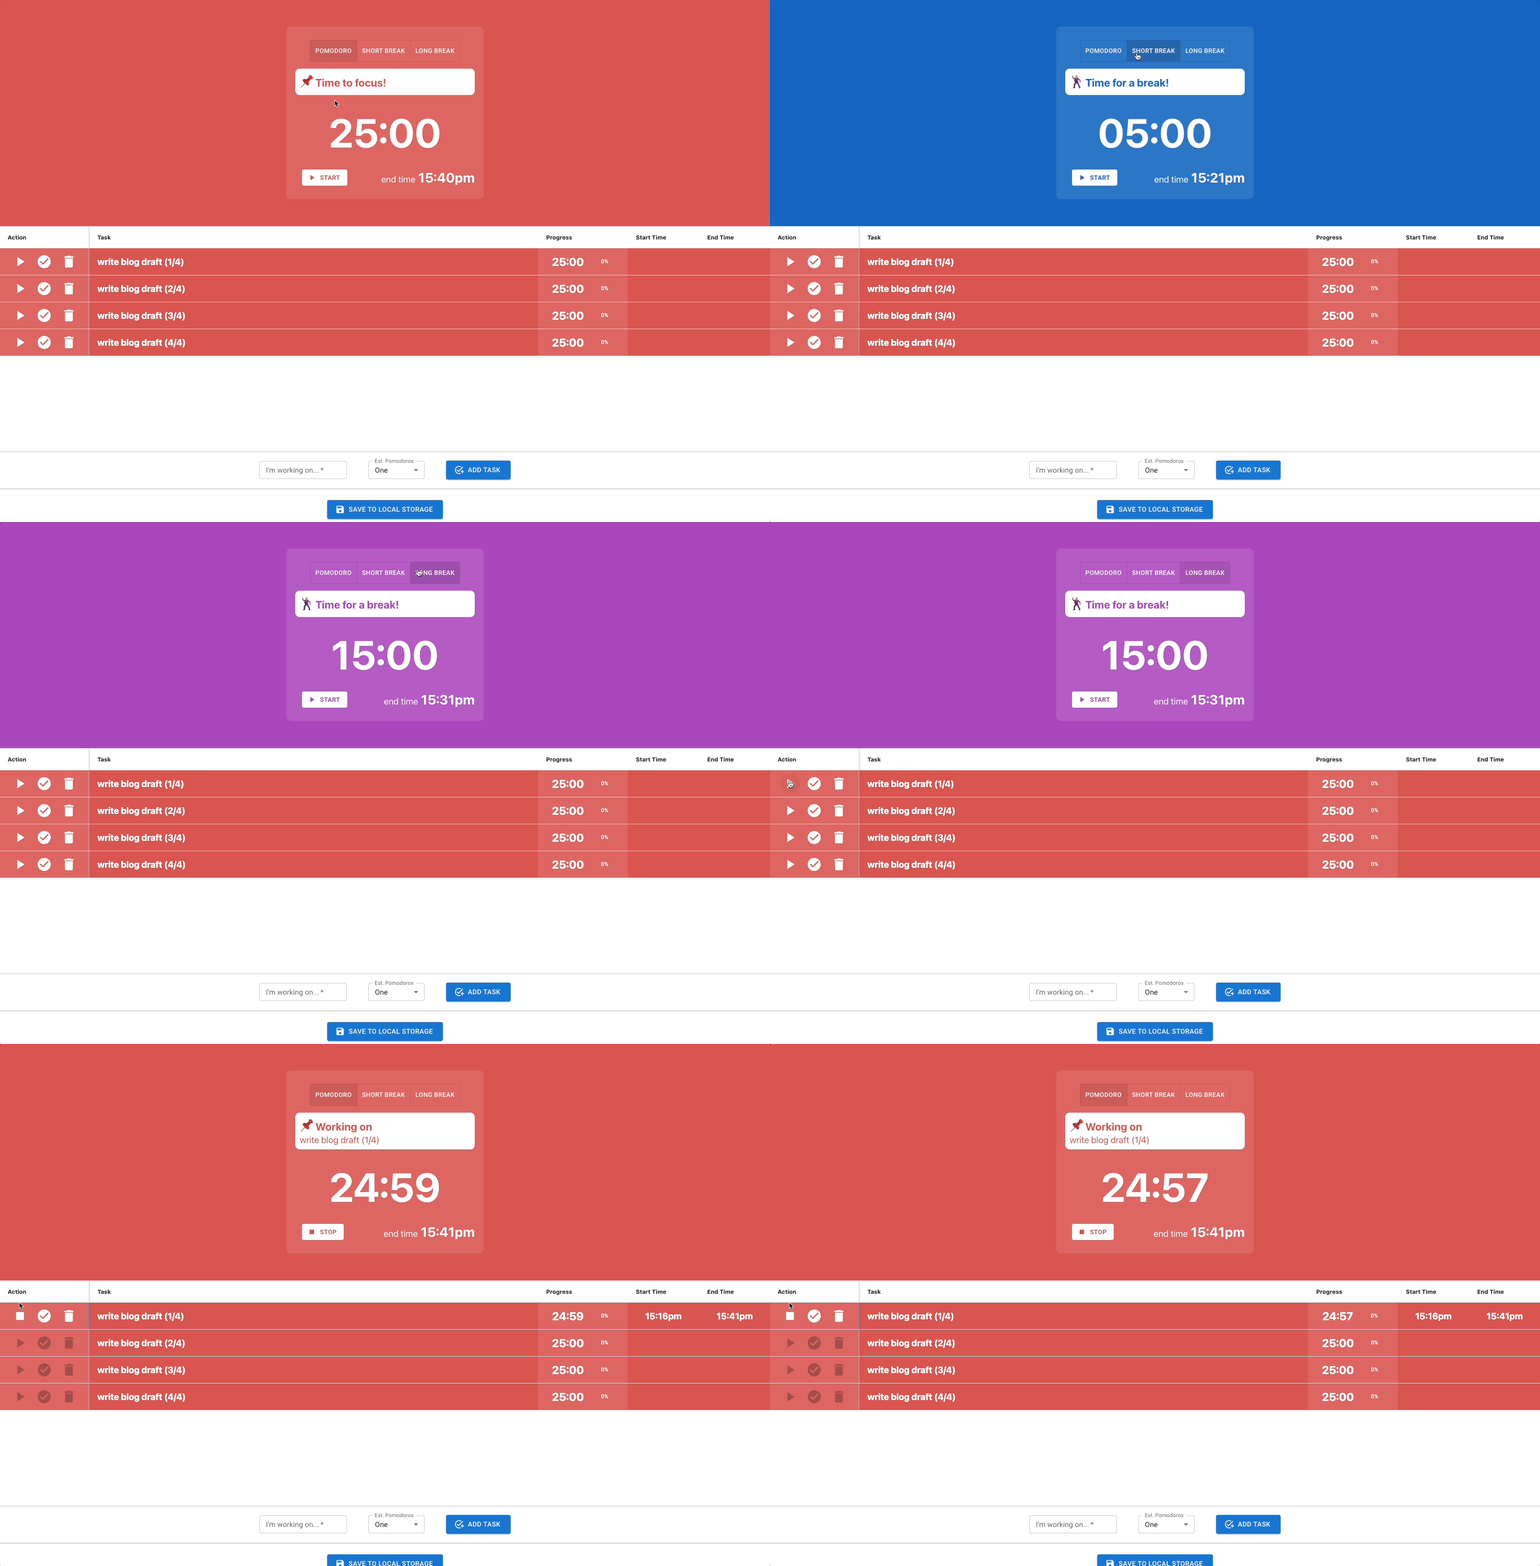
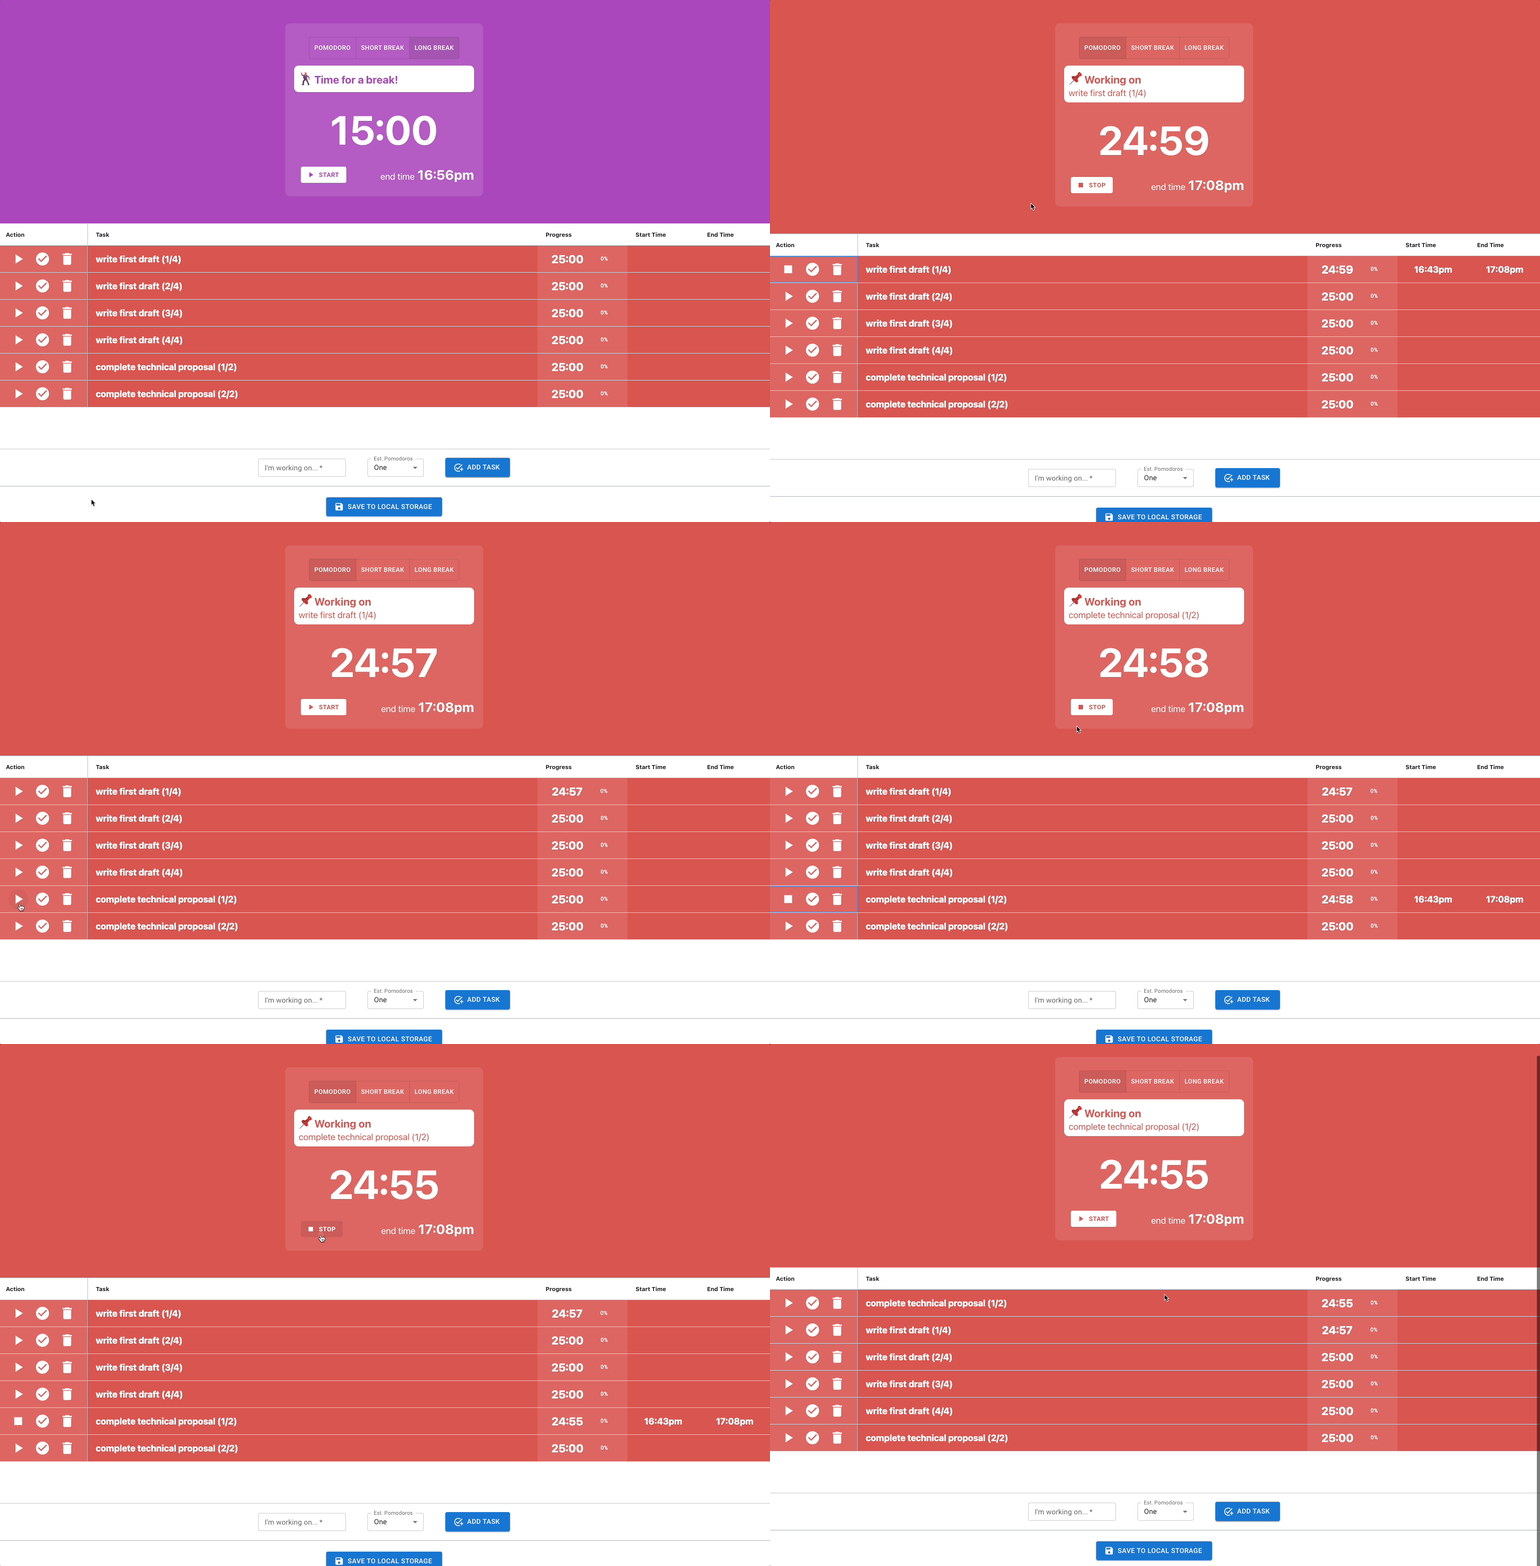
This component displays a group of buttons to toggle between the different task types: pomodoro, short break or long break. The component also shows a timer with a button to toggle the timer. MainTask can read from the shared state, where the tasks are stored, so that if a task from PomodoroGrid is selected, the timer progress and task details of that task will be shown inside the MainTask component.
You can see this demonstrated in the GIF below. Notice how after clicking the start button on the task "write blog draft" in the grid below, the task name is displayed inside the MainTask component above and the timer starts ticking:
MainTaskPomodoroGrid component
PomodoroGrid renders an AG Grid element with each row inside the grid representing a task. Similar to MainTask, the grid component can read and update the shared state where tasks are stored, which is defined outside of the PomodoroGrid component.
Each grid row has three buttons - (1) to toggle the timer, (2) to mark the task as completed and (3) to delete the task. These buttons are shown in the Action grid column.
The name of the task is shown in the Task column.
The row also displays a timer in the Progress column whose cells are rendered using ProgressCellRenderer.
At the bottom of the grid, there is a pinned row which is used to add tasks. When a task is added, the application state (which stores all tasks) is updated with the new task, which then re-renders the grid, showing the newly added task.
See this in action below:
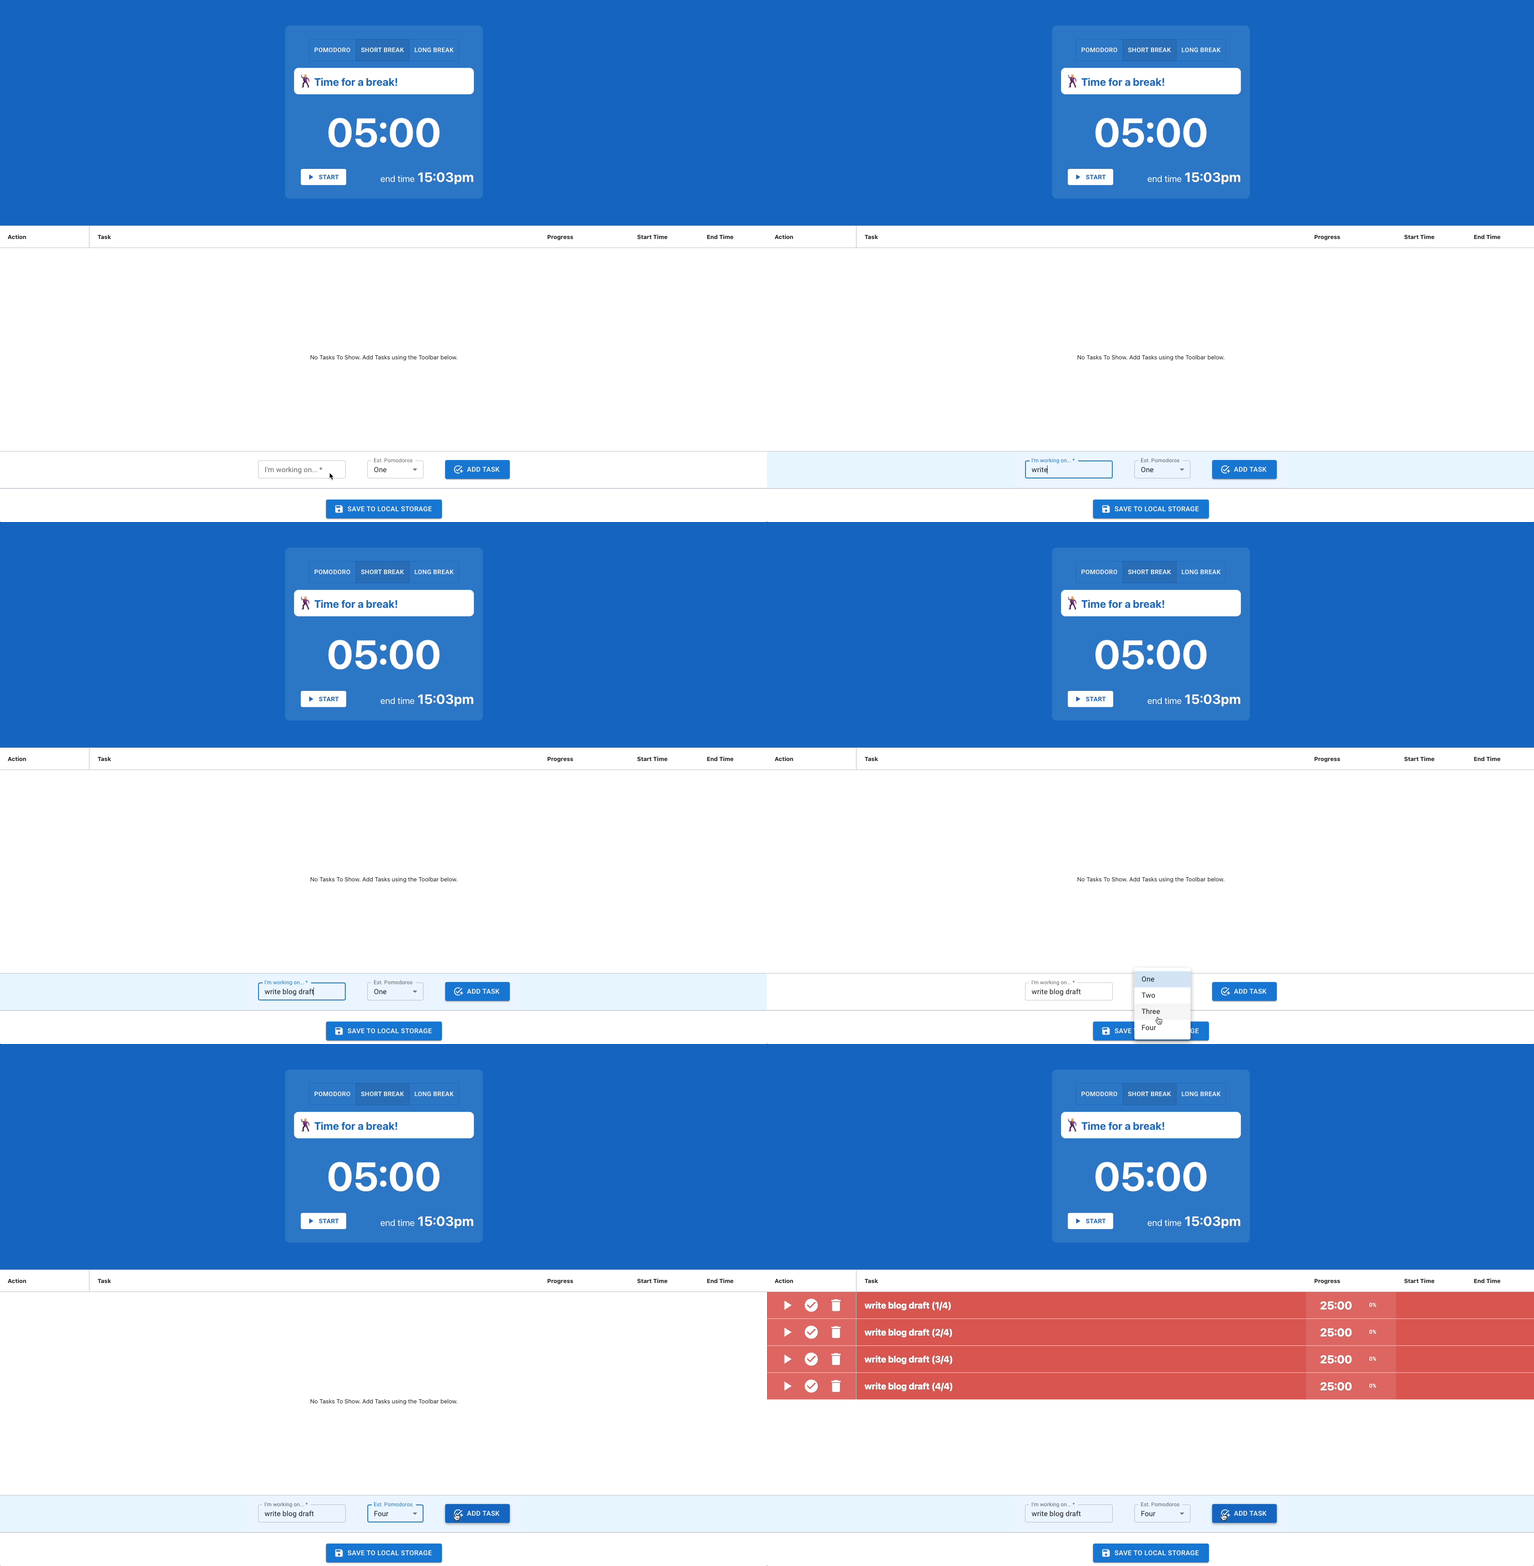
The implementation of this is further explained in the next section.
Managing State using useContext and useReducer
As mentioned in previous sections, we are managing the state outside of PomodoroGrid and MainTask so that both of these components can share the same data and update it when an action has been performed.
The diagram below shows an overview of how the state is shared and updated.
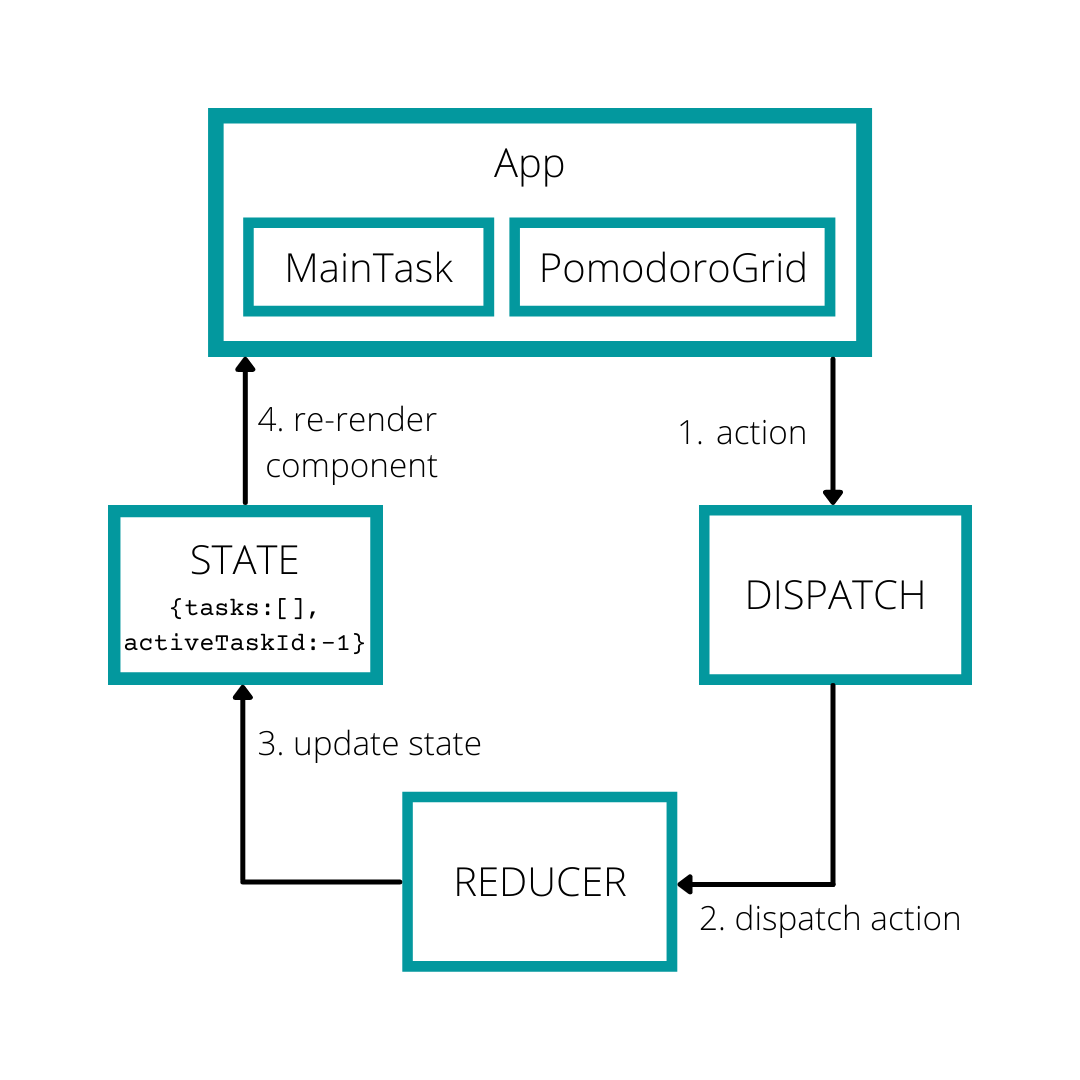
The following actions will update the state:
- Adding a Task
- Completing a Task
- Toggling the Task Timer
- Deleting a Task
To update the state based on these actions, we are using the useReducer hook as described below.
Reducer
The React useReducer hook lets you update the current state by dispatching actions.
Reducers are pure functions which receive the current application state along with the action to be performed on that state to produce some new state. Essentially, you can think of reducers as a state machine that has some initial state and updates the state based on the action.
Here's an example of how you would define this:
const initialState = {
    tasks: [],
    activeTaskId: -1
};

const reducer = (state = {}, action) => {
    switch (action.type) {
        case 'added_task':
            return {
                ...state,
                tasks: [...state.tasks, {
                    id: action.id,
                    task: action.task,
                    taskNo: action.taskNo,
                    taskCount: action.taskCount,
                }]
            }
        // ...
        default:
            return state;
    }
}

function MyComponent() {
    const [state, dispatch] = useReducer(reducer, initialState);
}
As you can see, the useReducer hook returns a tuple of the current state and the dispatch method, which is used to update the state.
Actions
Actions describe the operation the reducer should perform on the state. For example an action to add a new task might look like this:
const addTask = {
    type: 'added_task',
    id: generateId(),
    task: 'pick up groceries',
    taskNo: 1,
    taskCount: 1
 };
Using the dispatch method we send the action to the reducer which will transform the state.
In our application, we are calling dispatch when a button is clicked.
Here is the code to dispatch the addTask defined above:
function MyComponent() {
    const [state, dispatch] = useReducer(reducer, initialState);

    const addTask = {
    type: 'added_task',
    id: generateId(),
    task: 'pick up groceries',
    taskNo: 1,
    taskCount: 1
    };

    // this would be called from a button click
    const addTaskHandler = () => {
       dispatch(addTask);
    }
}
Context
React Context allows you to share data throughout React components without having to manually pass them down as props to each component.
To share state and dispatch to PomodoroGrid and MainTask we are adding it to React Context so that both components can update the state when necessary.
The context is defined as follows:
import { createContext } from 'react';

export const PomodoroContext = createContext();
Now that we've created PomodoroContext to hold our shared data, the next step is to create is a component to wrap the app which will provide the context from there:
// src/context/PomodoroContext.js
import reducer from "../reducers/reducer";

// initial state
const gridState = {
    tasks: [],
    activeTaskId: -1
};

export const PomodoroProvider = ({ children }) => {
    const [state, dispatch] = useReducer(reducer, gridState);
    const { tasks, activeTaskId } = state;

    // [...]

    const value = {tasks, activeTaskId, dispatch}

    return (<PomodoroContext.Provider value={actions}>
        {children}
    </PomodoroContext.Provider>
    );
}
The wrapper component PomodoroProvider defines the useReducer hook to hold the state and dispatch method. The component returns PomodoroContext.Provider and has the value property, which will initialise PomodoroContext with task, activeTaskId and dispatch. As a result, any component that is rendered inside PomodoroProvider can receive tasks, activeTaskId and dispatch.
The wrapper component is defined around the entire app, which can be seen in the snippet below. Note that MainTask, PomodoroGrid and SaveButton are wrapped inside PomodoroProvider which means they'll have access to tasks, activeTaskId and dispatch from PomodoroContext.
// src/App.js
import { PomodoroProvider } from './context/PomodoroContext';
import MainTask from './components/MainTask';
import SaveButton from './components/SaveButton';
import PomorodoGrid from './components/PomodoroGrid';

const App = () => {
  // [...]

  return (
    <>
      <PomodoroProvider>
        <MainTask />
        <PomodoroGrid />
        <SaveButton />
      </PomodoroProvider>
    </>
  );
}

export default App;
So now, whenever a component needs access to the store, it can read from PomodoroContext and grab tasks, activeTaskId and dispatch.
For example, the Grid component can get the data to show as rows from the tasks. It doesn't need access to dispatch or activeTaskId so it is not extracted from context:
// src/components/PomodoroGrid.js
import React, { useContext } from 'react';
import { PomodoroContext } from '../context/PomodoroContext';

const PomodoroGrid = props => {
    const { tasks } = useContext(PomodoroContext);
    // [...]

    return (
        <div style={{ height: '50%', width: '100%' }}>
            <AgGridReact
                rowData={tasks}
                // [...]
            >
            </AgGridReact>
        </div>
    );
}
To see this in action, see the following GIF. Note how we can toggle the timer from both MainTask or PomodoroGrid in addition to MainTask showing the details of the active task.
MainTask shows the active taskCreating a Custom Hook using useState and useEffect
The pomodoro application renders a timer in MainTask and in the Progress column of each row inside PomodoroGrid.
The GIF below shows how the timer works - note how the timers on MainTask and the Progress column are synchronized when a task is started:
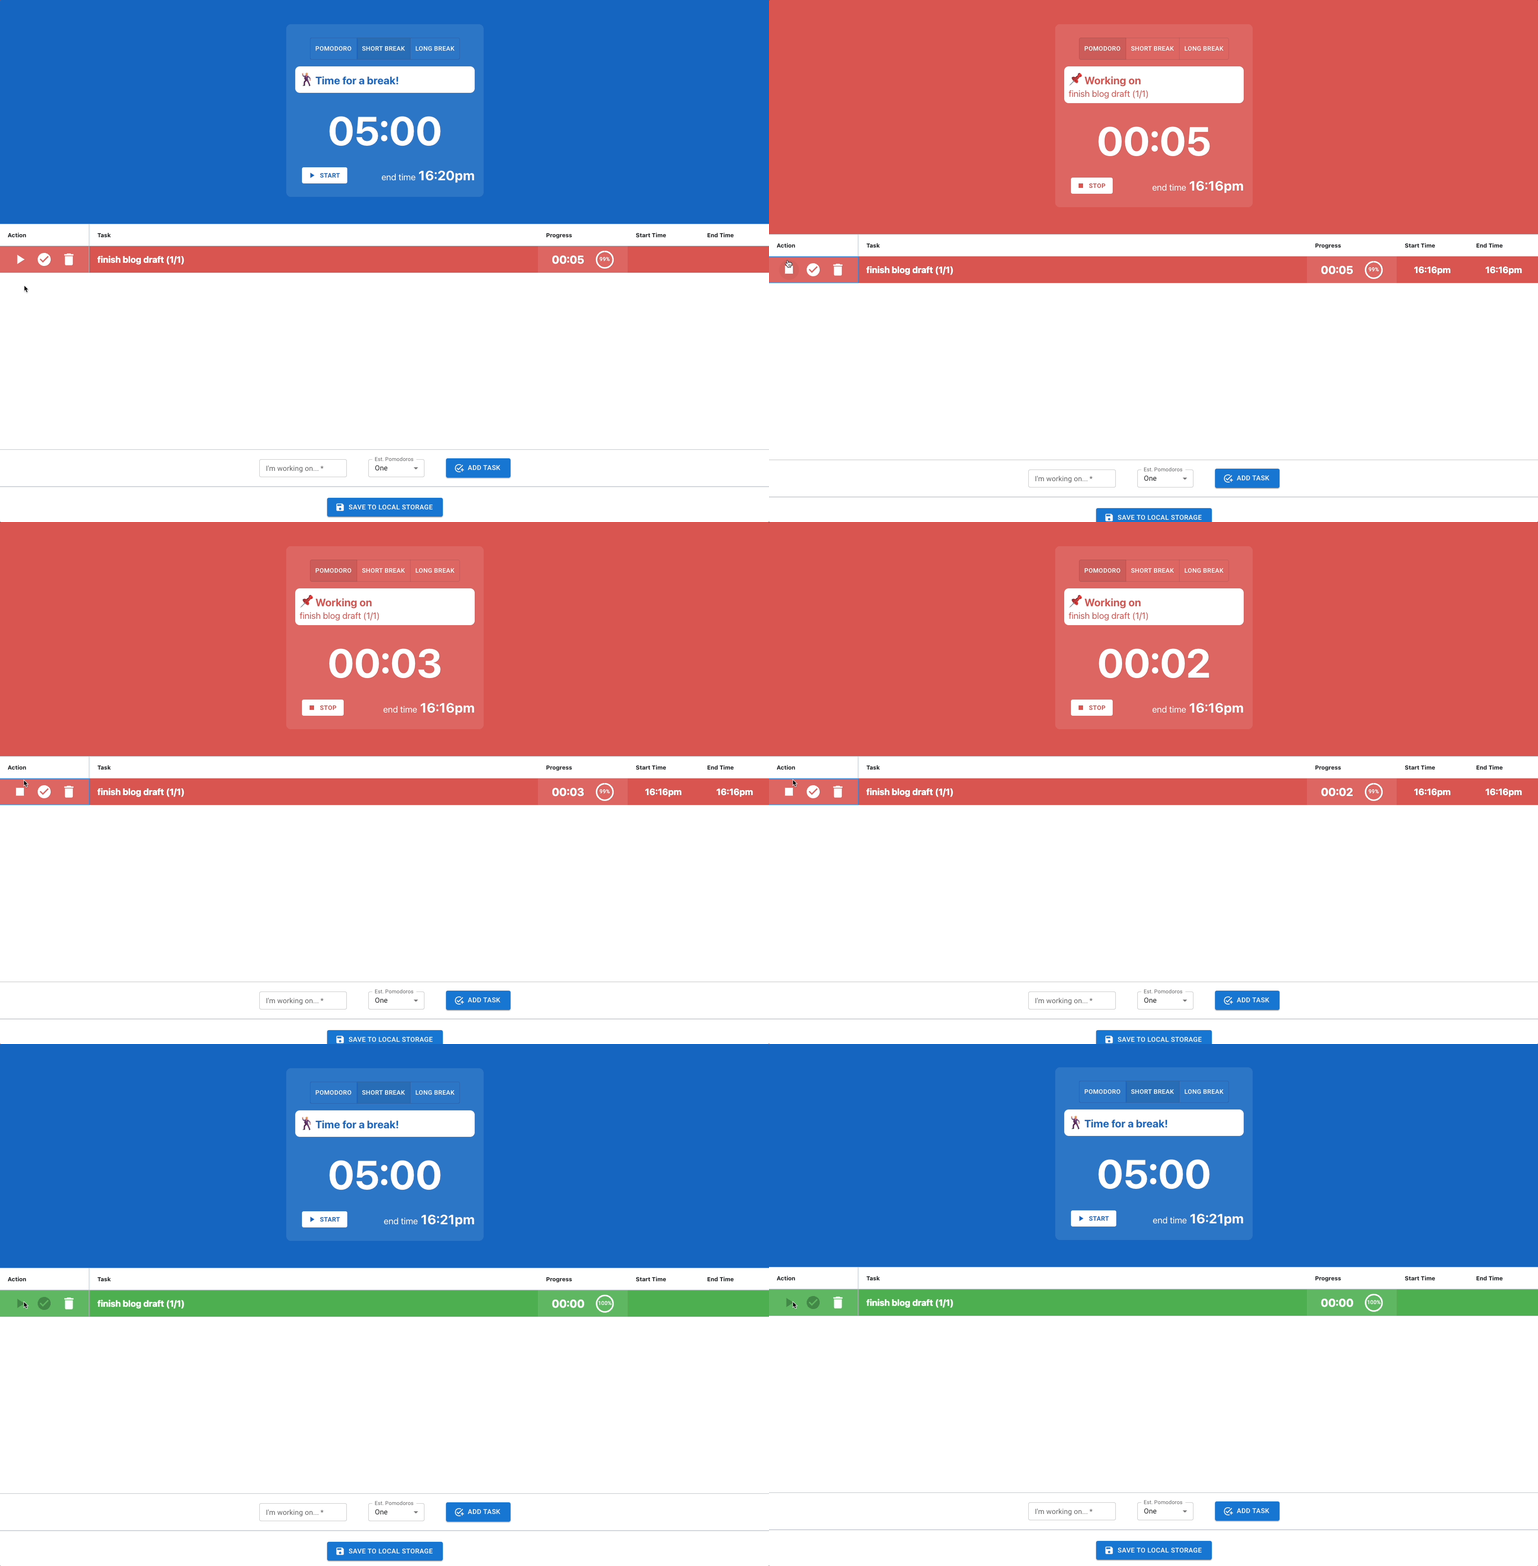
The logic that handles the ticking of a timer can be extracted into a custom hook as it is re-used for both components. The name for this custom hook in the source code is useTimer.
The useTimer hook takes three parameters:
timerStarted- abooleanvalue showing whether the timer has startedinitialSeconds- anumberthat sets the initial time for the timertaskCompletedCallback- a function to be called when the timer has reached zero
The useTimer custom hook is defined as follows:
const useTimer = (timerStarted, initialSeconds, taskCompletedCallback) => {
    // [...]
};
We've defined the useState hook seconds to hold the time left on the timer. It is initialised with initialSeconds as shown below:
const useTimer = (timerStarted, initialSeconds, taskCompletedCallback) => {
    const [seconds, setSeconds] = useState(initialSeconds);

    // [...]

    return [seconds, setSeconds];
};
The tuple seconds and setSeconds is returned by useTimer so that components that use useTimer can get seconds.
To handle the ticking of the timer, we've created a useEffect hook, where seconds is decremented every second until the timer is stopped or seconds has reached zero, in which case taskCompletedCallback is invoked:
// src/utils/useTimer.js
import { useEffect, useState } from "react";

const useTimer = (timerStarted, initialSeconds, taskCompletedCallback) => {
    const [seconds, setSeconds] = useState(initialSeconds);

    useEffect(() => {
        let timer;

        if (timerStarted) {
            if (seconds === 0) {
                taskCompletedCallback()
            } else if (seconds > 0) {
                timer = setInterval(() => {
                    setSeconds(seconds - 1)
                }, 1000);
            }
        }

        return () => {
            if (timer) { clearInterval(timer); };
        }

    }, [timerStarted, seconds, taskCompletedCallback]);

    return [seconds, setSeconds];
};

export default useTimer;
The grid custom Cell Renderer Component ProgressCellRenderer uses the useTimer hook as shown below:
const ProgressCellRenderer = memo(props => {
  const { dispatch, activeTaskId } = useContext(PomodoroContext);
  const { id, timerStarted, timeLeft } = props.node.data;

  const taskCompletedCallback = useCallback(() => {
    dispatch({ type: 'completed_task', id })
  }, [id, dispatch]);

  const [seconds] = useTimer(timerStarted, timeLeft, taskCompletedCallback);

  let timeString = formatSecondsIntoMinutesAndSeconds(seconds);

  return (<>
    <div>
      {timeString}
    </div>
  </>)

});
In this case, taskCompletedCallback is dispatching completed_task action when it is invoked, which is what causes the row to have a green background in the GIF shown above.
Accessing Grid API with useRef
The useRef hook allows us to get a reference to AG Grid's api and columnApi by passing it to the ref property of AgGridReact.
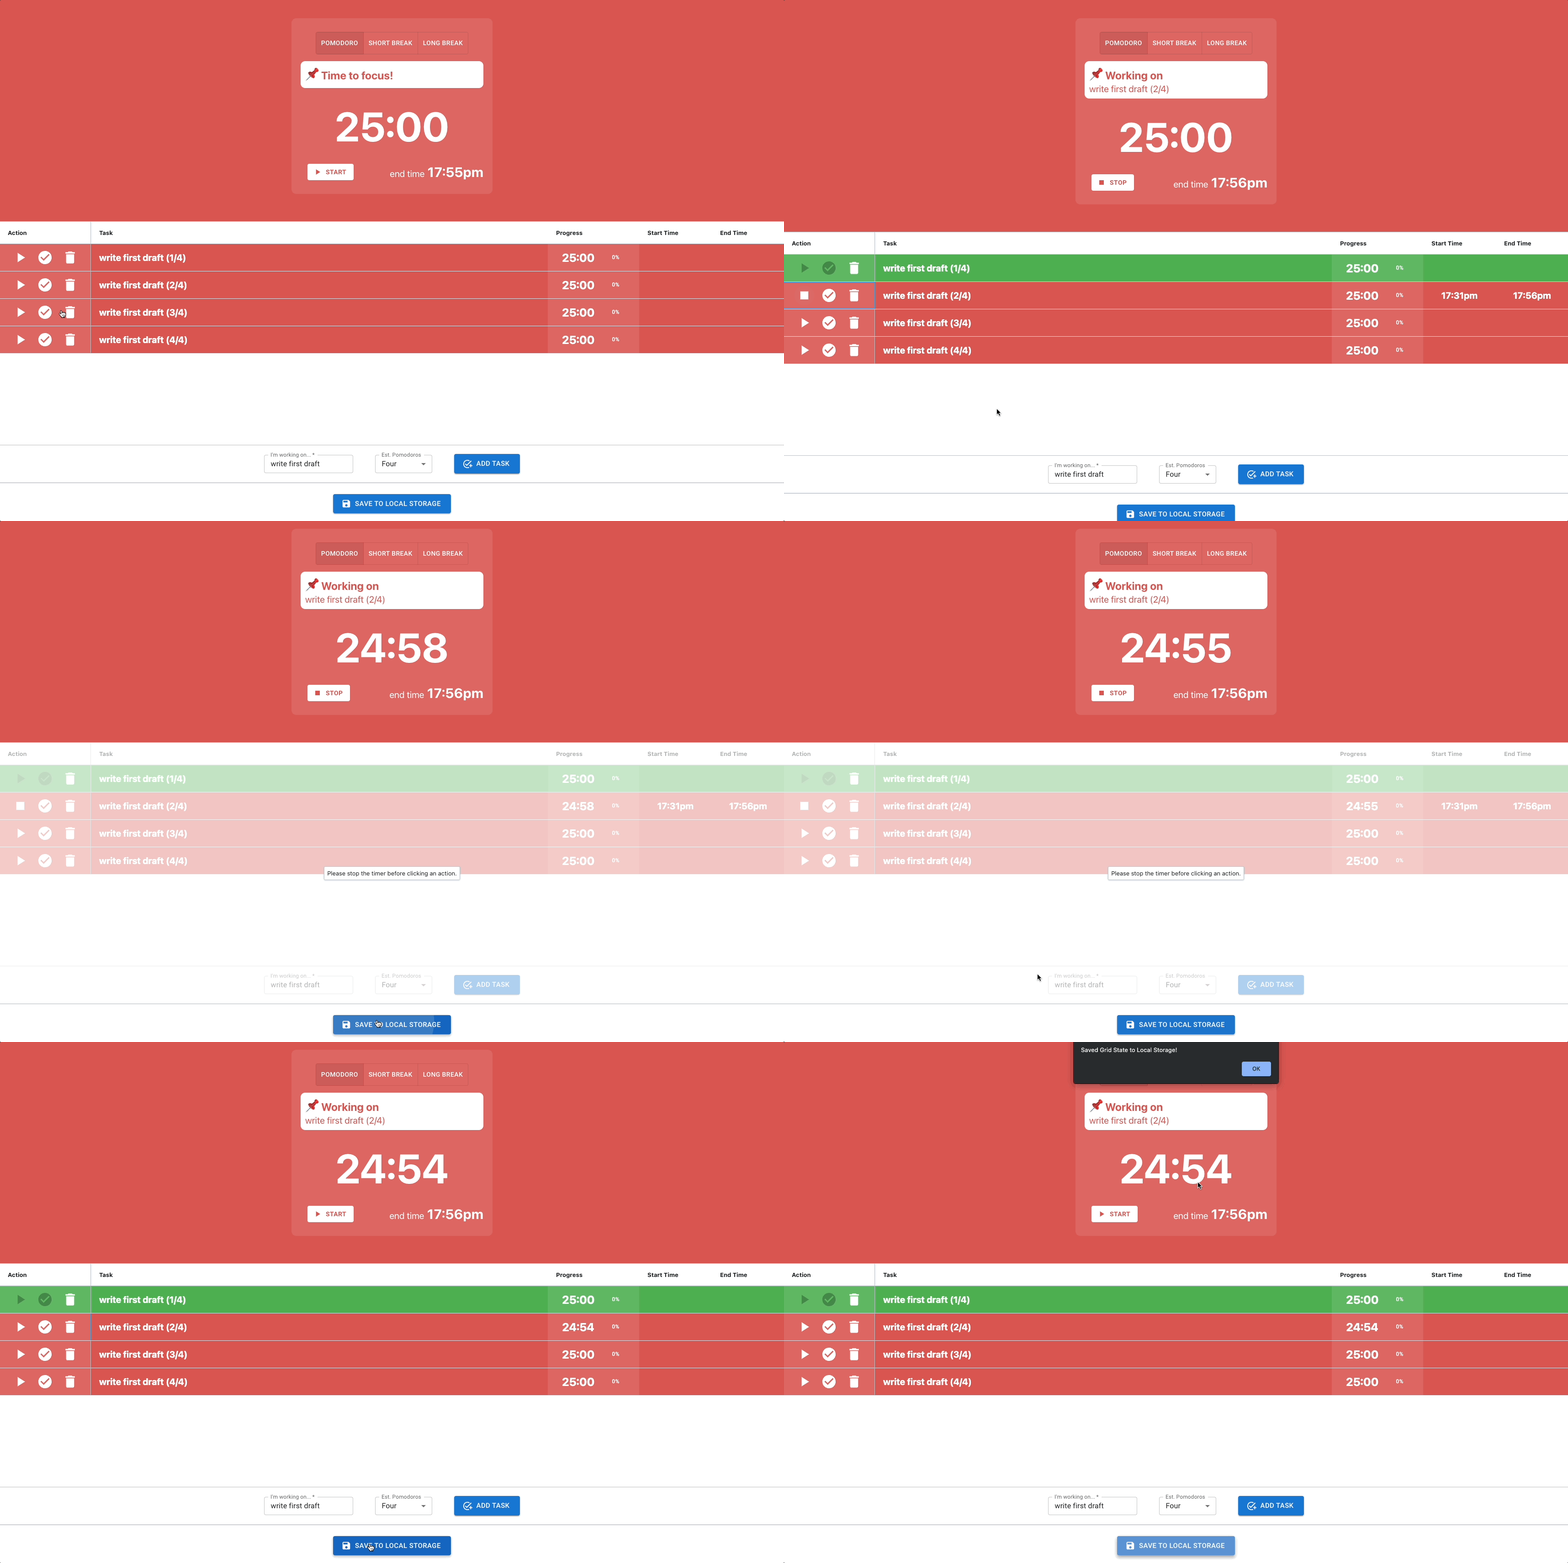
In our application, SaveButton renders a button which saves the current state to local storage when clicked. We are using the Grid API to call api.showLoadingOverlay() to notify the user that they cannot perform the action if a task is active.
See this in action in the following GIF, notice how the timer is running whilst the button is clicked, which causes the overlay to show up:
Since SaveButton and PomodoroGrid are sibling components, we have to define the useRef variable on the parent App, and pass it down to both components.
// src/App.js
const App = () => {
  const gridRef = useRef(null);

  // [...]

  return (
    <>
      <PomodoroProvider>
        <MainTaskComponent />
        <Grid gridRef={gridRef} />
        <SaveButton gridRef={gridRef} />
      </PomodoroProvider>
    </>
  );
}
PomodoroGrid receives the useRef hook gridRef as props, which is then initialised by passing to AG Grid's ref:
// src/components/PomodoroGrid.js

const PomodoroGrid = props => {
    // [...]

    return (
        <div style={{ height: '50%', width: '100%' }}>
            <AgGridReact
                ref={props.gridRef}
                // [...]
            >
            </AgGridReact>
        </div>
    );
}
After PomodoroGrid initialises gridRef with the Grid API, we can now access the API methods from SaveButton to save the list of tasks to local storage:
// src/components/SaveButton.js

const SaveButton = props => {
    const { tasks, activeTaskId } = useContext(PomodoroContext);
    const { gridRef } = props;

    const saveHandler = () => {
        if (activeTaskId) {
            let activeTask = tasks.filter(row => row.id === activeTaskId);
            if (activeTask.length > 0) {
                if (activeTask[0].timerStarted) {
                    gridRef.current.api.showLoadingOverlay();
                    setTimeout(() => {
                        gridRef.current.api.hideOverlay();
                    }, 3000);
                    return;
                }
            }
        }
        localStorage.setItem('gridState', JSON.stringify({ tasks, activeTaskId }));
        alert('Saved Grid State to Local Storage');
    }

    return (<div>
            <Button
                // [...]
                onClick={saveHandler}
            >
                Save to Local Storage
            </Button>
        </div>
    )
})
Summary
We hope you find this article helpful when using AG Grid with React Hooks. Feel free to fork the example from this git repository and modify it according to your needs.
If you would like to try out AG Grid check out our getting started guides (JS / React / Angular / Vue)
