Author: CTO Epicmax Yauheni Prakopchyk
Original: Epicmax Blog
Vuestic is a growing vue UI framework with high customizability and SSR support. It’s a good choice for modern responsive application.
In this article you will learn to create an application using Vuestic UI and AG Grid.
You can find repo here and codesandbox here.
Requirements
The application we’re going to build is a CRUD page of users - something an admin would use to manage users. You can find something similar in almost any admin dashboard.
Here’s a wireframe for application:
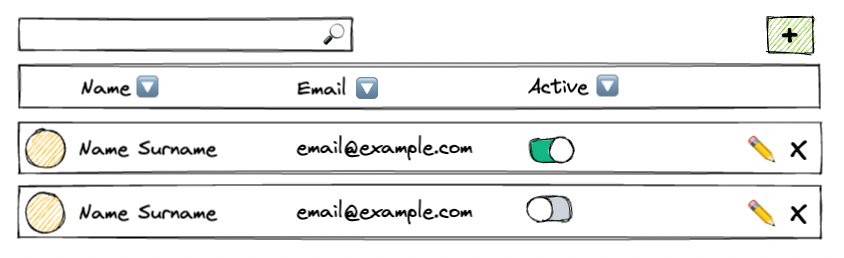
Can’t work on app without a plan, so here’s one:
-
Scaffold new project
-
Make a simple table with
image,name,email -
Add
activecolumn -
Implement sorting for all columns
-
Implement full-text filtering
-
Add create, edit and delete functionality

Scaffold new project
As we’re starting from scratch, we need a runtime environment. Vite is an optimal choice.
npm create vite ag-grid-project -- --template vue-ts

cd ag-grid-project

npm install

npm run dev
If you open the page in browser - you should see default vite page:

There are several dependencies we’d need for our project:
npm install vuestic-ui @vuestic/ag-grid-theme sass
Then we should add Vuestic UI import to main.ts file:
import { createApp } from "vue";

import App from "./App.vue";

import { createVuesticEssential } from "vuestic-ui"; // <--

import 'vuestic-ui/dist/vuestic-ui.css' // <--

const app = createApp(App);

app.use(createVuesticEssential()); // <--

app.mount("#app");
Make a simple table with image, name, email
Now let’s work on UsersPage.vue component:
<template>

    <div style="height: 300px; width: 100%;">

    <ag-grid-vue

        class="ag-theme-vuestic"

        style="width: 100%; height: 100%;"

        :columnDefs="columnDefs"

        :rowData="reactiveUsers"

        :modules="modules"

    />

    </div>

</template>

<script setup lang="ts">

import { AgGridVue } from '@ag-grid-community/vue3'

import {

    ClientSideRowModelModule,

} from '@ag-grid-community/client-side-row-model'

import { users } from '../data/users'

import { reactive } from 'vue'

const modules = [ClientSideRowModelModule]

const reactiveUsers = reactive(users)

const columnDefs = [

    { field: 'name' },

    { field: 'email' },

]

</script>

<style lang="scss">

@import "@vuestic/ag-grid-theme/index.scss";

</style>
Here we used modules import for AG Grid instead of packages. The difference is that modules is something like lego bricks, you assemble the configuration you need with small pieces to minimize footprint, and packages bundle already has everything included. modules is generally preferrable.
We need data for several users:
type User = {

    id: number,

    image: string,

    name: string,

    email: string,

    active: boolean,

}

export const users: User[] = [

    {

    id: 1,

    image: 'https://picsum.photos/id/1/50/50',

    name: 'Ashley Mcdaniel',

    email: 'ashleymcdaniel@nebulean.com',

    active: true,

    },

...
We don’t use backend in this example, but normally you’ll fetch this data from API. In our case - we import it directly from data/users.ts file.
reactive(users) is of no importance right now, but would be useful for dynamic data updates later on.
Image doesn’t look right! We can use AG Grid formatter, but better idea would be to use va-avatar from Vuestic UI. For that let’s create a component:
<template>

    <va-avatar :src="url" :size="44" />

</template>

<script setup lang="ts">

import { VaAvatar } from 'vuestic-ui'

import { computed } from 'vue'

const props = defineProps<{params: {value: string}}>()

const url = computed(() => props.params.value)

</script>
and register it in UsersPage.vue
const columnDefs = [

    { field: 'image', cellRenderer: UserImage, width: 65 },

    ...
All custom components we have to attach via cellRenderer. From component side we also have to use params, which is a prop AG Grid passes to component.
We can mark this step as complete and do a little celebration 🎉!

Add active column
In active field we modify user data. Let’s create the component
<template>

    <va-switch class="user-active" v-model="user.active" size="small" />

</template>

<script setup lang="ts">

import { VaSwitch } from 'vuestic-ui'

import { computed, reactive } from 'vue'

import { User } from '../data/users'

const props = defineProps<{params: {data: User}}>()

// AG Grid strips reactivity for some reason, so we have to force it back.

const user = computed(() => reactive(props.params.data))

</script>
and register it in UsersPage.vue
const columnDefs = [

`	`...

    { field: 'active', cellRenderer: UserActive, width: 75 },

Generally, you won’t modify user data directly, and instead rely on backend. Something like this:
const active = computed(() => props.params.data.active)

const setActive = (value) => api.setActive(props.params.data.id, value)
Then, in component we can:
<va-switch :modelValue="active" @modelValue:update="setActive" />
But our example is complicated enough as it is 😉, so let’s move to the next step.
Implement sorting for all columns
Sorting is the simplest thing if we just use sorting from AG Grid:
const columnDefs = [

    { field: 'image', headerName: '', cellRenderer: UserImage, width: 65 },

    { field: 'name', \*\*sortable: true\*\* },

    { field: 'email', \*\*sortable: true\*\* },

    { field: 'active', cellRenderer: UserActive, width: 75, \*\*sortable: true\*\* },

]
Implement full text filtering
For filtering AG Grid built in functionality is far from being sufficient, and we have to mostly implement it externally.
<template>

    <va-input

    v-model="filter"

    placeholder="Filter..."

    />

    <div style="height: 300px; width: 100%;">

    <ag-grid-vue

        class="ag-theme-vuestic"

        style="width: 100%; height: 100%;"

        :columnDefs="columnDefs"

        :rowData="reactiveUsers"

        :isExternalFilterPresent="() => true"

        :doesExternalFilterPass="doesExternalFilterPass"

        @grid-ready="onGridReady"

        :modules="modules"

    />

    </div>

</template>

<script setup lang="ts">

...

const filter = ref('')

let gridApi: any = null

const onGridReady = (params: any) => {

    gridApi = params.api

}

watch(() => filter.value, () => {

    gridApi.onFilterChanged()

})

const doesExternalFilterPass = ({ data: user }: {user: User}) => {

    return JSON.stringify(user).includes(filter.value)

}

...
That’s a lot of code, so let’s try to piece it apart.
-
watchpart is needed to let AG Grid know that filter had changed, as it doesn’t catch up on its own. -
isExtenalFilterPresentinforms AG Grid that external filter is present. -
doesExternalFilterPassallows us to pass external filter.
A bit excessive, but it works 😬.

Add create, edit and delete functionality
That’s a big task, compared to what we did before, so let’s do it piece meal.
First, let’s focus on UI: we’d need “Actions” column with “Edit” and “Delete” buttons as well as “Create” button.
For “Actions”, as before, we’ll create a component with 2 buttons:
<template>

    <div>

    <va-button flat icon="edit" @click="editUser(user)" />

    <va-button flat icon="close" @click="removeUser(user)" />

    </div>

</template>

<script setup lang="ts">

import { VaButton } from 'vuestic-ui'

import { computed, reactive } from 'vue'

import { User } from '../data/users'

const props = defineProps<{params: {data: User, context: {

    editUser: (user: User) => {},

    removeUser: (user: User) => {},

}}}>()

const { editUser, removeUser } = props.params.context

const user = computed(() => reactive(props.params.data))

</script>
The key difference with “Active” component is that we use params.context, which gives access to state from parent component. In our case we pass editUser and removeUser functions from parent, which “Actions” component can run.
Create button is not hard at all and will just call a method UsersPage component.
<va-button @click="createUser()" icon="add" text-color="white" color="success" />
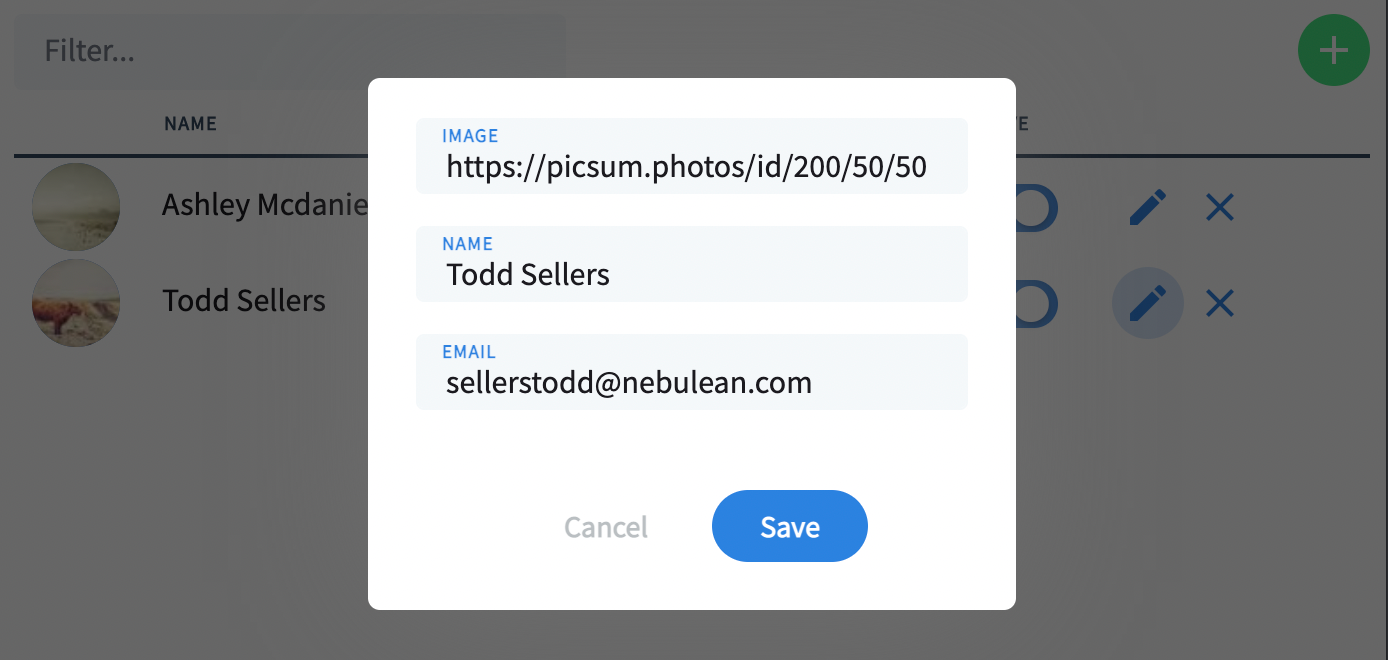
Before we focus on users list logic we have to add an editing modal, with input for each field:
<va-modal

    :model-value="!!selectedUser"

    ok-text="Save"

    cancel-text="Cancel"

    @cancel="selectedUser = null"

    @ok="saveUser()"

\>

    <va-input class="mb-3 d-block" label="Image" v-model="selectedUser.image"/>

    <va-input class="mb-3 d-block" label="Name" v-model="selectedUser.name"/>

    <va-input class="mb-3 d-block" label="Email" v-model="selectedUser.email"/>

</va-modal>
In parent component we implement all logic for creating, updating and deletion:
const editUser = (user: User) => {

    selectedUser.value = { ...user }

}

const removeUser = (userToRemove: User) => {

    reactiveUsers.value = reactiveUsers.value.filter(user => user !== userToRemove)

}

const createUser = () => {

    selectedUser.value = {

    id: Math.ceil(Math.random()\*10000),

    image: 'https://picsum.photos/id/100/50/50',

    name: '',

    email: '',

    active: true,

    }

}

const saveUser = () => {

    const currentUser = selectedUser.value

    selectedUser.value = null

    if (!currentUser) {

    return

    }

    const users = reactiveUsers.value

    const existingUser = users.find(user => user.id === currentUser.id)

    if (existingUser) {

    reactiveUsers.value = reactiveUsers.value.map(user => existingUser === user ? currentUser : user)

    } else {

    reactiveUsers.value.push(currentUser)

    }

}

const agGridContext = {

    editUser,

    removeUser,

}
The only interesting part here is agGridContext, which we have to pass to ag-grid-vue component as a prop:
<ag-grid-vue

    ...

    :context="agGridContext"

/>
Alternative would be to use inject/provide, but it doesn’t work for composition api.
Here’s the end result of our journey:
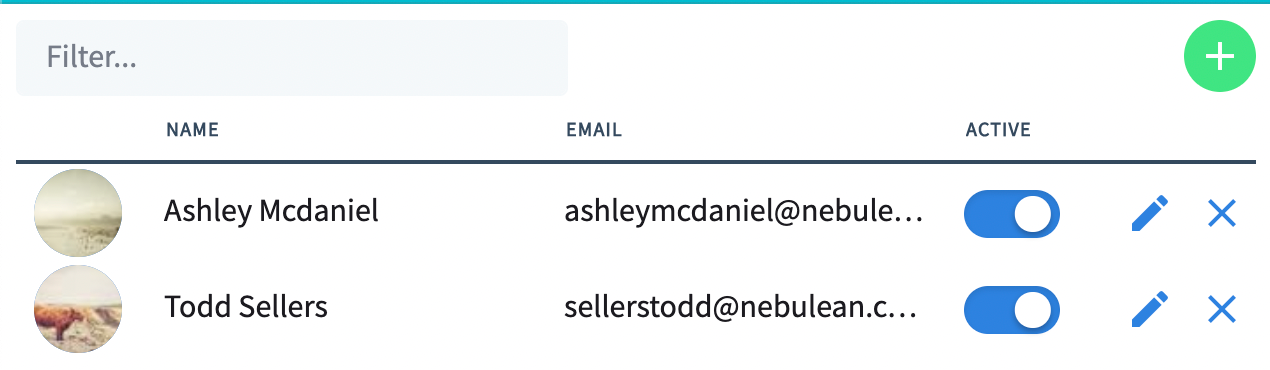
And here’s an actual page if you want to click around.
Conclusion
In this article you learned how to use Vuestic UI and AG Grid together. AG Grid Vue is an advanced and configurable solution, that will support your application regardless of scale and complexity. That’s definitely a good option to consider if you’re looking for open source data grid with virtual scroll, fixed columns, editing and many other features you can check in docs.
Author: CTO Epicmax Yauheni Prakopchyk
Original: Epicmax Blog