This post contributed to the AG Grid blog by Arek Nawo.
Remix is a new full-stack JavaScript framework based on React Router that aims to combine a fast and resilient user experience (UX) with a high-quality development experience (DX) through progressive enhancement and web fundamentals.
In this tutorial, you’ll learn how to use Remix with AG Grid, an advanced, high-performance JavaScript grid library, to create all sorts of apps involving large data tables and live data streaming. Thanks to Remix and AG Grid, you’ll have both your frontend and backend ready in no time!
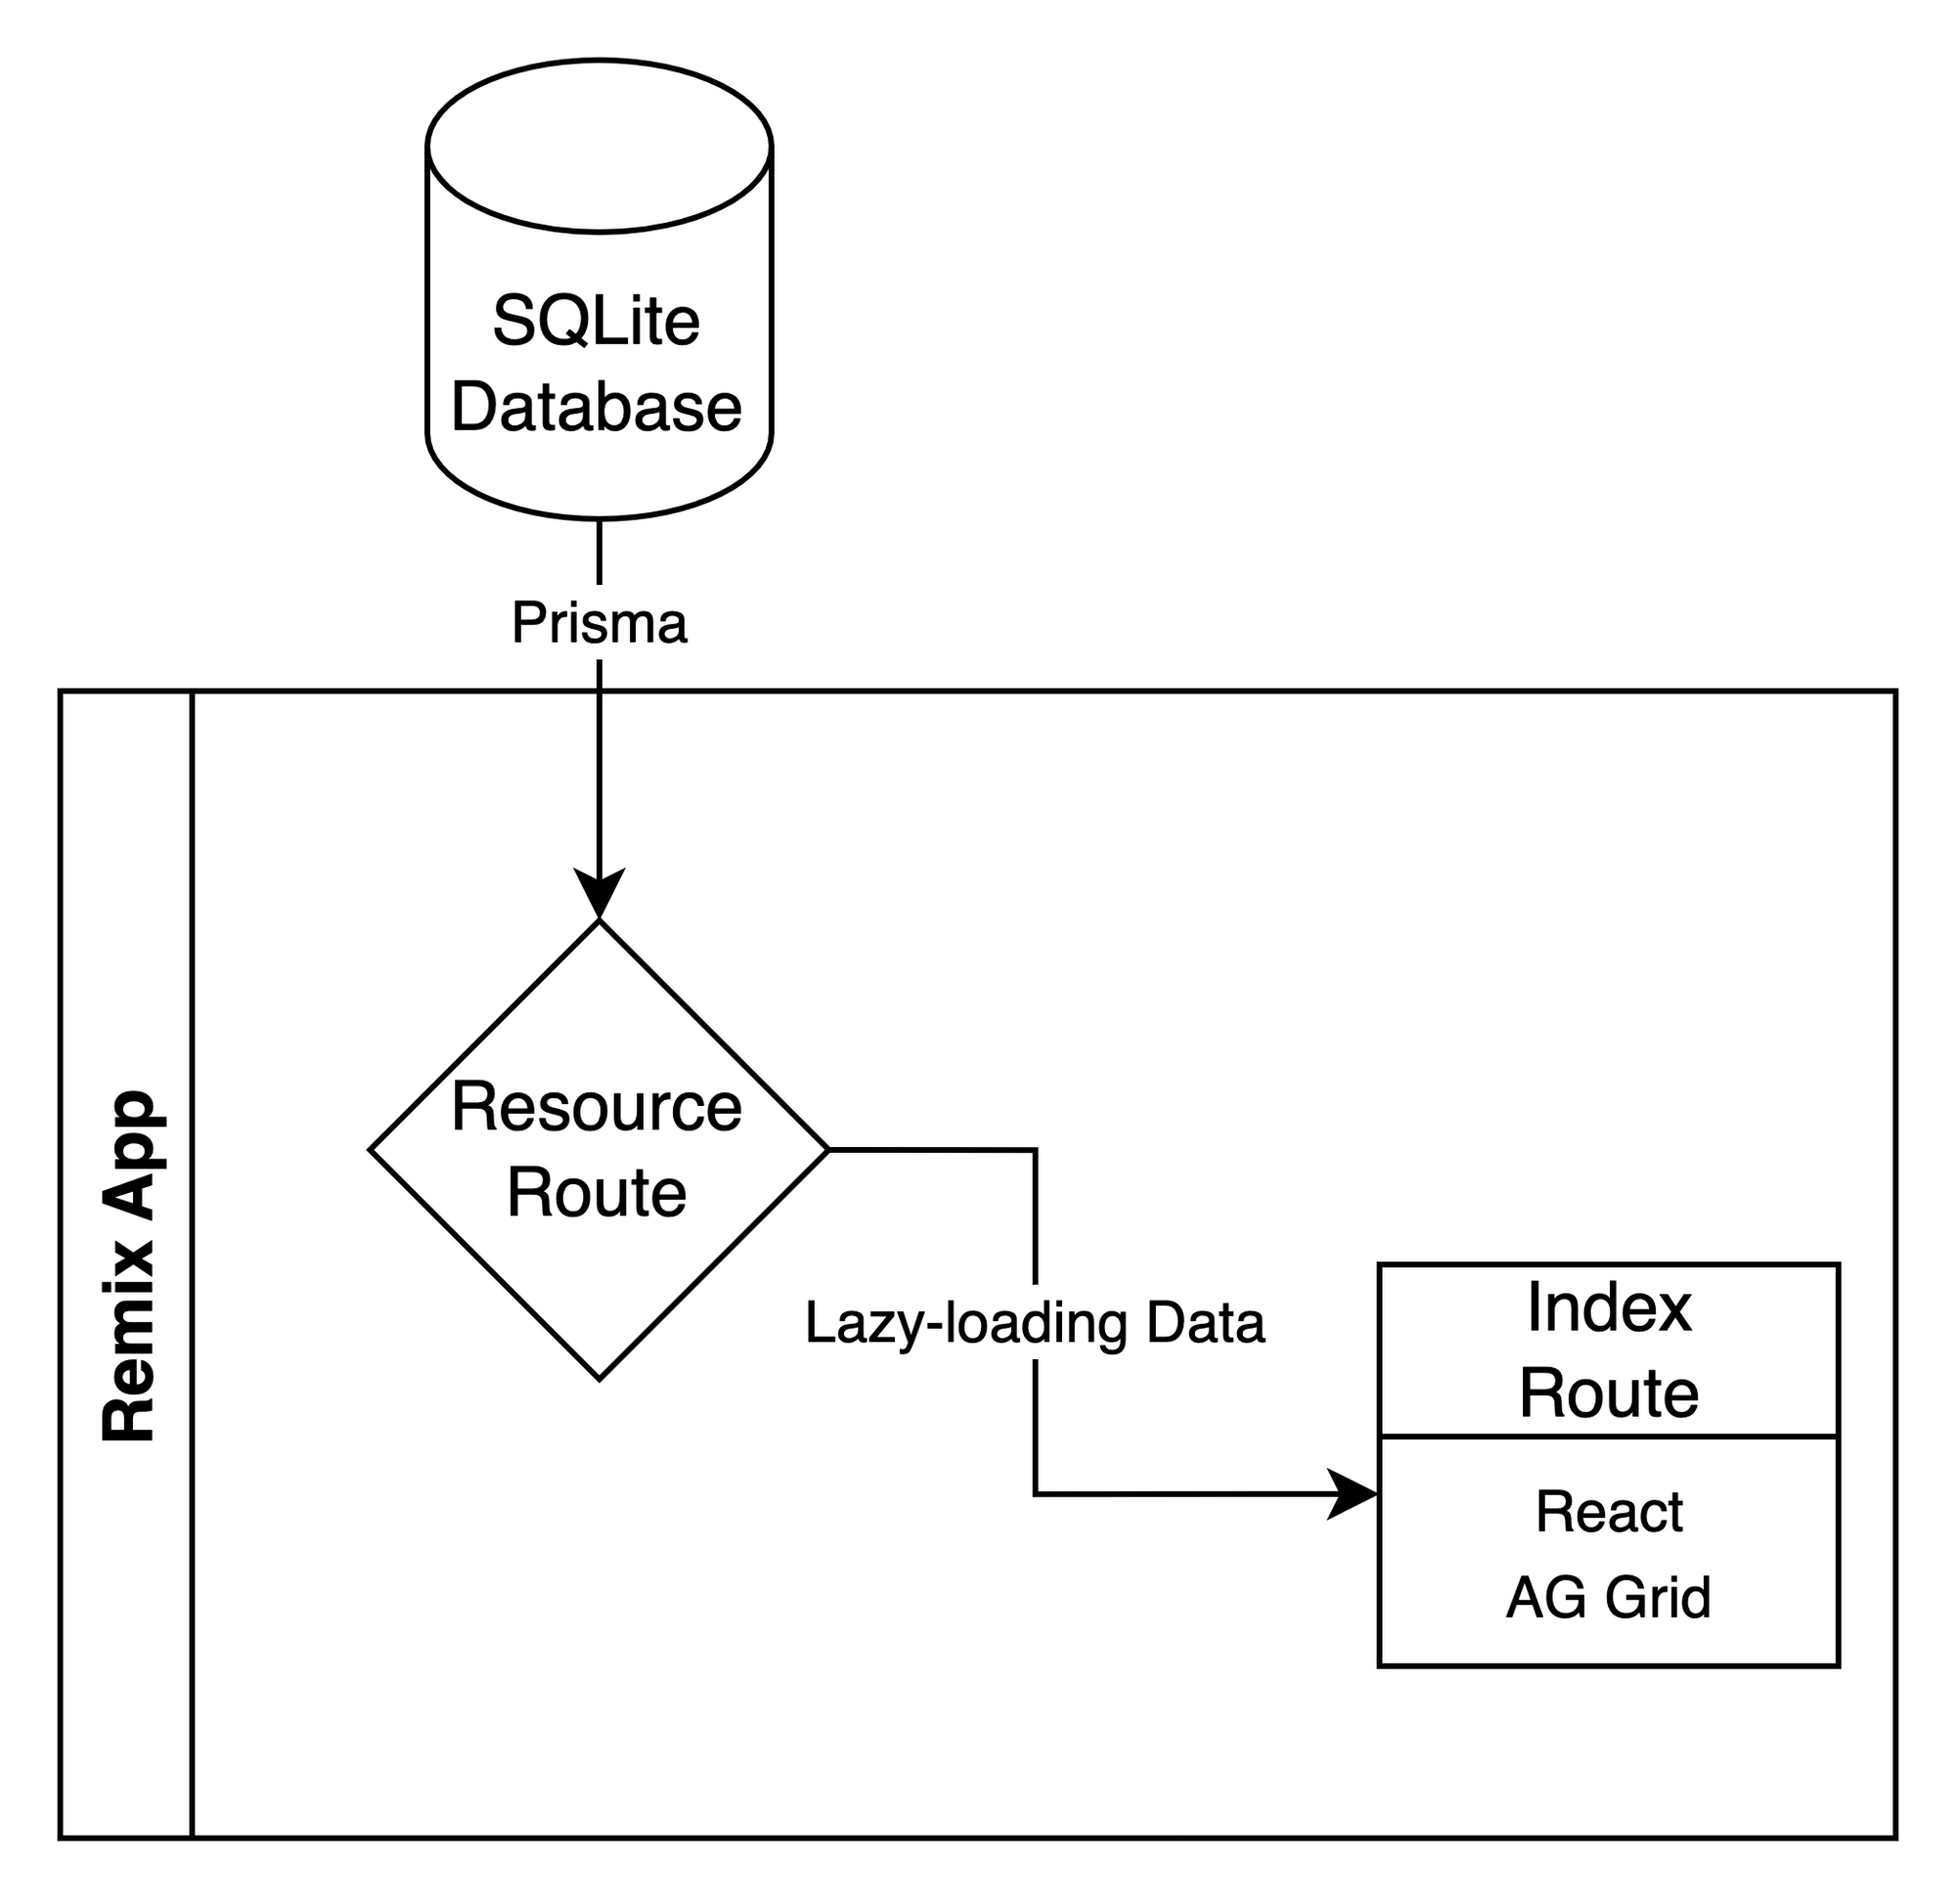
Here’s how the app will work in a nutshell:
You can follow along using this GitHub repo.
Remix Features
Before getting into the code, you should have a good understanding of Remix’s architecture and advantages. Let’s take a closer look.
Remix Architecture
Remix is a full-stack framework built on top of the Web Fetch API, focusing on Server-Side Rendering (SSR). It closely couples your frontend and backend, with each route being able to be both UI and API at once. On top of that, thanks to first-class support for progressive enhancement, Remix can serve any web environment, with or without JavaScript, progressively applying modern features and optimizations while keeping the core simple and in line with web fundamentals.
Nested Routes
One of the stand-out features of Remix is nested routes. Thanks to the underlying React Router, Remix can pre-fetch data and resources for entire pages or only the changed parts. This leads to faster loading times and a better user experience with little to no wait when interacting with the web app. Furthermore, with dedicated error boundaries for each nested route, you can make sure your errors only affect a given part of your app rather than its entirety.
Other Features
Apart from nested routes, Remix is packed with other great features for handling forms, improving accessibility, and optimizing your UI. All of those are based on web standards and, along with progressive enhancement, allow you to provide the best possible experience for your users.
Integrating Remix with AG Grid
To get started with Remix, ensure you’ve got Node.js v14 and npm v7 or newer installed. To quickly set up a new project, use Remix CLI.
Initiate your project with the following command:
npx create-remix
Running this command will prompt you to enter the directory and template you want to use. For this tutorial, choose Just the basics and Remix App Server.
With the project set up, go to its directory and install additional dependencies:
npm install ag-grid-react ag-grid-community @prisma/client
npm install -D prisma
The dependencies include everything you need to set up AG Grid and Prisma, a modern Node.js ORM (Object-Relational Mapping Tool).
Setting Up Prisma
Before jumping into Remix, you’ll first have to initialize Prisma and connect it to your database. This tutorial will use SQLite, but Prisma works well with many relational databases and even MongoDB.
Start by initiating Prisma:
npx prisma init
The above command will create a new prisma directory with a schema.prisma file inside it, as well as a .env in the root of your project file containing your database connection string.
For SQLite, provide a path to where the database is meant to be located inside the .env file:
DATABASE_URL="file:./dev.db"
Defining the Schema
In prisma/schema.prisma, specify your data source, as well as all the necessary data models:
generator client {
  provider = "prisma-client-js"
}

datasource db {
  provider = "sqlite"
  url      = env("DATABASE_URL")
}

model Post {
  id        Int      @id @default(autoincrement())
  createdAt DateTime @default(now())
  updatedAt DateTime @updatedAt
  title     String
  content   String?
  author    Author   @relation(fields: [authorId], references: [id])
  authorId  Int
}

model Author {
  id    Int     @id @default(autoincrement())
  email String  @unique
  name  String?
  posts Post[]
}
Prisma schema files have their own syntax and rules, but they’re pretty readable even if you don’t have much experience with Prisma. The above schema specifies the following:
- Generator for the database client, which will output a customized client library specifically for your data model.
- Data source providing details about what database should be used, as well as any required credentials.
PostandAuthormodels with different properties—like thetitleof typeString. All the types will be mapped to ones used by the specified database. On top of that, a simple relation between the two models is established by utilizing the@relationattribute.
Applying the Schema
With the schema ready, you can now use the Prisma CLI to generate migrations and apply them to your database using the prisma migrate command:
npx prisma migrate dev --name init
Finally, run prisma generate to generate a dedicated client library matching your schema:
npx prisma generate
Creating a Resource Route
To connect with Prisma from your Remix app, you’ll have to use a previously-generated Prisma client. Start by creating a new db.server.js file inside the app folder:
// app/db.server.ts
import { PrismaClient } from "@prisma/client";

let prisma;

if (process.env.NODE_ENV === "production") {
  prisma = new PrismaClient();
} else {
  // Reuse the client when development server restarts
  if (!global.dbClient) {
    global.dbClient = new PrismaClient();
  }
  prisma = global.dbClient;
  prisma.$connect();
}

export { prisma };
The above module exports an instance of PrismaClient. With some additional handling, the instance is cached and reused across Remix server restarts to optimize the development process.
Adding a Posts Resource Route
To use the exported instance of the Prisma client, create a new resource route in app/routes/posts.js:
// app/routes/posts.js
import { prisma } from "../db.server";

export async function loader({ request }) {
  const from = Number(new URL(request.url).searchParams.get("from"));
  const to = Number(new URL(request.url).searchParams.get("to"));

  if (from >= 0 && to > 0) {
    const posts = await prisma.post.findMany({
      skip: from,
      take: to - from,
      select: {
        id: true,
        title: true,
        updatedAt: true,
        author: {
          select: {
            email: true,
            name: true,
          },
        },
      },
    });

    return posts;
  }
  return [];
}
In Remix, a resource route is a route that isn’t a part of your UI—i.e., it doesn’t render any components. Instead, it’s meant solely for data processing, services, and resources used by other parts of your website.
In the above code, the resource loader is used with the Prisma client. It returns JSON data resulting from querying the database for a list of posts.
Pagination is implemented as the route will be used by AG Grid to lazy load the data. Using from and to URL parameters together with Prisma’s offset pagination (skip and take properties) allows the data to be loaded in chunks that the grid will require.
Using the select field, you can choose the exact fields you want to include in the query’s result, including ones from a relation, as demonstrated through the author property.
Adding Test Data
In a production app, the users will fill your database through the provided frontend. However, when testing out the connection and data fetching mechanism, it’s worth having some sample data you can work with.
For this tutorial, you can use the pre-filled SQLite database file from the GitHub repo. Alternatively, you can create a dedicated Node.js script and use it to fill the database as follows:
// test-data.js
import { prisma } from "./app/db.server.js";
import { faker } from "@faker-js/faker";

const generateTestData = async (numberOfPosts) => {
  const author = await prisma.author.create({
    data: {
      email: faker.internet.exampleEmail(),
      name: faker.name.findName(),
    },
  });

  for (let i; i < numberOfPosts; i++) {
    await prisma.post.create({
      data: {
        title: faker.lorem.sentence(getRandomInt(5, 8)),
        content: faker.lorem.paragraph(),
        author: { connect: { id: author.id } },
      },
    });
  }
};

generateTestData(1000);
The script uses the Faker.js library to generate and fill the database with fake data. Also, it’s worth noting that Prisma’s createMany method is not supported by SQLite and, as such, posts have to be created individually in the loop.
You can run the script, thus filling the database file, with the following command:
node test-data.js
Connecting with AG Grid
With the data source ready, it’s time to connect it to the frontend AG Grid. Start by creating a CSS file to ensure the grid is displayed correctly:
/* app/styles.css */
html {
  height: 100%;
  width: 100%;
}
body {
  margin: 0;
  padding: 1rem;
  height: calc(100% - 2rem);
  width: calc(100% - 2rem);
}
In Remix, CSS files are loaded by exporting a dedicated links function from the specific route. As this CSS should be applied to the entire website, you should place the function inside the app/root.jsx file:
// app/root.jsx
// ...
import styles from "./styles.css";

// ...
export function links() {
  return [{ rel: "stylesheet", href: styles }];
}
Defining Route Structure
The entire grid and data fetching logic will fit inside the default app/routes/index.jsx file.
Start by defining the route’s structure:
// app/routes/index.js
import { useCallback, useEffect, useState } from "react";
import { AgGridReact } from "ag-grid-react";
import AgGridStyles from "ag-grid-community/dist/styles/ag-grid.css";
import AgThemeAlpineStyles from "ag-grid-community/dist/styles/ag-theme-alpine.css";
import { useFetcher } from "remix";

// ...
const columnDefs = [
  /* ... */
];
export default function Index() {
  const onGridReady = useCallback((params) => {
    // ...
  }, []);

  return (
    <div className="ag-theme-alpine" style={{ width: "100%", height: "100%" }}>
      <AgGridReact
        columnDefs={columnDefs}
        rowModelType="infinite"
        onGridReady={onGridReady}
      ></AgGridReact>
    </div>
  );
}
export function links() {
  return [
    { rel: "stylesheet", href: AgGridStyles },
    { rel: "stylesheet", href: AgThemeAlpineStyles },
  ];
}
You can see that the AG Grid’s default styles and the Alpine theme have been loaded through the links function.
The grid itself uses the Infinite Row Model, which implements an infinite scrolling mechanism to lazy load new rows as the user scrolls. That’s where the previously-created resource route will come in.
columnDefs defines what the grid’s columns will look like and how they should be constructed.
Lastly, onGridReady is a callback in which you can initiate the data source connection.
Connecting the Data Source
In Remix, data unrelated to the navigation process that’s been fetched after the initial load should be handled with the useFetcher hook. Use it together with useState to construct the component’s state:
const [isFetching, setIsFetching] = useState(false);
const [getRowParams, setGetRowParams] = useState(null);
const posts = useFetcher();
// ...
Then, inside the onGridReady callback, create and set the datasource:
// ...
const onGridReady = useCallback((params) => {
  const datasource = {
    getRows(params) {
      if (!isFetching) {
        posts.load(`/posts?from=${params.startRow}&to=${params.endRow}`);

        setGetRowParams(params);
        setIsFetching(true);
      }
    },
  };

  params.api.setDatasource(datasource);
}, []);
// ...
The datasource is a config object that can define several properties, the most important of which is getRows, as it’s responsible for actually fetching the data.
In the code above, the data is fetched from the /posts resource route only when no other data fetching is in process. The fetcher’s load method will first fetch the data and then save it in its data property. As such, the successCallback that’s part of the getRows method’s params is saved in getRowParams for later use.
To set the datasource on the grid, use the api.setDatasource method of the object provided to the callback:
useEffect(() => {
  if (getRowParams) {
    const data = posts.data || [];

    getRowParams.successCallback(
      data,
      data.length < getRowParams.endRow - getRowParams.startRow
        ? getRowParams.startRow
        : -1
    );
  }

  setIsFetching(false);
  setGetRowParams(null);
}, [posts.data]);
The useEffect hook in the code above will trigger when the fetcher has loaded new data. If a successCallback is available, it’ll call it, passing the loaded data and the last row to load (if known). After the process is done, the state properties are reset to be ready for another data fetch.
Displaying Columns
With data already loaded, all you need is to tell AG Grid how it should display the data. You can do so through the columnDefs prop of the AgGridReact component:
// ...
const dateFormatter = (params) => {
  if (params.value) {
    return new Date(params.value).toLocaleString();
  }

  return " ";
};
const columnDefs = [
  { field: "id" },
  { field: "title", flex: 1, minWidth: 400 },
  { field: "author.email", minWidth: 250 },
  { field: "author.name" },
  {
    field: "updatedAt",
    valueFormatter: dateFormatter,
  },
];
// ...
AG Grid Column Definitions (columnDefs) are an array of config objects with different properties, most important of which is the field, as it “relates” the data property to the actual column. You can use the dot syntax (.value) to connect with nested properties.
The minWidth and flex properties define how the column should scale in width. minWidth specifies the minimum width a column can have in px, while flex makes the column fill all available space.
For columns with data that requires further processing or formatting, you can provide a valueFormatter. In the example above, it’s used to convert ISO data to a more user-friendly locale string.
The final result should look like this:
You can view the live demo on CodeSandbox.
End-to-End Testing with Cypress
While the app is now ready, you should still test it to ensure a bug-free experience for your end users. For that, you can use Cypress, a modern end-to-end (E2E) testing framework.
To get started with Cypress, first install the necessary development dependencies:
npm install -D cypress start-server-and-test
Apart from Cypress itself, start-server-and-test is a simple utility command that makes it easy to start both the development server and the E2E testing suite in a single command.
With dependencies installed, create a cypress.json config file at the root of your project:
{
  "baseUrl": "http://localhost:3000",
  "integrationFolder": "cypress/e2e"
}
The configuration sets the base URL for your test suite as well as the location of integration tests.
Inside the cypress/e2e folder, you can place all your E2E test suites. Take the following grid.test.js test as an example:
// cypress/e2e/grid.test.js
describe("Grid test", () => {
  it("Should contain rows", () => {
    cy.visit("/");
    const element = cy.get("div.ag-center-cols-container");

    element.children().should("have.length.above", 0);
  });
});
This test uses the Cypress API to first go to the development server host and then check whether or not the table contains any columns.
To run your tests, use the start-server-and-test command:
npx start-server-and-test dev http://localhost:3000 "cypress open"
This command will start your development server via the dev command and then open Cypress.
Production Deployment
Thanks to Remix’s flexible architecture, it can be deployed to many environments—including serverless platforms, containers, and Node.js servers. With that said, Remix doesn’t build abstraction over the underlying platform; it allows you access to all of the platform’s features but also requires some changes when deploying to different targets.
The app in this tutorial is configured for Remix App Server, which is built on top of Express.
In this case, for a production-ready setup, all you need to do is create a production build and start the Node.js server:
npm run build
npm run start
With the server running, set up a reverse proxy like Nginx to allow outside access to your server, and you’re ready to go!
Conclusion
In this tutorial, you’ve learned how to combine Remix and AG Grid to create a fast and user-focused data processing app. You’ve used some of Remix’s unique features and seen how it integrates with other tools, such as Prisma ORM or the Cypress E2E testing framework.
The full source code for this tutorial can be found here.
AG Grid is a high-performance JavaScript table library that’s easy to set up. It comes with powerful out-of-the-box features, like large data handling, live data streaming, and charting.